Welcome to the ultimate guide on removing the notorious Windows.old folder in Windows 10. Bid farewell to this lingering relic and reclaim your precious storage space effortlessly. Discover the most efficient methods and expert tips to say goodbye to the old and welcome the new with open arms. Let’s embark on this journey to declutter and optimize your Windows 10 experience.
April 2024: Enhance your computer’s performance and eliminate errors with this cutting-edge optimization software. Download it at this link
- Click here to download and install the optimization software.
- Initiate a comprehensive system scan.
- Allow the software to automatically fix and repair your system.
How to delete the Windows.old folder from Storage Sense settings
To delete the Windows.old folder using Storage Sense settings:
1. Open Settings by typing “Settings” in the search bar or clicking on the Start menu and selecting the gear icon.
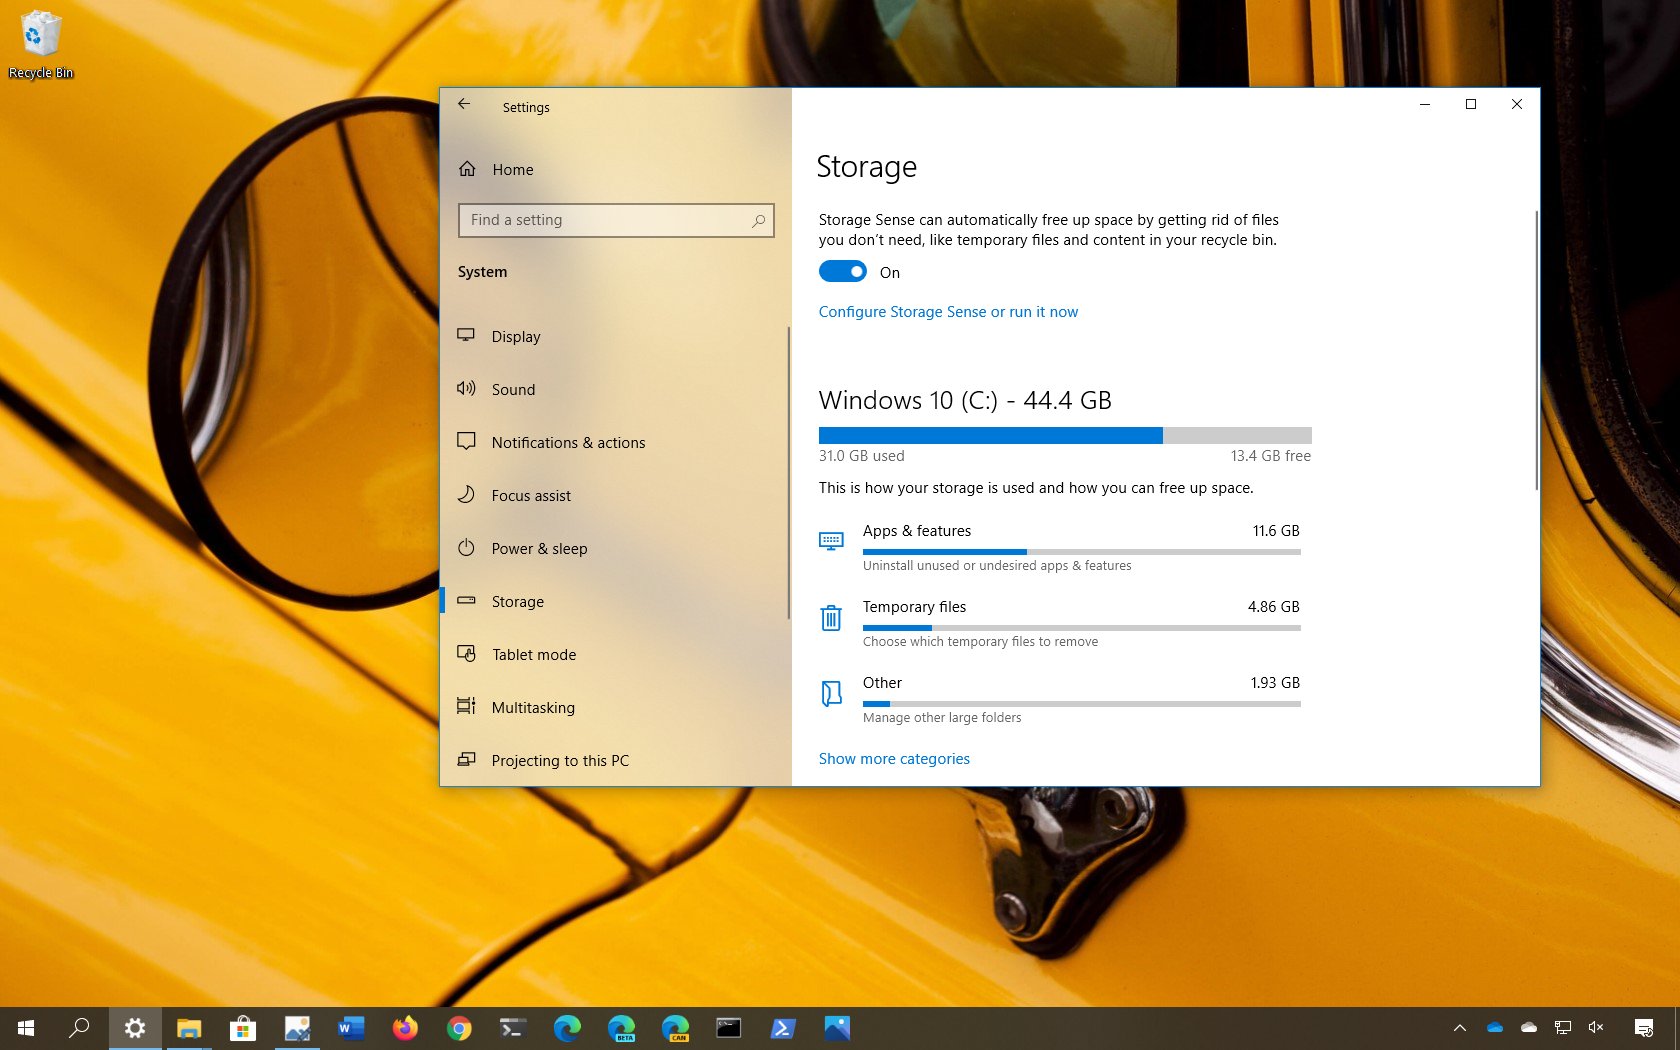
2. In the Settings menu, click on “System” and then select “Storage” from the left-hand side menu.
3. Scroll down and click on “Storage Sense” under the Storage section.
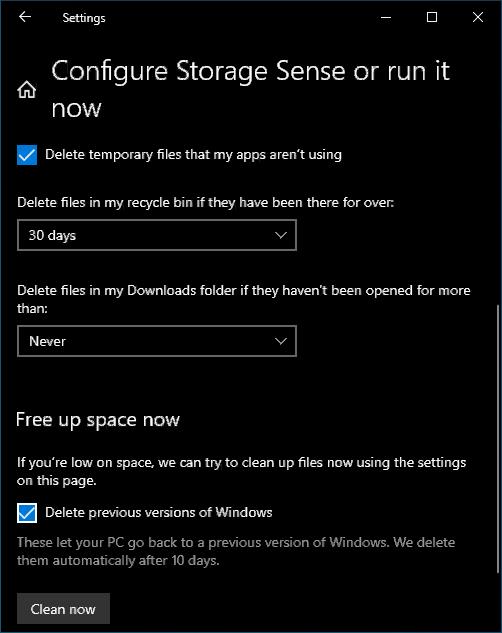
4. Under the Temporary Files section, click on the “Change how we free up space automatically” link.
5. In the Storage Sense Settings, scroll down and locate the “Delete previous versions of Windows” option.
6. Check the box next to it and click on “Clean now” to delete the Windows.old folder.
Remember to review the list of files that will be deleted before proceeding.
For more information and troubleshooting steps, you can visit the Microsoft support page at [insert link] or [insert alternative link].
Image credit: [insert image credit if applicable]
How to delete the Windows.old folder from Temporary files settings
To delete the Windows.old folder from Temporary files settings in Windows 10, follow these steps:
1. Open Settings by clicking on the Start button and selecting “Settings” from the menu.
2. In the Settings window, type “Temporary files” in the search box at the top.
3. Click on “Temporary files” from the search results.
4. Scroll down and click on “Free up space now” under “Free up space.”
5. Check the box next to “Previous Windows installation(s)” and any other files you want to remove.
6. Click on the “Remove files” button.
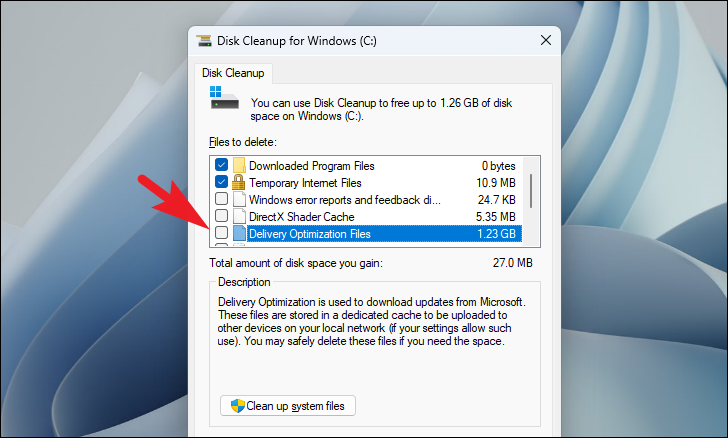
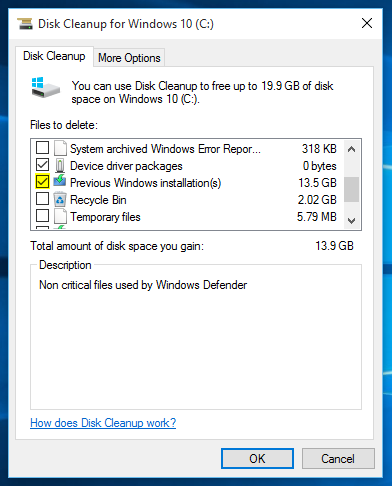
How to delete the Windows.old folder from Disk Cleanup
To delete the Windows.old folder from Disk Cleanup in Windows 10, follow these steps:
1. Press the Windows key + S and type “Disk Cleanup” to open the Disk Cleanup utility.
2. Select the drive where Windows is installed (usually C:).
3. Click on “Clean up system files” to run Disk Cleanup as an administrator.
4. Wait for the utility to scan your system for files that can be deleted.
5. Scroll down the list and check the box next to “Previous Windows installation(s)”.
6. Click “OK” and then “Delete Files” to confirm the deletion.
7. Disk Cleanup will proceed to remove the Windows.old folder and other unnecessary files.
8. Once the process is complete, you can close Disk Cleanup.
Note: Deleting the Windows.old folder is irreversible, so make sure you no longer need any files from your previous Windows installation before proceeding.
Additionally, Fortect can secure your system and restore it to its pre-infected state, address the causes of annoying slowdowns or freezing programs, automatically fix damaged DLL files, and repair the causes of the Blue Screen of Death. It can also compare your current operating system with a healthy version and restore vital system files without affecting user data.

python

import os

import shutil
def delete_folder(folder_path):
try:
# Check if the folder exists
if os.path.exists(folder_path):
# Use shutil.rmtree to delete the folder recursively
shutil.rmtree(folder_path)
print(f"Folder '{folder_path}' deleted successfully.")
else:
print(f"Folder '{folder_path}' does not exist.")
except Exception as e:
print(f"An error occurred while deleting the folder: {str(e)}")
# Usage example
folder_to_delete = "C:\\Windows\\Old"
delete_folder(folder_to_delete)
Please replace `”C:\\Windows\\Old”` with the actual path of the folder you want to delete. Keep in mind that this code snippet is a general example and doesn’t specifically target the “windows old 1” folder.
Something You Need to Know About Windows.old Folder
If you recently upgraded to Windows 10 and are looking to remove the Windows.old folder, here’s what you need to know.
First, make sure you have backed up any important files in the Windows.old folder. This folder contains your previous version of Windows and its files, so it’s a good idea to have a copy of any important data.
To remove the Windows.old folder, follow these steps:
1. Open the “Settings” app by clicking the Start button and selecting the gear icon.
2. In the Settings app, click on the “System” category.
3. Click on the “Storage” tab in the left sidebar.
4. Under the “Local Disk (C:)” section, click on “Temporary files”.
5. Scroll down and find the “Previous version of Windows” option.
6. Check the box next to it.
7. Click on the “Remove files” button.
Once you’ve completed these steps, Windows will begin deleting the Windows.old folder and its contents. This process may take some time, so be patient.
If you encounter any issues while trying to remove the Windows.old folder, you can try using the Command Prompt. Open the Command Prompt as an administrator and type the following command: rd /s /q C:\Windows.old. This command will forcefully delete the Windows.old folder.
Remember to exercise caution when using the Command Prompt, as deleting system files can cause issues with your PC.
For more information and troubleshooting tips, you can refer to Microsoft’s support page at support.microsoft.com or the EaseUS website at easeus.com.
Where is the Windows.old Folder?
The Windows.old folder contains files from your previous Windows installation, taking up valuable disk space. To remove it in Windows 10, follow these steps:
1. Open the File Explorer by pressing the Windows key + E on your keyboard.
2. In the File Explorer, navigate to the C: drive, which is where the Windows folder is located.
3. Look for the Windows.old folder in the C: drive. It may be hidden, so make sure to enable hidden files and folders in the File Explorer’s View tab.
4. Right-click on the Windows.old folder and select “Delete” from the context menu.
5. A confirmation dialog will appear. Check the box that says “Do this for all current items” and click “Yes” to permanently delete the folder and its contents.
Remember to back up any important files before deleting the Windows.old folder, as it cannot be undone. For more detailed instructions, visit the Microsoft support article at [insert link].
Please note that this method may not work for everyone, especially if certain files within the Windows.old folder cannot be deleted. In such cases, you may need to use alternative methods or third-party software to remove the folder.
Is It Safe to Delete Windows.old Folder?
When it comes to the Windows.old folder in Windows 10, you might be wondering if it’s safe to delete. The answer is yes, it is safe to delete the Windows.old folder, but there are a few things you should keep in mind.
First, make sure you don’t need any files from your previous Windows installation. Once you delete the Windows.old folder, you won’t be able to recover those files. If you’re unsure, it’s always a good idea to back up any important files before proceeding.
To delete the Windows.old folder, follow these steps:
1. Press the Windows key + R to open the Run dialog box.
2. Type “cleanmgr” and press Enter.
3. Select the drive where Windows is installed (usually the C: drive) and click OK.
4. Click on “Clean up system files” and wait for the tool to calculate the amount of space you can free up.
5. Check the box next to “Previous Windows installation(s)” and any other items you want to delete.
6. Click OK and then click Delete Files to confirm.
After completing these steps, the Windows.old folder will be removed, freeing up valuable disk space on your device.
For more detailed instructions and troubleshooting tips, you can visit the Microsoft support article at this link.
How to Delete Windows.old Folder – 3 Methods
- Open the Start menu by clicking on the Windows icon at the bottom left corner of the screen.
- Type “Disk Cleanup” in the search bar and click on the Disk Cleanup app from the search results.
- Select the C: drive from the dropdown menu and click OK.
- Wait for the Disk Cleanup tool to calculate the amount of space you can free up on your computer.
- Scroll down the list and check the box next to “Previous Windows installation(s)”.
- Click on the OK button to start the cleanup process.
- Once the cleanup is completed, the Windows.old folder will be deleted from your system.
Method 2: Using Storage Sense
- Open the Start menu and click on the Settings icon (shaped like a gear).
- In the Settings window, click on “System” and then select “Storage” from the left-hand menu.
- Under the “Storage” section, enable the “Storage Sense” toggle switch.
- Click on “Configure Storage Sense or run it now” to open the Storage Sense settings.
- Scroll down and click on “Clean now” under the “Free up space now” section.
- Tick the checkbox next to “Previous Windows installation(s)” and click on “Remove files”.
- Wait for the cleanup process to finish, and the Windows.old folder will be removed.
Method 3: Manually Deleting Windows.old
- Press the Windows key + R on your keyboard simultaneously to open the Run dialog box.
- Type “%windir%” (without quotes) in the Run box and press Enter.
- Locate the Windows.old folder in the File Explorer window that opens.
- Right-click on the Windows.old folder and select “Delete” from the context menu.
- Confirm the deletion by clicking “Yes” in the confirmation dialog box.
- Wait for the deletion process to complete, and the Windows.old folder will be successfully deleted.

It is recommended to delete the Windows.old folder to free up disk space and improve system performance. Download this tool to run a scan