In my experience with URL blacklist infections, I have discovered effective strategies for fixing and preventing them. In this article, I will share these insights and offer practical solutions to safeguard your website from malicious attacks.
September 2025: Enhance your computer’s performance and eliminate errors with this cutting-edge optimization software. Download it at this link
- Click here to download and install the optimization software.
- Initiate a comprehensive system scan.
- Allow the software to automatically fix and repair your system.
How Does a URL Get Blacklisted

If a URL has been blacklisted, it means that it has been flagged as potentially harmful or malicious. This can happen for various reasons, such as being associated with spamming, malware, or other types of cyberattacks.
To fix and prevent URL blacklist infections, follow these steps:
1. Scan your website: Use a reliable antivirus software or a website security tool to scan your website for any malware or suspicious files. Remove or quarantine any infected files that are found.
2. Identify the source: Investigate the source of the infection by checking your website logs, looking for any suspicious activity or unauthorized access. This will help you understand how the URL got blacklisted in the first place.
3. Remove malicious code: Carefully review your website’s code and remove any suspicious or malicious code that may have been injected. Make sure to sanitize your website and strengthen its security measures.
4. Request a review: If your website has been blacklisted by search engines or security tools, request a review to have it reevaluated. Most search engines provide a process for website owners to request a review and removal from their blacklist.
5. Enhance security measures: Take proactive steps to prevent future URL blacklist infections. Keep your software and plugins up to date, use strong passwords, implement security measures such as firewalls and SSL certificates, and regularly backup your website.
Phishing Schemes and Content
Phishing schemes and malicious content can pose a significant threat to your online security. Here are some steps you can take to fix and prevent URL blacklist infections.
1. Stay vigilant: Be cautious of suspicious emails, messages, or pop-up ads that ask for personal or financial information. These could be phishing attempts trying to trick you into revealing sensitive data.
2. Keep your software up to date: Regularly update your antivirus software, web browsers, and operating system to ensure you have the latest security patches and protection against known threats.
3. Use reputable security tools: Install reliable antivirus software, such as Norton or McAfee, to detect and block potential threats. These tools can help identify malicious URLs and warn you before visiting them.
4. Be mindful of URL redirection: Be cautious when clicking on links, especially those from unknown or suspicious sources. Cybercriminals often use URL redirection to lead you to malicious websites without your knowledge.
5. Enable safe browsing: Utilize features like Norton Safe Web or Microsoft Bing’s SafeSearch to help identify and avoid potentially harmful websites in search results.
6. Practice strong password hygiene: Use unique and complex passwords for your online accounts, and consider using a password manager to securely store them.
7. Be cautious of pop-up ads: Avoid clicking on pop-up ads, as they can lead to malicious websites or initiate unwanted downloads.
8. Regularly back up your data: Protect your files by regularly backing them up to an external storage device or cloud service. In case of a malware infection, you can easily restore your data.
9. Stay informed: Keep yourself updated on the latest phishing techniques and cybersecurity best practices. Regularly research and educate yourself to stay one step ahead of cybercriminals.
SEO Spam
Fixing and Preventing URL Blacklist Infections
If you’ve discovered that your website has been blacklisted due to SEO spam, it’s important to take immediate action to fix the issue and prevent future infections. Here are some steps you can take:
1. Identify and remove malicious content: Conduct a thorough scan of your website to identify any malicious files or URLs. Remove all infected content, including hidden backdoors, spam links, and malware.
2. Update your security measures: Ensure that your website’s security software is up to date and capable of detecting and preventing SEO spam. Consider using reputable security tools such as Norton Safe Web, McAfee SiteAdvisor, or Microsoft Bing Webmaster Tools.
3. Strengthen access controls: Secure your website by implementing strong passwords, enabling two-factor authentication, and regularly monitoring login attempts. Limit access to sensitive areas of your website to trusted individuals only.
4. Conduct regular backups: Regularly backup your website’s files and databases to prevent data loss in case of an attack. Store these backups in a secure location separate from your website’s server.
5. Monitor search engine results: Keep a close eye on your website’s search engine results page (SERP) to ensure that your URLs are not being flagged as spam. If you notice any suspicious activity, take immediate action to investigate and resolve the issue.
6. Stay updated on SEO best practices: Stay informed about the latest SEO techniques and avoid engaging in black hat tactics such as keyword stuffing or cloaking. Conduct keyword research and optimize your website’s content using legitimate and ethical strategies.
7. Report the issue: If you believe your website has been a victim of SEO spam, report the incident to the relevant authorities, such as search engines or cybersecurity organizations. This helps raise awareness and prevents others from falling victim to similar attacks.
python

# This code demonstrates a basic URL blacklist tool that checks if a given URL is present in a static blacklist.
# Static URL blacklist
url_blacklist = [
"example.com",
"malicious-site.org",
"spammy-domain.net",
"phishing-url.com",
# Add more URLs to the blacklist as needed
]
def is_infected_url(url):
"""Check if a given URL is present in the blacklist"""
return url in url_blacklist
# Example usage
url_to_check = "example.com"
if is_infected_url(url_to_check):
print(f"The URL '{url_to_check}' is blacklisted and could be infected.")
else:
print(f"The URL '{url_to_check}' is not blacklisted.")
Malware
Fixing and Preventing URL Blacklist Infections
If your website has been blacklisted due to a URL infection, it is crucial to take immediate action to fix the issue and prevent it from happening again. Here are some steps you can follow to address this problem:
1. Scan your website for malware: Use a reliable malware scanner or security software to thoroughly scan your website for any malicious code or malware. This will help you identify the source of the infection and determine the extent of the damage.
2. Remove infected files: Once you have identified the infected files, remove them from your website. Make sure to backup your website before deleting any files to avoid any accidental loss of data.
3. Update your software and plugins: Outdated software and plugins are often vulnerable to attacks. Make sure to update all your website’s software, including content management systems (CMS) and plugins, to the latest versions. This will help patch any security vulnerabilities and minimize the risk of future infections.
4. Strengthen your website’s security: Implement strong security measures to protect your website from future attacks. This includes using strong passwords, regularly updating your security software, enabling two-factor authentication, and limiting access to sensitive areas of your website.
5. Monitor your website: Regularly monitor your website for any suspicious activities or signs of infection. Set up alerts and notifications to be informed immediately if any unauthorized changes occur.
6. Request a review: Once you have fixed the issue and taken steps to prevent future infections, you can request a review from search engines and antivirus companies to remove your website from their blacklist. This will help restore your website’s reputation and regain the trust of your visitors.
Using Unsafe Plugins
When it comes to fixing and preventing URL blacklist infections, it is crucial to be cautious about the plugins you use on your website. Unsafe plugins can leave your site vulnerable to various cyber threats such as spyware, malware, and hacking attempts. To protect your site and maintain its security, follow these steps:
1. Regularly update your plugins: Outdated plugins can have security vulnerabilities that hackers can exploit. Make sure to update your plugins regularly to ensure they have the latest security patches.
2. Use reputable plugins: Stick to plugins from trusted sources, such as the official WordPress plugin directory or reputable third-party developers. Avoid downloading plugins from unknown or suspicious websites, as they may contain malicious code.
3. Read reviews and ratings: Before installing a plugin, check its reviews and ratings to get an idea of its reputation. Look for plugins with high ratings and positive reviews from other users. This can help you gauge the reliability and security of the plugin.
4. Check for plugin compatibility: Ensure that the plugins you choose are compatible with your website’s version and other installed plugins. Incompatible plugins can cause conflicts and potentially compromise your site’s security.
5. Regularly audit your plugins: Periodically review the plugins installed on your website and remove any that are no longer necessary or actively maintained. Unused or outdated plugins can become a security risk.
6. Enable automatic updates: Consider enabling automatic updates for your plugins to ensure that you always have the latest security fixes. This can save you time and effort in manually updating each plugin.
How to Prevent Your Website From Getting Blacklisted
- Regularly update software and plugins: Keeping your website’s software and plugins up to date helps prevent vulnerabilities that could be exploited by hackers.
- Implement strong authentication: Utilize strong passwords and two-factor authentication to secure access to your website’s admin panel and prevent unauthorized access.
- Monitor website traffic: Regularly review your website’s traffic to identify any suspicious or unusual activity that may indicate a security breach.
- Use reputable hosting providers: Choose a reliable hosting provider that implements robust security measures and regularly monitors their server infrastructure.
- Incorporate a Web Application Firewall (WAF): Deploying a WAF can help detect and block malicious traffic, ensuring your website’s protection against various types of attacks.
- Scan your website for vulnerabilities: Conduct regular security scans to identify any weaknesses in your website’s code, plugins, or configurations that may leave it susceptible to attacks.
- Secure file uploads: Implement strict file upload validation and filtering to prevent uploading of malicious files that could compromise your website’s security.
- Regularly backup your website: Create and maintain regular backups of your website’s files and database, allowing you to restore your website quickly in case of an attack or accidental data loss.
- Stay informed about security threats: Stay updated with the latest security news and vulnerabilities in popular CMS platforms or plugins used on your website, and promptly apply patches or updates.
- Consider a website security solution: Explore comprehensive website security solutions that offer continuous monitoring, malware scanning, and immediate remediation to proactively protect your website.
Updated: September 2025
If you’re experiencing issues with your computer after being infected with urlblacklist,
Fortect might be able to help. It can repair damaged system files and faulty settings that are causing problems. Additionally,
Fortect can address the damage caused by viruses and malware, ensuring your system is restored to its pre-infected state.
It can also fix issues like freezing programs, damaged DLL files, and even the dreaded Blue Screen of Death. Fortect can compare and restore vital system files for a smooth OS recovery without affecting your data.
Keep Everything up to Date
Fixing and Preventing URL Blacklist Infections
Keeping your website safe from URL blacklist infections is crucial for maintaining a secure online presence. Follow these steps to fix and prevent such infections:
1. Identify the issue: If you suspect your website is infected or blacklisted, start by running a comprehensive scan using a reliable security software like McAfee SiteAdvisor or Norton. These tools will help detect any malicious code or suspicious activity.
2. Remove malware: Once the scan is complete, take immediate action to remove any malware or malicious files found. This can be done by deleting infected files, cleaning up your database, and updating all plugins and themes to their latest versions.
3. Secure your website: To prevent future infections, strengthen your website’s security measures. Regularly update your CMS (Content Management System) and all installed plugins to patch any vulnerabilities. Use strong passwords for your admin accounts, enable two-factor authentication, and limit access to sensitive files and directories.
4. Monitor website activity: Stay vigilant by monitoring your website’s activity regularly. Keep an eye out for any suspicious behavior, such as unauthorized login attempts, unusual file modifications, or unexpected traffic spikes. Implement a website monitoring tool to receive real-time alerts in case of any security threats.
5. Conduct keyword research: Ensure that your website’s content aligns with relevant keywords while avoiding any black hat SEO techniques like keyword stuffing. This will help improve your website’s visibility in search engine results pages without risking potential blacklisting.
6. Secure your domain: Protect your domain name from being used for malicious purposes. Enable domain privacy to hide your personal information from WHOIS searches. Regularly review your domain registrar’s security features and consider using a reputable registrar with advanced security measures.
7. Educate your users: Raise awareness among your website visitors about potential online threats, such as phishing attempts or pop-up ads. Educate them on safe browsing practices, like avoiding suspicious links or downloading files from untrustworthy sources.
Only Use Trusted Software
Only use trusted software to fix and prevent URL blacklist infections. When dealing with computer security, it’s important to be cautious of rogue security software and potential spyware. To ensure your safety, always download software from reputable sources and verify its authenticity before installation. Be wary of search engine optimization techniques that may lead you to malicious websites or backdoor access points for cybercriminals. Keep your web browser and antivirus software up to date to protect against Trojan horse attacks and other threats. Avoid clicking on suspicious pop-up ads and be cautious of internet bots that may engage in click fraud.
Use Strong Passwords
1. Use a combination of uppercase and lowercase letters, numbers, and symbols in your password. This makes it harder for hackers to guess or crack your password.
2. Avoid using common words, phrases, or personal information that can be easily guessed. Instead, use a random combination of characters that is unique to you.
3. Make sure your password is at least 8 characters long. The longer the password, the more secure it is.
4. Avoid using the same password for multiple accounts. If one account gets compromised, all your accounts will be at risk.
5. Consider using a password manager tool to securely store and generate strong passwords for you.
Remember, strong passwords are just the first line of defense. It’s also important to keep your computer’s security software up to date, avoid clicking on suspicious links or downloading unknown files, and regularly scan your system for malware.
Use Google Web Risk API
If you’re facing URL blacklist infections and want to fix and prevent them, the Google Web Risk API can be a valuable tool. This powerful API allows you to leverage Google’s vast knowledge and resources to protect your website and users from malicious URLs.
To get started, integrate the Google Web Risk API into your website or application. This will enable real-time scanning of URLs and provide you with information about their potential risks. By using this API, you can proactively identify and block URLs that may be harmful to your website or users.
To fix URL blacklist infections, follow these steps:
1. Scan your website: Use the Google Web Risk API to scan your website and identify any URLs that are flagged as malicious or suspicious. This will help you pinpoint the infected areas and take appropriate action.
2. Remove malicious URLs: Once you’ve identified the infected URLs, remove them from your website immediately. This may involve deleting or updating the affected pages or files. Make sure to also check for any backdoors or hidden malware that may have been installed.
3. Secure your website: Take steps to strengthen the security of your website. This includes updating your software and plugins, using strong and unique passwords, and regularly backing up your data. Consider implementing additional security measures such as firewalls and intrusion detection systems.
4. Monitor and prevent future infections: Continuously monitor your website for any signs of infection or suspicious activity. Regularly scan your URLs using the Google Web Risk API to stay updated on potential risks. Implement strong security measures to prevent future infections, such as regularly updating your software and educating your users about safe browsing practices.
By using the Google Web Risk API and following these steps, you can effectively fix and prevent URL blacklist infections on your website. Protecting your website and users from malicious URLs is crucial in today’s digital landscape, and the Google Web Risk API is a valuable tool in your cybersecurity arsenal.
How to Remove Your URL From a Blacklist

To remove your URL from a blacklist, follow these steps:
1. Identify the blacklist: Check if your website is listed on any known blacklists. You can use online blacklist checker tools to scan your URL and see if it appears on any lists.
2. Investigate the cause: Once you know which blacklist your URL is listed on, investigate the reason behind it. It could be due to malware infections, spamming, or other malicious activities. Analyze your website for any vulnerabilities or suspicious activities.
3. Clean your website: Remove any malware, viruses, or malicious code from your website. Use a reliable antivirus program to scan your website files and databases thoroughly. Delete any infected files and update all plugins, themes, and CMS software to their latest versions to patch any security vulnerabilities.
4. Request removal from the blacklist: Once your website is clean, visit the blacklist’s website and look for their removal process. Each blacklist may have its own procedure, so make sure to follow their instructions carefully. Some blacklists may require you to submit a removal request or provide evidence that your website is now secure.
5. Monitor and prevent future blacklisting: Regularly monitor your website’s security and performance to prevent future blacklisting. Implement strong security measures, such as regularly updating software, using secure passwords, and conducting regular security audits. Consider using a website security service to provide ongoing protection against cyber threats.
Unsafe or Outdoor Plugins with Backdoor
To fix and prevent URL blacklist infections, it is crucial to be aware of unsafe or outdoor plugins that may contain backdoors. These plugins can open doors for cybercriminals to exploit your website’s vulnerabilities and compromise its security.
When dealing with plugins, always prioritize safety and security. Only download and install plugins from trusted sources such as the Microsoft Store or reputable plugin marketplaces. Avoid downloading plugins from unknown or suspicious websites, as they may contain malware or backdoors.
Regularly update your plugins to ensure you have the latest security patches and fixes. Developers often release updates to address vulnerabilities and improve security. Keeping your plugins up to date helps to prevent potential breaches.
Regularly scan your website for malware and backdoors using a reliable security scanner. There are various tools available that can scan your website for any malicious code or suspicious activity. These scanners can help identify and remove any unsafe plugins or backdoors that may have been installed on your website.
Monitor your website’s traffic and logs for any suspicious activity. Keep an eye out for any unusual patterns or unauthorized access attempts. If you notice any suspicious activity, investigate it further and take appropriate action to secure your website.
Consider implementing a web application firewall (WAF). A WAF acts as a barrier between your website and potential threats by filtering out malicious requests. It can help prevent attacks like SQL injections, cross-site scripting, and other common web vulnerabilities.
Regularly backup your website. In case of a security breach or infection, having a recent backup can save you from significant data loss. Make sure to store your backups securely and test their restoration process to ensure they are reliable.
Virus and Malware Threats
Fixing and Preventing URL Blacklist Infections
URL blacklist infections can be a serious threat to your computer’s security. These infections occur when your website is flagged by search engines or security software as being potentially harmful. To fix and prevent URL blacklist infections, follow these steps:
1. Scan your website for malware: Use a trusted antivirus program or online scanner to thoroughly scan your website for any malware or malicious code. This will help identify and remove any potential threats.
2. Update your software: Make sure all your website’s software, including content management systems, plugins, and themes, are up to date. Outdated software can leave vulnerabilities that hackers can exploit.
3. Secure your website: Implement strong passwords, enable two-factor authentication, and regularly backup your website’s files and database. These measures can help protect your website from unauthorized access and data loss.
4. Monitor your website: Regularly check your website’s traffic and logs for any suspicious activity. Look for unusual spikes in traffic, unfamiliar IP addresses, or strange file modifications. This can help you detect and respond to potential threats early on.
5. Submit a reconsideration request: If your website has been blacklisted by search engines, you will need to submit a reconsideration request to have it removed from the blacklist. Follow the specific guidelines provided by each search engine to ensure a successful request.
6. Improve your website’s security: Enhance your website’s security measures by implementing a firewall, using HTTPS encryption, and regularly updating your security software. This can help prevent future infections and protect your website and users.
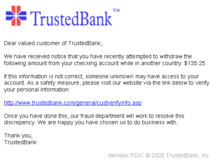
Example Message
?
If you suspect that your device is infected with urlblacklist, it is crucial to immediately run a thorough antivirus scan to detect and remove any malicious software. Download this tool to run a scan