Month: September 2023

Two Windows Boot Manager Entries in BIOS

Unraveling the Enigma: The Mystery of Two Windows Boot Manager Entries in BIOS

Important
Fortect addresses issues with two Windows boot manager in BIOS, ensuring smooth program running and identifying malfunctioning hardware.

Download Now

Troubleshooting Windows Boot Manager in BIOS

If you are experiencing the issue of having two Windows Boot Manager entries in the BIOS, follow these troubleshooting steps to resolve the problem.

1. Restart your computer and enter the BIOS settings by pressing the designated key (usually F2 or Delete) during startup.
2. Navigate to the Boot section in the BIOS menu.
3. Look for duplicate entries under the UEFI Boot Entries.
4. Identify the duplicate entry related to Windows Boot Manager.
5. Select the duplicate entry and press the Delete key to remove it.
6. Save the changes and exit the BIOS settings.
7. Restart your computer and check if the issue is resolved.

Updated: September 2023

Fortect provides solutions for various Windows issues, including those related to the Windows Boot Manager in BIOS. If you are experiencing errors or confusion messages related to the Boot Manager, Fortect can help by repairing damaged system files and faulty settings that may be causing the issue.

While we cannot guarantee that Fortect will fix every specific Boot Manager error, it can address common underlying causes such as damaged DLL files, incompatible drivers, and Windows bugs.

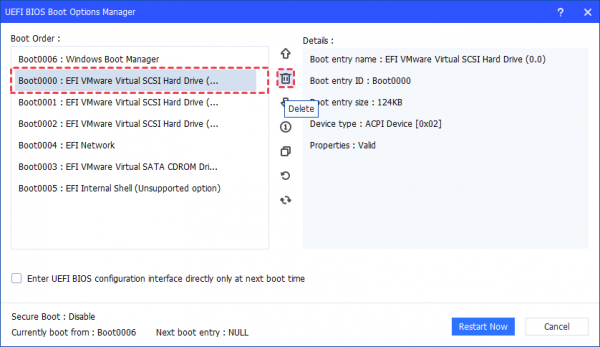
Removing Multiple “Windows Boot Manager” Entries with EasyUEFI

  1. Download and install EasyUEFI from the official website.
  2. Launch EasyUEFI and click on the “Manage EFI Boot Option” button.
    Download and install EasyUEFI from the official website.
Launch EasyUEFI and click on the "Manage EFI Boot Option" button.
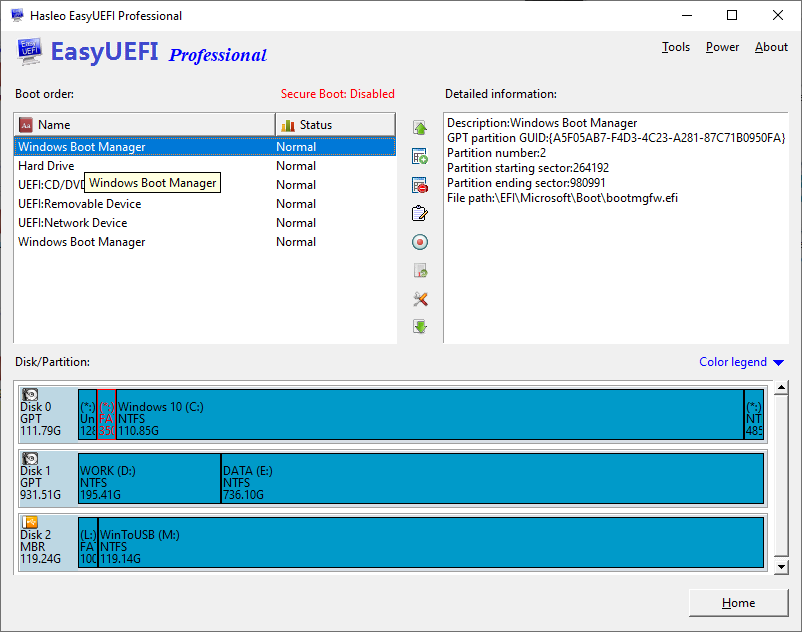
  3. Locate the “Windows Boot Manager” entries that you want to remove.
  4. Select each unwanted entry and click on the “Delete” button.
  5. Confirm the deletion when prompted.
  6. Restart your computer to check if the “Windows Boot Manager” entries have been successfully removed from the BIOS.
    Confirm the deletion when prompted.
Restart your computer to check if the "Windows Boot Manager" entries have been successfully removed from the BIOS.

Method 2: Using Command Prompt

  1. Press the Windows key + X and select “Command Prompt (Admin)” to open an elevated Command Prompt.
  2. Type the command bcdedit and press Enter to view the boot entries.
    Press the Windows key + X and select "Command Prompt (Admin)" to open an elevated Command Prompt.
Type the command bcdedit and press Enter to view the boot entries.
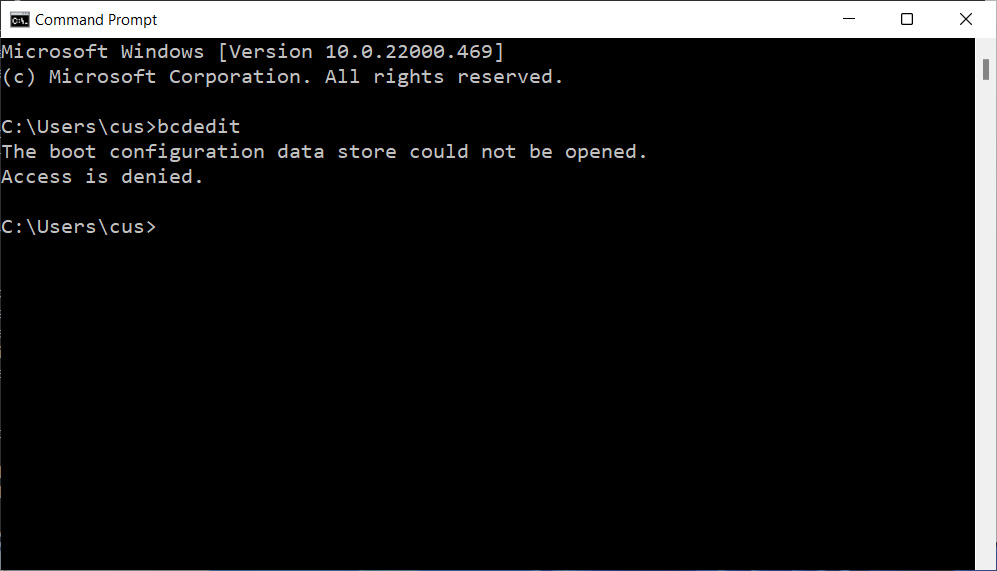
  3. Identify the unwanted “Windows Boot Manager” entries by their identifiers.
  4. Type the command bcdedit /delete {identifier} for each unwanted entry, replacing “{identifier}” with the actual identifier of the entry.
  5. Press Enter to execute the command and confirm the deletion when prompted.
  6. Restart your computer to check if the unwanted “Windows Boot Manager” entries have been removed from the BIOS.
    Press Enter to execute the command and confirm the deletion when prompted.
Restart your computer to check if the unwanted "Windows Boot Manager" entries have been removed from the BIOS.

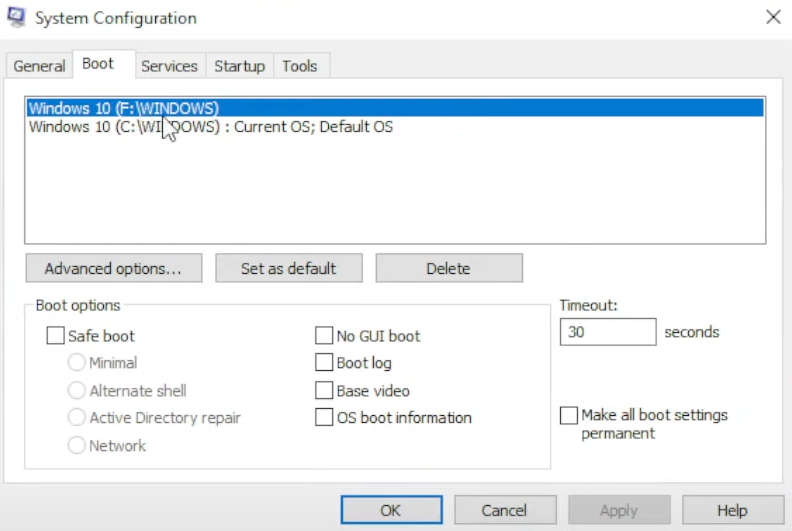
Method 3: Using System Configuration

  1. Press the Windows key + R to open the Run dialog box.
  2. Type msconfig and press Enter to open the System Configuration utility.
  3. Go to the “Boot” tab.
  4. Under the “Boot options” section, locate the unwanted “Windows Boot Manager” entries.
    Go to the "Boot" tab.
Under the "Boot options" section, locate the unwanted "Windows Boot Manager" entries.
  5. Select each unwanted entry and click on the “Delete” button.
  6. Click on “Apply” and then “OK” to save the changes.
    Select each unwanted entry and click on the "Delete" button.
Click on "Apply" and then "OK" to save the changes.
  7. Restart your computer to check if the unwanted “Windows Boot Manager” entries have been removed from the BIOS.

Resolving Access Issues on Tenforums.com

If you are experiencing access issues on Tenforums.com related to having two Windows Boot Manager entries in your BIOS, follow these steps to resolve the problem:

1. Restart your computer and access your BIOS settings. This is typically done by pressing a specific key (e.g., F2 or DEL) during startup. Consult your computer or motherboard’s documentation for the exact key.

2. Once in the BIOS, navigate to the Boot section or a similar menu.

3. Look for the UEFI Boot Entries or Boot Priority options.

4. Locate the duplicate Windows Boot Manager entry and select it.

5. Use the appropriate key (e.g., – or +) to move it down or up in the boot order until it is below the desired Windows Boot Manager entry.

6. Save the changes and exit the BIOS.

7. Restart your computer and check if the access issues have been resolved.

If you continue to experience issues, it may be helpful to consult the Tenforums community for further assistance.

python
import os

def display_menu():
print("Select boot manager:")
print("1. Windows Boot Manager 1")
print("2. Windows Boot Manager 2")
print("3. Exit")

def set_boot_manager(selection):
if selection == 1:
# Set BIOS settings to boot from Windows Boot Manager 1
print("Setting boot manager to Windows Boot Manager 1...")
elif selection == 2:
# Set BIOS settings to boot from Windows Boot Manager 2
print("Setting boot manager to Windows Boot Manager 2...")
elif selection == 3:
print("Exiting...")
exit()
else:
print("Invalid selection. Please try again.")

def main():
while True:
display_menu()
selection = input("Enter your choice: ")
try:
selection = int(selection)
set_boot_manager(selection)
break
except ValueError:
print("Invalid input. Please enter a number.")

if __name__ == "__main__":
main()

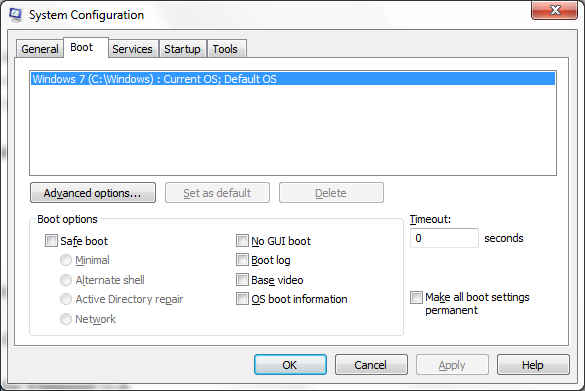
Using msconfig and EasyBCD for Boot Manager Fixes

To fix the issue of having two Windows Boot Manager entries in BIOS, you can use msconfig and EasyBCD. First, open the Run dialog by pressing Windows key + R, then type “msconfig” and hit Enter. In the System Configuration window, go to the Boot tab. Here, you can see the boot entries and select the one you want to remove. Check the box next to the unwanted entry and click “Delete”. Confirm the action and restart your computer.

If the above method doesn’t work, you can try using EasyBCD. Download and install EasyBCD from the official website. Launch the program and go to the “Edit Boot Menu” section. Select the unwanted entry and click “Delete”. Apply the changes and restart your computer.

By using either msconfig or EasyBCD, you can easily fix the issue of having two Windows Boot Manager entries in BIOS.

Example Message
?

It is advisable to check your BIOS settings to ensure that there is only one Windows Boot Manager listed, as having two may cause conflicts and hinder the proper booting of your system. Download this tool to run a scan

Fix Windows 10 Games Not Launching

Troubleshooting technology can be a daunting task, particularly when it comes to gaming. In this article, we delve into the world of Windows 10 games and explore effective solutions to tackle the frustrating issue of games not launching. Whether you are a seasoned gamer or a casual player, join us as we unravel the mysteries behind this common problem and discover ways to restore your gaming experience on Windows 10.

Important
Fortect can address issues with games not working in Windows 10 by repairing damaged system files and faulty settings.

Download Now

Update Graphics Drivers: Outdated or incompatible graphics drivers can often cause issues with games on Windows 10. Visit the manufacturer’s website and download the latest drivers for your graphics card to ensure optimal performance.

Troubleshooting Windows 10 Games

If you’re experiencing issues with Windows 10 games not launching, follow these troubleshooting steps:

1. Update your operating system and graphics card drivers to the latest versions. Updating Windows: Go to Settings > Update & Security > Windows Update. Updating graphics card drivers: Visit the manufacturer’s website or use Windows Device Manager.

2. Check for any pending game patches or updates. Visit the game developer’s website or use the game launcher to ensure you have the latest version installed.

3. Disable any background processes or applications that might interfere with the game launch. Close any unnecessary programs running in the background.

4. Try running the game in compatibility mode. Right-click on the game’s shortcut or executable file, select Properties, go to the Compatibility tab, and choose an earlier version of Windows.

5. If you’re using multiple monitors, disconnect all but the primary display and try launching the game again.

6. Disable any overlays or screen recording software, such as Xbox Game Bar or third-party game launchers like Steam or WildTangent.

7. Reset the game settings to default. Look for an option within the game’s settings menu or delete the game’s configuration files (if available).

8. If the game is installed through the Microsoft Store, try resetting the Microsoft Store cache. Open Command Prompt as administrator and enter the command: wsreset.exe

Windows 10: Where gaming dreams become nightmares.

Solutions for Steam Games Not Working in Windows 10

If you’re having trouble launching Steam games on Windows 10, we have solutions for you. First, make sure your operating system is up to date and that your computer meets the game’s system requirements. If the game still won’t launch, try these steps:

1. Restart Steam: Close Steam completely and reopen it to see if the game launches.
2. Verify game files: Right-click on the game in your Steam library, go to Properties, then Local Files, and click on “Verify Integrity of Game Files.”
3. Update drivers: Make sure your device drivers, especially your graphics card driver, are up to date.
4. Disable background processes: Temporarily disable any background processes or software that may be interfering with the game.
5. Check for software conflicts: Some software, like the Xbox Game Bar or WildTangent Games App, may conflict with Steam. Try disabling or uninstalling them.
6. Try windowed mode: Launch the game in windowed mode instead of fullscreen to see if that helps.
7. Reinstall Steam: If all else fails, try uninstalling and reinstalling Steam. Remember to back up your game files before doing this.

Hopefully, these solutions will get your Steam games up and running on Windows 10.

When it comes to games on Windows 10, it’s a roll of the dice.

Fixing Games That Won’t Launch on Windows 10

Having trouble launching games on Windows 10? Here are some quick and easy fixes:

1. Update your graphics drivers. Go to the manufacturer’s website and download the latest drivers for your graphics card.

2. Run the game as an administrator. Right-click on the game’s shortcut or executable file, select “Run as administrator,” and try launching the game again.

3. Check for compatibility issues. Right-click on the game’s shortcut or executable file, go to “Properties,” and under the “Compatibility” tab, enable compatibility mode for a previous version of Windows.

4. Disable fullscreen optimizations. Right-click on the game’s shortcut or executable file, go to “Properties,” and under the “Compatibility” tab, check the box that says “Disable fullscreen optimizations.”

5. Close unnecessary background processes. Open Task Manager (Ctrl + Shift + Esc), go to the “Processes” tab, and close any processes that may be using up resources.

6. Disable overlays and recording software. If you are using software like Steam, Xbox App, or screen recording tools, try disabling them before launching the game.

7. Uninstall and reinstall the game. If all else fails, uninstall the game, restart your computer, and then reinstall it from a trusted source.

Updated: September 2023

Fortect can help with certain errors that may prevent games from working in Windows 10. It can repair damaged system files and faulty settings that cause issues or error messages. Additionally, Fortect addresses the causes of freezing programs or slowdowns, whether it’s due to a damaged registry, missing files, or excessive junk.

It can also fix damaged DLL files, which are crucial for program functionality. However, it cannot fix issues related to incompatible hardware or other non-software related problems.

python
import os

def check_game_compatibility(game_name):
# Check if the game is compatible with Windows 10
compatibility = True

# Add custom compatibility checks for specific games
if game_name == "ExampleGame":
# Check compatibility for ExampleGame
compatibility = False

return compatibility

def run_game(game_name):
# Run the game executable
os.startfile(game_name)

# Prompt the user for the game name
game_name = input("Enter the name of the game: ")

# Check game compatibility
compatible = check_game_compatibility(game_name)

if compatible:
print("The game is compatible!")
# Run the game
run_game(game_name)
else:
print("The game is not compatible with Windows 10.")
# Provide instructions or suggestions for troubleshooting
print("Please check for any available updates or contact the game developer for support.")

In this code, `check_game_compatibility()` function is used to determine the compatibility of a game with Windows 10. You can customize it to include specific checks for each game if you have knowledge about their compatibility requirements. The `run_game()` function can be used to launch the game if it’s compatible.

Resolving Issues with Game Opening on Windows 10

If you’re having trouble launching games on Windows 10, follow these steps to resolve the issue:

1. Check your computer’s specifications and ensure it meets the game’s requirements.
2. Update your graphics drivers and ensure they are compatible with the game.
3. Disable any background processes or antivirus software that may interfere with the game.
4. Verify the game’s installation files by right-clicking on the game in your library and selecting “Verify integrity of game files.”
5. Try running the game in compatibility mode by right-clicking on the game’s executable file, selecting “Properties,” and navigating to the “Compatibility” tab.
6. Disable any overlays or game launchers, such as the Xbox app or WildTangent Games app, that may conflict with the game.
7. Ensure that your Windows 10 is up to date by going to Settings > Update & Security > Windows Update.
8. If the issue persists, try reinstalling the game or contacting the game’s support for further assistance.

Fixing Apps, Games, and Programs Not Opening in Windows 10

If you’re experiencing issues with games not launching in Windows 10, follow these steps to fix the problem:

1. Restart your computer: Sometimes a simple restart can resolve the issue.

2. Check for updates: Ensure that your Windows 10 is up to date by going to Settings > Update & Security > Windows Update.

3. Update your graphics drivers: Visit the manufacturer’s website for your graphics card and download the latest drivers.

4. Run the app troubleshooter: Windows 10 has a built-in troubleshooter that can automatically fix common app issues. Press the Windows key + I, then navigate to Update & Security > Troubleshoot > Additional troubleshooters > Windows Store Apps.

5. Reset the app: Right-click on the app that is not launching, select More, and then choose App settings. Scroll down and click on the Reset button.

6. Uninstall and reinstall the app: If all else fails, uninstall the app and reinstall it from the Microsoft Store or the developer’s website.

Common Causes of Games Not Responding in Windows 10

  1. Check system requirements:

    • Make sure your computer meets the minimum system requirements for the game.
    • Check the game’s official website or documentation for the specific requirements.
      Make sure your computer meets the minimum system requirements for the game.
Check the game's official website or documentation for the specific requirements.
  2. Update graphics drivers:

    • Open Device Manager by pressing Win+X and selecting it from the menu.
    • Expand the Display adapters category.
    • Right-click on your graphics card and select Update driver.
    • Choose the option to search automatically for updated driver software.
      Right-click on your graphics card and select Update driver.
Choose the option to search automatically for updated driver software.
    • Follow the on-screen instructions to complete the driver update process.
  3. Disable background applications:

    • Open Task Manager by pressing Ctrl+Shift+Esc.
    • Go to the Processes tab.
      Open Task Manager by pressing Ctrl+Shift+Esc.
Go to the Processes tab.
    • Look for any unnecessary or resource-intensive processes running in the background.
    • Right-click on the process and select End task to close it.
  4. Scan for malware:

    • Install and run a reliable antivirus or anti-malware program.
    • Perform a full system scan to detect and remove any malware.
      Install and run a reliable antivirus or anti-malware program.
Perform a full system scan to detect and remove any malware.
  5. Verify game files:

    • Open the Steam client (if applicable).
    • Navigate to your game library.
      Open the Steam client (if applicable).
Navigate to your game library.
    • Right-click on the game that is not launching and select Properties.
    • Go to the Local Files tab.
    • Click on the Verify integrity of game files button.
    • Wait for the process to complete and any corrupted files to be repaired.
      Click on the Verify integrity of game files button.
Wait for the process to complete and any corrupted files to be repaired.
  6. Disable game overlays:

    • Open the game launcher or settings.
    • Look for an option related to game overlays or game bar.
      Open the game launcher or settings.
Look for an option related to game overlays or game bar.
    • Disable any overlays or game bar features.

Troubleshooting Windows 10 App and Game Opening Issues

To troubleshoot Windows 10 app and game opening issues, follow these steps:

1. Check for any pending updates for your Windows 10 operating system and install them.
2. Ensure that your computer meets the minimum system requirements for the game or app you’re trying to launch.
3. Verify that the game or app is properly installed on your computer.
4. Restart your computer and try launching the game or app again.
5. Update your device drivers, especially the graphics driver, as outdated drivers can cause compatibility issues.
6. Disable any background processes or applications that might interfere with the game or app.
7. Temporarily disable your antivirus or firewall software to see if it’s causing the issue.
8. If the game or app is downloaded from a platform like Steam, try verifying the integrity of the game files.
9. Try running the game or app in compatibility mode by right-clicking on the shortcut or executable and selecting “Properties,” then navigating to the “Compatibility” tab and selecting the appropriate settings.
10. If all else fails, consider uninstalling and reinstalling the game or app.

Example Message
?

If you are experiencing issues with games not working properly in Windows 10, it is recommended to check for any available updates or patches for the game, ensure that your graphics card drivers are up to date, and consider running the game in compatibility mode or as an administrator to troubleshoot and resolve the issue. Download this tool to run a scan

Getting Files Ready for Installation Stuck – How to Fix Windows 10 USB Clean Install Freezing

Introducing an Easy Fix for Windows 10 USB Clean Install Freezing

Important
Fortect can address the causes of files getting stuck during installation, ensuring smooth running of Windows and other programs.

Download Now

Clear out unnecessary files: Before installation, go through your files and delete any unnecessary or redundant files that may be taking up space. This will help streamline the installation process and prevent any potential conflicts with existing files.

Troubleshooting “Getting Files Ready for Installation Stuck” Error

If you’re experiencing the “Getting Files Ready for Installation Stuck” error during a Windows 10 USB clean install, follow these steps to fix the issue:

Step 1: Disconnect any peripherals connected to your PC, such as printers or external hard drives. This can help resolve any hardware conflicts.

Step 2: Restart your computer and enter the BIOS settings. Check if your HDD or SSD is set as the primary boot device.

Fix 1: Boot your PC in Safe Mode and try the installation again. This can bypass any conflicting software or drivers causing the error.

Fix 2: Use the command prompt to repair any corrupted files or folders that may be causing the issue.

If these solutions don’t work, there may be a hardware issue with your device. Contact Microsoft Support for further assistance.

Fixing Installation Stuck by Disconnecting Peripherals and External Devices

To fix the issue of getting stuck at the “Getting Files Ready for Installation” stage during a Windows 10 USB clean install, try disconnecting peripherals and external devices. This can help resolve any potential conflicts that may be causing the installation to freeze.

Step 1: Disconnect all peripherals and external devices, such as USB flash drives, LAN cables, and DVD/CD drives.

Step 2: Restart your computer and proceed with the installation process.

By disconnecting these devices, you can eliminate any potential hardware issues that may be causing the installation to freeze. This troubleshooting step can help ensure a smooth and successful installation of Windows 10.

Resolving the Issue by Deleting Problematic Files

To resolve the issue of getting files ready for installation stuck during a Windows 10 USB clean install, follow these steps:

1. Disconnect any peripherals, such as USB flash drives or LAN cables.
2. Restart your computer and enter the BIOS settings.
3. Make sure your hard drive (HDD) or solid-state drive (SSD) is set as the primary boot device.
4. Save the changes and exit the BIOS.
5. Boot from the Windows installation DVD or USB.
6. When you reach the Windows setup screen, press Shift + F10 to open the command prompt.
7. Type “diskpart” and press Enter.
8. Type “list disk” and press Enter to display a list of available disks.
9. Identify the disk containing your Windows installation and note its number.
10. Type “select disk [number]” and press Enter, replacing [number] with the disk number from the previous step.
11. Type “clean” and press Enter to delete all partitions on the selected disk.
12. Type “exit” and press Enter to close the command prompt.
13. Continue with the Windows installation as usual.

Updated: September 2023

Fortect is a powerful software that addresses various issues that can cause files to get stuck during installation. Whether it’s damaged system files, faulty settings, or confusing error messages, Fortect can repair them and ensure that normal tasks can proceed smoothly. Additionally, if the installation issues are due to missing or corrupt DLL files, Fortect can automatically fix the problem.

It also helps with freezing programs, addressing the causes of slowdowns, and ensuring that Windows and other programs run seamlessly. While it cannot fix every issue, Fortect is a reliable solution for many common installation problems.

Solving “Getting Files Ready” Error by Entering Safe Mode

If you’re encountering the “Getting Files Ready” error during a Windows 10 USB clean install, entering Safe Mode can help resolve the issue. Here’s how to do it:

1. Restart your computer and press the F8 key repeatedly until the Advanced Boot Options menu appears.
2. Select Safe Mode from the options.
3. Once in Safe Mode, navigate to the Windows setup folder (C:\Windows\SoftwareDistribution\Download) and delete its contents.
4. Restart your computer and proceed with the clean install.

Entering Safe Mode can help bypass any potential hardware issues causing the error.

Resetting the BIOS to Fix Installation Stuck

If you’re experiencing the issue of your Windows 10 USB clean install freezing at the “Getting Files Ready for Installation” stage, resetting the BIOS can often resolve the problem. To do this, follow these steps:

1. Power off your computer.
2. Disconnect any peripherals such as USB flash drives or LAN cables.
3. Locate the BIOS reset jumper on your motherboard. Consult your computer’s manual for its exact location.
4. Use a jumper cap or a screwdriver to short the reset pins on the jumper.
5. Power on your computer and enter the BIOS settings by pressing the designated key (usually Del or F2).
6. Look for the option to load default settings or reset the BIOS.
7. Save the changes and exit the BIOS.
8. Reconnect any peripherals and try reinstalling Windows 10.

Resetting the BIOS can often resolve hardware-related issues that may cause the installation to freeze. If this solution doesn’t work, you may need to consider other troubleshooting options.

Cleaning Up Large and Junk Files to Ensure Smooth Installation

Cleaning up large and junk files is crucial for a smooth installation of Windows 10. To fix the issue of “Getting Files Ready for Installation Stuck” during a clean install, follow these steps:

Fix 1:
1. Disconnect any unnecessary peripherals, such as printers or external hard drives.
2. Remove any CD/DVD from the optical drive.
3. Disconnect the LAN cable and any USB flash drives.
4. Restart the system and try reinstalling Windows 10.

Fix 2:
1. If the problem persists, it may be due to a hardware issue. Check for any faulty hardware components.
2. Try using the Advanced Startup options to repair the system.
3. Use EaseUS Data Recovery Wizard to recover any important data before proceeding with the clean install.

Seeking Assistance from Microsoft Store for Installation Issues

If you’re experiencing issues with your Windows 10 USB clean install freezing at the “Getting files ready for installation” stage, you may need assistance from the Microsoft Store. To resolve this issue, try the following solutions:

1. Disconnect any peripherals: Unplug all unnecessary devices, such as printers or external hard drives, and try the installation again.

2. Use EaseUS Data Recovery Wizard: If you have important files on your USB flash drive, use this software to recover them before proceeding with the installation.

3. Check LAN cable connection: Ensure that your LAN cable is properly connected and try the installation again.

If these solutions don’t fix the issue, visit the Microsoft Store for further assistance.

Common FAQs and Troubleshooting Tips for “Getting Files Ready” Error

  1. Restart your computer
    • Click on the Start button
      Restart your computer
Click on the Start button
    • Select Restart
  2. Disconnect unnecessary devices
    • Unplug any external USB devices such as printers, scanners, or cameras
    • Remove any CDs or DVDs from the optical drive
      Unplug any external USB devices such as printers, scanners, or cameras
Remove any CDs or DVDs from the optical drive
  3. Check system requirements
    • Make sure your computer meets the minimum system requirements for Windows 10 installation
    • Refer to the official Microsoft website for the detailed requirements
      Make sure your computer meets the minimum system requirements for Windows 10 installation
Refer to the official Microsoft website for the detailed requirements
  4. Perform a clean boot
    • Press Ctrl+Shift+Esc to open Task Manager
    • Click on the Startup tab
      Press Ctrl+Shift+Esc to open Task Manager
Click on the Startup tab
    • Select Open Task Manager
    • Disable all the startup programs
    • Restart your computer
  5. Check your USB drive
    • Ensure that the USB drive is properly connected to your computer
    • Try using a different USB port
      Ensure that the USB drive is properly connected to your computer
Try using a different USB port
    • If possible, try using a different USB drive
  6. Disable antivirus software temporarily
    • Open your antivirus software
    • Locate the option to disable or turn off the antivirus protection
      Open your antivirus software
Locate the option to disable or turn off the antivirus protection
    • Temporarily disable the antivirus software
  7. Run Windows Update Troubleshooter
    • Click on the Start button
    • Go to Settings
    • Select Update & Security
    • Click on Troubleshoot
      Select Update & Security
Click on Troubleshoot
    • Choose Windows Update
    • Click on Run the troubleshooter
      Choose Windows Update
Click on Run the troubleshooter
    • Follow the on-screen instructions
  8. Reset Windows Update components
    • Open Command Prompt as an administrator
    • Type the following commands and press Enter after each one:
      • net stop wuauserv
      • net stop cryptSvc
      • net stop bits
        net stop cryptSvc
net stop bits
      • net stop msiserver
      • Ren C:\Windows\SoftwareDistribution SoftwareDistribution.old
        net stop msiserver
Ren C:\Windows\SoftwareDistribution SoftwareDistribution.old
      • Ren C:\Windows\System32\catroot2 Catroot2.old
      • net start wuauserv
      • net start cryptSvc
      • net start bits
        net start cryptSvc
net start bits
      • net start msiserver
    • Restart your computer
  9. Perform a system file check
    • Open Command Prompt as an administrator
    • Type the following command and press Enter:
      • sfc /scannow
        Open Command Prompt as an administrator
sfc /scannow
    • Wait for the scan to complete
    • If any errors are found, follow the on-screen instructions to repair them
  10. Perform a disk cleanup
    • Click on the Start button
    • Type disk cleanup in the search bar
      Click on the Start button
Type disk cleanup in the search bar
    • Select Disk Cleanup from the search results
    • Choose the drive you want to clean up
    • Select the file types you want to delete
    • Click on OK and then Delete Files
      Select the file types you want to delete
Click on OK and then Delete Files
  11. Reinstall Windows 10
    • Backup your important files and data
    • Insert the Windows 10 installation USB
      Backup your important files and data
Insert the Windows 10 installation USB
    • Restart your computer
    • Follow the on-screen instructions to reinstall Windows 10
    • Restore your files and data from the backup
Example Message
?

Make sure to properly prepare your files before installation to avoid any potential issues of them getting stuck. Download this tool to run a scan

Fixing the This Site Can’t Be Reached Error in Chrome

Introducing an Error Solution: Resolving the Unreachable Website Glitch in Chrome

Important
Fortect can address issues like freezing programs or missing DLLs to help resolve the “site can’t be reached” error.

Download Now

Check your internet connection: Ensure that your device is connected to the internet and try accessing other websites or services to confirm if the issue is specific to the site you are trying to reach.

Understanding the Causes of the “This Site Can’t Be Reached” Error

When encountering the “This Site Can’t Be Reached” error in Google Chrome, there are several potential causes to consider. One common reason is an issue with the internet connection, such as a timeout or reset. Another possibility is a problem with the website’s server or DNS settings. Additionally, browser cache, firewall settings, or network configurations can also trigger this error. To fix it, try the following troubleshooting methods:

1. Check your internet connection: Ensure that you have a stable internet connection and try refreshing the page.
2. Clear browser cache: Clear your browser’s cache and cookies to eliminate any corrupted files.
3. Disable firewall: Temporarily disable your firewall to see if it’s blocking the website.
4. Check DNS settings: Verify your DNS settings are correct or try using a different DNS server.
5. Try a different browser: Test the website on a different browser to determine if the issue is specific to Chrome.

The inability to reach a site often indicates a breakdown in the connection between the user’s device and the server hosting the site.
Updated: September 2023

Fortect can help with various issues that can prevent a site from being reached. It addresses Windows issues that cause tasks to stop working or result in confusing error messages. It also repairs the damage caused by viruses and malware, ensuring the system is restored to its pre-infected state.

Additionally, Fortect tackles freezing programs by addressing the causes, such as damaged registry, missing files, or excessive junk. It can also fix damaged DLL files and repair the causes of Blue Screen of Death (BSoD). Furthermore, Fortect can facilitate OS recovery without affecting user data.

Solutions to Fix the “This Site Can’t Be Reached” Error

  • Open Google Chrome.
  • Click on the three-dot menu icon in the top-right corner of the browser window.
    Open Google Chrome.
Click on the three-dot menu icon in the top-right corner of the browser window.
  • Select “Settings” from the dropdown menu.
  • Scroll down and click on “Advanced” to expand the advanced settings.
  • Under the “Privacy and security” section, click on “Clear browsing data”.
  • Select “Cache” and “Cookies and other site data” checkboxes.
    Under the "Privacy and security" section, click on "Clear browsing data".
Select "Cache" and "Cookies and other site data" checkboxes.
  • Click on the “Clear data” button.
  • Restart Google Chrome and check if the error is resolved.

Solution 2: Flush DNS and Renew IP

  • Press the “Windows” key on your keyboard.
  • Type “Command Prompt” into the search bar.
  • Right-click on “Command Prompt” and select “Run as administrator”.
  • In the Command Prompt window, type “ipconfig /flushdns” and press “Enter”.
    Right-click on "Command Prompt" and select "Run as administrator".
In the Command Prompt window, type "ipconfig /flushdns" and press "Enter".
  • Wait for the confirmation message.
  • Type “ipconfig /release” and press “Enter”.
    Wait for the confirmation message.
Type "ipconfig /release" and press "Enter".
  • Type “ipconfig /renew” and press “Enter”.
  • Close the Command Prompt window and check if the error is resolved.

Solution 3: Disable VPN or Proxy

  • Click on the three-dot menu icon in the top-right corner of Google Chrome.
  • Select “Settings” from the dropdown menu.
    Click on the three-dot menu icon in the top-right corner of Google Chrome.
Select "Settings" from the dropdown menu.
  • Scroll down and click on “Advanced” to expand the advanced settings.
  • Under the “System” section, click on “Open proxy settings”.
  • In the “Internet Properties” window, click on the “LAN settings” button.
  • Uncheck the boxes for “Use a proxy server for your LAN” and “Automatically detect settings”.
    In the "Internet Properties" window, click on the "LAN settings" button.
Uncheck the boxes for "Use a proxy server for your LAN" and "Automatically detect settings".
  • Click “OK” to save the changes.
  • Restart Google Chrome and check if the error is resolved.

Troubleshooting Steps to Resolve the “This Site Can’t Be Reached” Error

  • Step 1: Check your internet connection
    • Ensure that your device is connected to a stable and working internet connection
    • Try accessing other websites to confirm if the issue is specific to a particular site or all sites
  • Step 2: Clear browser cache and cookies
    • Open Google Chrome
    • Click on the three-dot menu in the top-right corner
    • Select “Settings” from the dropdown menu
    • Scroll down and click on “Advanced” to expand the advanced settings
      Select "Settings" from the dropdown menu
Scroll down and click on "Advanced" to expand the advanced settings
    • Under the “Privacy and security” section, click on “Clear browsing data”
    • Choose the time range and the types of data you want to clear (cache and cookies)
      Under the "Privacy and security" section, click on "Clear browsing data"
Choose the time range and the types of data you want to clear (cache and cookies)
    • Click on “Clear data” to remove the selected data
  • Step 3: Disable browser extensions
    • Open Google Chrome
    • Click on the three-dot menu in the top-right corner
      Open Google Chrome
Click on the three-dot menu in the top-right corner
    • Select “More tools” and then “Extensions”
    • Disable all extensions by toggling the switch next to each extension
    • Restart Chrome and check if the error persists
  • Step 4: Reset TCP/IP stack
    • Press Win + X keys on your keyboard
    • Select “Command Prompt (Admin)” from the menu
      Press Win + X keys on your keyboard
Select "Command Prompt (Admin)" from the menu
    • In the command prompt, type netsh int ip reset and press Enter
    • Restart your computer
  • Step 5: Check firewall and antivirus settings
    • Disable your firewall temporarily and try accessing the website
    • If the site opens, adjust your firewall settings to allow the connection
      Disable your firewall temporarily and try accessing the website
If the site opens, adjust your firewall settings to allow the connection
    • Similarly, disable your antivirus temporarily and check if the error still occurs
    • If necessary, add the website to your antivirus’ exceptions or whitelist
  • Step 6: Flush DNS cache
    • Open the command prompt (press Win + X and select “Command Prompt”)
    • Type ipconfig /flushdns and press Enter
      Open the command prompt (press Win + X and select "Command Prompt")
Type ipconfig /flushdns and press Enter
    • Wait for the command to complete and then restart your computer

python
import requests

def check_website(url):
try:
response = requests.get(url)
if response.status_code == 200:
return "Website is reachable."
else:
return f"Website is unreachable. Status code: {response.status_code}"
except requests.exceptions.RequestException as e:
return f"An error occurred: {str(e)}"

# Usage example:
website_url = "https://example.com"
result = check_website(website_url)
print(result)

This code defines a function `check_website` that takes a URL as input. It uses the `requests` library to send an HTTP GET request to the provided URL. If the response status code is 200 (indicating a successful response), it returns a message stating that the website is reachable. Otherwise, it returns a message with the actual status code or an error message if an exception occurs.

Additional Tips and Considerations for Dealing with the “This Site Can’t Be Reached” Error

– Check your internet connection and make sure it’s stable.
– Refresh the page or try opening it in a different browser.
– Clear your browser cache and cookies.
– Disable any VPN or proxy settings that may be interfering.
– Restart your computer or device.
– If the error persists, try accessing the website from a different network or device.
– Contact the website’s support for further assistance.
– If the error message includes an error code, search for it online for specific troubleshooting steps.
– Consider using network diagnostics tools to identify and resolve any network issues.

Example Message
?

The site cannot be reached because there might be an issue with the server or the internet connection. Download this tool to run a scan

Fixing PC Restart Problems

Troubleshooting PC restart issues can be a frustrating experience for users. In this article, we delve into effective solutions and expert tips to resolve common problems leading to unexpected restarts on your computer. Find out how to regain stability and ensure uninterrupted performance, without the need for excessive technical expertise.

Important
Fortect can address the causes of a PC restart problem, such as damaged system files, missing DLLs, and incompatible drivers.

Download Now

Understanding the Issue: Computer Restart Problem Explained

If your PC keeps restarting or rebooting without warning, it can be frustrating and disruptive. This article will help you understand the reasons behind this problem and provide solutions to fix it.

One common reason for frequent computer restarts is system instability caused by malware, corrupted system files, or incompatible plugins. To address this, scan your device for malware using a reliable antivirus software and update your system files and plugins to ensure compatibility.

Another possible cause is hardware failure, such as overheating. Check if the CPU fan is working properly and clean any dust buildup in your CPU cabinet. Additionally, run a hardware diagnostic test using tools like Passmark to identify any hardware issues.

In some cases, an operating system update can lead to system instability and frequent restarts. To resolve this, roll back the update or reinstall the operating system using a guide or tutorial available on websites like YouTube.

If you encounter a blue screen of death or error message before the restart, it indicates a more serious problem. Export the error message details and search for solutions online or contact technical support for assistance.

Remember to back up your important files before attempting any fixes. In case data loss occurs, you can use software like MiniTool Power Data Recovery to recover lost files.

Recovering Lost Files After a Computer Restart

If you have lost files after a computer restart, there are a few steps you can take to recover them. First, check the recycle bin to see if the files are there. If not, you can try using a data recovery tool like MiniTool Power Data Recovery to scan your device and retrieve the lost files. It’s also a good idea to check for any recent driver updates or operating system updates that may have caused the restart. Additionally, make sure your device is not overheating by cleaning the fan and ensuring proper ventilation.

Updated: September 2023

Fortect is a software solution that addresses various PC issues, including those related to PC restart problems. It can repair damaged system files and faulty settings that may be causing the restart problem. Additionally, Fortect can secure the system and restore it to its pre-infected state, addressing any damage caused by viruses.

It also tackles annoying slowdowns or freezing programs, ensuring smooth operation of Windows and other programs. Moreover, Fortect can fix missing or corrupt DLL files, and repair the causes of Blue Screen of Death (BSoD) errors. Lastly, it can compare and restore vital system files for OS recovery without affecting user data.

Solutions to Fix Random Computer Restarts

  • Check for Overheating:
    • Ensure that the computer is placed on a flat surface with proper ventilation.
    • Open the computer case and clean any dust or debris from the fans and heat sinks.
    • Verify that all fans are functioning correctly.
      Open the computer case and clean any dust or debris from the fans and heat sinks.
Verify that all fans are functioning correctly.
    • If necessary, replace any faulty cooling components.
  • Scan for Malware:
    • Install reputable antivirus software if not already installed.
    • Perform a full system scan to detect and remove any malware.
      Install reputable antivirus software if not already installed.
Perform a full system scan to detect and remove any malware.
    • Update the antivirus software and run regular scans to prevent future infections.
  • Check Power Supply:
    • Ensure that the power supply is securely connected to the motherboard.
    • Inspect the power supply for any signs of damage or overheating.
      Ensure that the power supply is securely connected to the motherboard.
Inspect the power supply for any signs of damage or overheating.
    • Consider replacing the power supply if it is old or unreliable.
  • Update Drivers:
    • Visit the manufacturer’s website to download and install the latest drivers for all hardware components.
    • Pay special attention to drivers for the motherboard, graphics card, and chipset.
      Visit the manufacturer's website to download and install the latest drivers for all hardware components.
Pay special attention to drivers for the motherboard, graphics card, and chipset.
    • Uninstall any outdated or incompatible drivers before installing the new ones.
  • Check for Hardware Issues:
    • Disconnect any recently installed hardware and check if the restart problem persists.
    • Run hardware diagnostic tests to identify faulty components.
      Disconnect any recently installed hardware and check if the restart problem persists.
Run hardware diagnostic tests to identify faulty components.
    • Replace or repair any malfunctioning hardware.
  • Update BIOS:
    • Consult the motherboard manufacturer’s website for the latest BIOS version.
    • Follow the instructions provided to update the BIOS.
      Consult the motherboard manufacturer's website for the latest BIOS version.
Follow the instructions provided to update the BIOS.
    • Exercise caution during the update process as an incorrect BIOS update can cause system instability.
  • Check for Software Conflicts:
    • Uninstall any recently installed software that may be causing conflicts.
    • Use the Task Manager to identify and end any processes that are consuming excessive resources.
      Uninstall any recently installed software that may be causing conflicts.
Use the Task Manager to identify and end any processes that are consuming excessive resources.
    • Consider performing a clean boot to troubleshoot software conflicts.
  • Perform System Restore:
    • Open the System Restore utility from the Control Panel.
    • Select a restore point before the random restarts began.
      Open the System Restore utility from the Control Panel.
Select a restore point before the random restarts began.
    • Follow the on-screen instructions to restore the system to the selected point.

python
import os

def restart_computer():
try:
os.system("shutdown /r /t 0") # Restart the computer immediately
except OSError as e:
print(f"An error occurred while restarting the computer: {e}")

restart_computer()

In this example, the code utilizes the `os` module in Python to execute a system command to restart the computer. The `shutdown` command with the `/r` flag indicates a restart, and the `/t 0` flag sets the time delay to 0, causing an immediate restart.

Keep in mind that this code assumes you are running it on a Windows system, as the `shutdown` command syntax may vary across different operating systems.

Please note that restarting a computer programmatically can have potential risks, and it’s always recommended to save your work and close any running applications before initiating a restart. Additionally, ensure that you have the necessary permissions to perform such actions on your system.

If you are facing specific PC restart problems, it would be more helpful to provide additional details about the issue you’re experiencing, and I can try to assist you with possible solutions or troubleshooting steps.

Preventing Future Computer Restarts: Tips and Tricks

  • Update your operating system:

    • Open the Start Menu and click on Settings.
    • Select Update & Security.
    • Click on Windows Update and then select Check for updates.
    • Install any available updates.
      Click on Windows Update and then select Check for updates.
Install any available updates.
  • Check for faulty hardware:

    • Open the Start Menu and click on Settings.
    • Select Update & Security.
    • Click on Windows Update and then select Check for updates.
    • Install any available updates.
      Click on Windows Update and then select Check for updates.
Install any available updates.
  • Scan for malware and viruses:

    • Open your preferred antivirus software.
    • Select the Scan option.
      Open your preferred antivirus software.
Select the Scan option.
    • Choose a Full Scan to thoroughly search for any malware or viruses.
    • Follow the on-screen instructions to complete the scan.
    • If any threats are detected, follow the recommended actions to remove them.
  • Clean your computer:

    • Disconnect the power cord from your computer.
    • Use a soft, lint-free cloth to gently wipe the exterior of the computer.
      Disconnect the power cord from your computer.
Use a soft, lint-free cloth to gently wipe the exterior of the computer.
    • Remove any dust or debris from the vents using compressed air.
    • Open your computer’s case and carefully clean the internal components using a can of compressed air.
    • Ensure all connections are secure.
    • Close the computer case and reconnect the power cord.
      Ensure all connections are secure.
Close the computer case and reconnect the power cord.
  • Manage startup programs:

    • Press Ctrl+Shift+Esc to open the Task Manager.
    • Go to the Startup tab.
      Press Ctrl+Shift+Esc to open the Task Manager.
Go to the Startup tab.
    • Disable any unnecessary programs from starting up with your computer.

Frequently Asked Questions about Computer Restarts

Question Answer
Why does my computer keep restarting? There can be various reasons for frequent computer restarts, such as hardware issues, overheating, software conflicts, driver problems, or malware infections.
How can I determine if my computer is overheating? You can monitor the temperatures using software tools like HWMonitor or SpeedFan. If the CPU or GPU temperatures are consistently high, it may indicate overheating as a potential cause of restarts.
What should I do if my computer restarts randomly? First, ensure that your computer is free from malware and viruses. Then, check for any recently installed software or updates that may be causing conflicts. Additionally, make sure your hardware components are properly connected and not failing.
How can I fix driver-related restart issues? Try updating your drivers to the latest versions. If the problem persists, you can try rolling back the driver to a previous version or performing a clean installation. It’s also helpful to check for any driver conflicts or incompatible software.
Is it necessary to restart my computer after installing updates? Yes, restarting your computer after installing updates is often necessary for the changes to take effect. It helps to ensure that all the updated components are properly initialized and functioning.
Can a faulty power supply cause frequent restarts? Yes, a faulty power supply can cause unexpected restarts. If your computer restarts during high-demand tasks or randomly, it’s worth checking the power supply unit (PSU) for any issues.
How do I prevent automatic restarts after Windows updates? In Windows 10, go to the “Settings” menu, select “Update & Security,” then click on “Windows Update” and choose “Advanced options.” Under “Advanced options,” click on “Restart options” and disable the “Restart this device as soon as possible when a restart is required to install an update” option.
Example Message
?

If you are experiencing frequent PC restart problems, it is recommended to check for any software updates or conflicts, run a thorough virus scan, and consider consulting a professional for further assistance. Download this tool to run a scan

Troubleshooting YouTube Videos Not Working on Chrome

Unlocking the Mystery: Unveiling the Secrets Behind YouTube Videos Refusing to Play on Chrome

Important
Fortect can address issues with freezing or slow YouTube videos on Chrome by repairing damaged system files and settings.

Download Now

Enable JavaScript and Configure Chrome Settings

1. Open Chrome and click on the three dots in the top right corner.
2. Select “Settings” from the drop-down menu.
3. Scroll down and click on “Advanced” to expand the advanced settings.
4. Under the “Privacy and security” section, click on “Site settings.”
5. Scroll down and click on “JavaScript.”
6. Make sure the toggle switch next to “Allowed” is turned on.
7. Clear your browser cache by clicking on “Privacy and security” in the left sidebar, then selecting “Clear browsing data.”
8. Choose the time range and check the box next to “Cached images and files,” then click “Clear data.”
9. Update Chrome to the latest version by clicking on “About Chrome” in the left sidebar.
10. If you’re still experiencing issues, try disabling hardware acceleration by going back to “Settings,” then click on “Advanced” and scroll down to the “System” section.
11. Toggle off the option that says “Use hardware acceleration when available.”
12. Restart Chrome and try playing YouTube videos again.

If these steps don’t resolve the problem, it may be related to network issues or other factors.

Clear YouTube and Browser Data

Clearing YouTube and browser data can help resolve issues with YouTube videos not working on Chrome.

Method 1: Clear your browser cache and cookies.
1. Select Chrome and click “Settings.”
2. Scroll down and click “Advanced.”
3. Under “Privacy and security,” click “Clear browsing data.”
4. Check the boxes for “Cookies and other site data” and “Cached images and files.”
5. Click “Clear data.”

Method 2: Update your Chrome browser to the latest version.
1. Select Chrome and click “Settings.”
2. Scroll down and click “About Chrome.”
3. Chrome will check for updates and install them if available.

If these methods don’t solve the issue, there may be other factors causing the problem, such as network issues or incompatible video formats. Consider reaching out to the YouTube community or consulting online resources for further assistance.

Update Chrome Browser

Update Chrome to ensure optimal video playback on YouTube. Here’s how:

1. Open Google Chrome.
2. Click the three-dot menu in the top-right corner.
3. Go to “Help” and select “About Google Chrome.”
4. Chrome will automatically check for updates and install them if available.
5. Once the update is complete, relaunch Chrome.

If you’re still experiencing issues, try these additional steps:

1. Quit Chrome and reopen it.
2. Check the Task Manager to ensure no background processes are interfering with video playback.
3. Clear your browser cache and cookies.
4. Disable any extensions that may be causing conflicts.
5. Make sure your internet connection is stable.

By updating Chrome and following these steps, most users can resolve video playback problems on YouTube. If you continue to experience issues, consider using a different browser like Firefox or downloading the YouTube app for a more stable experience.

Disable Third-Party Extensions and Hardware Acceleration

To troubleshoot YouTube videos not working on Chrome, you can try disabling third-party extensions and hardware acceleration. These can sometimes interfere with video playback.

To disable third-party extensions, follow these steps:

1. Open Chrome and click on the three-dot menu in the top right corner.
2. Go to “More tools” and select “Extensions.”
3. In the Extensions tab, toggle off any extensions that you suspect may be causing the issue.

To disable hardware acceleration, follow these steps:

1. Open Chrome and click on the three-dot menu in the top right corner.
2. Go to “Settings” and click on “Advanced” at the bottom of the page.
3. Under the “System” section, toggle off “Use hardware acceleration when available.”

Updated: September 2023

Fortect can address certain issues related to YouTube videos not working on Chrome. If the problem is caused by damaged system files or faulty settings, Fortect can repair them.

It can also help if the computer freezes while playing videos, by addressing the causes of slowdowns or freezing programs. However, if the issue is not related to these specific aspects, Fortect may not be able to fix it.

Use Another Browser as a Temporary Solution

If you’re having trouble watching YouTube videos on Chrome, using another browser as a temporary solution can help. Quit Chrome and open the Task Manager to ensure no background processes are causing the issue. There can be various causes for this problem, but there are several solutions you can try. One method is to use another browser like Firefox.
Many users have found this helpful in resolving video playback problems. Don’t worry, you don’t need to switch browsers permanently. This is just a temporary solution to get your videos playing again.

Repair Corrupt Videos with Video Repair Tool

If you’re experiencing issues with YouTube videos not working on Chrome, one possible reason could be corrupt video files. To resolve this, you can use the Video Repair Tool.

Here’s how to repair corrupt videos using the tool:

1. Download and install the Video Repair Tool from a trusted source.
2. Launch the tool and select the corrupt video file you want to repair.
3. Click on the “Repair” button to start the repair process.
4. Wait for the tool to analyze and fix any issues with the video.
5. Once the repair is complete, try playing the video again on YouTube.

Close Chrome Using Task Manager and Clear Cache

If you’re experiencing issues with YouTube videos not working on Chrome, you can try closing Chrome using Task Manager and clearing the cache to resolve the problem.

First, open Task Manager by pressing Ctrl + Shift + Esc. In the Processes or Details tab, find and select “Chrome” from the list. Then, click on the “End Task” button to close Chrome completely.

Next, clear the cache by following these steps:

1. Open Chrome and click on the three-dot menu in the top right corner.
2. Go to “More tools” and select “Clear browsing data”.
3. Choose the time range and make sure “Cached images and files” is selected.
4. Click on the “Clear data” button.

After completing these steps, reopen Chrome and try playing YouTube videos again. This should help resolve any issues caused by cached data.

Uninstall and Reinstall Chrome

If YouTube videos are not working on Chrome, a possible solution is to uninstall and reinstall the browser. This can help resolve issues caused by corrupt files or incompatible extensions.

To uninstall Chrome, follow these steps:

1. Close all Chrome windows.
2. Press the Windows key + R to open the Run dialog box.
3. Type “appwiz.cpl” and press Enter to open the Programs and Features window.
4. Find Google Chrome in the list of installed programs, right-click on it, and select Uninstall.
5. Follow the on-screen instructions to complete the uninstallation process.

Once Chrome is uninstalled, you can reinstall it by downloading the latest version from the official Google Chrome website.

Remember to restart your device after reinstalling Chrome. This should help resolve any issues and allow YouTube videos to play properly.

If the problem persists, you may need to further troubleshoot your internet connection or check for any conflicting extensions that could be causing the issue.

Prevent and Troubleshoot YouTube Video Playback Issues on Chrome

  • Open Chrome browser.
  • Click on the three dots at the top right corner to open the menu.
    Open Chrome browser.
Click on the three dots at the top right corner to open the menu.
  • Select “More tools” and then “Clear browsing data”.
  • Choose the time range (e.g. “All time”) and make sure “Cached images and files” and “Cookies and other site data” are selected.
  • Click on “Clear data” to remove the cache and cookies.

Disable Browser Extensions

  • Open Chrome browser.
  • Click on the three dots at the top right corner to open the menu.
    Open Chrome browser.
Click on the three dots at the top right corner to open the menu.
  • Select “More tools” and then “Extensions”.
  • Toggle off the switch next to each extension to disable them temporarily.
  • Restart the browser and try playing a YouTube video.

Update Chrome Browser

  • Open Chrome browser.
  • Click on the three dots at the top right corner to open the menu.
    Open Chrome browser.
Click on the three dots at the top right corner to open the menu.
  • Select “Help” and then “About Google Chrome”.
  • Chrome will automatically check for updates and install them if available.
  • Restart the browser once the update is complete.

Disable Hardware Acceleration

  • Open Chrome browser.
  • Click on the three dots at the top right corner to open the menu.
    Open Chrome browser.
Click on the three dots at the top right corner to open the menu.
  • Select “Settings”.
  • Scroll down and click on “Advanced” to expand the advanced settings.
  • Under the “System” section, toggle off the switch next to “Use hardware acceleration when available”.
  • Restart the browser for the changes to take effect.
    Under the "System" section, toggle off the switch next to "Use hardware acceleration when available".
Restart the browser for the changes to take effect.

Reset Chrome Settings

  • Open Chrome browser.
  • Click on the three dots at the top right corner to open the menu.
    Open Chrome browser.
Click on the three dots at the top right corner to open the menu.
  • Select “Settings”.
  • Scroll down and click on “Advanced” to expand the advanced settings.
  • Scroll down to the “Reset and clean up” section and click on “Restore settings to their original defaults”.
  • Click on “Reset settings” in the confirmation pop-up.
    Scroll down to the "Reset and clean up" section and click on "Restore settings to their original defaults".
Click on "Reset settings" in the confirmation pop-up.
Example Message
?

If you are experiencing issues with YouTube videos not playing on Chrome, try clearing your browser cache and disabling any extensions that may be interfering with the playback. Download this tool to run a scan

Fix Application Start Error 0xc00007b

Unlocking the gateway to seamless application launches, this article delves into the perplexing error 0xc00007b and unveils the key to fixing it.

Important
Fortect can help address the “this application was unable to start correctly 0xc00007b” error by repairing damaged system files and faulty settings.

Download Now

Update your Windows 7 operating system: Ensure that all the latest updates and patches are installed on your Windows 7 computer. This can help resolve any compatibility issues and fix the error 0xc00007b.

Reboot your computer

To fix the application start error 0xc00007b, try rebooting your computer. First, close any open applications. Then, click on the Start menu and select Restart. Once your computer restarts, try launching the application again to see if the error persists. If the error continues, you may need to try other methods to fix it.
One method is to check if the application is compatible with your operating system. Right-click on the application’s icon and select Properties. Go to the Compatibility tab and check the box that says “Run this program in compatibility mode for” and select an older version of Windows, such as Windows 7. Another method is to reinstall the . NET framework or update it to the latest version.
You can download the . NET framework from Microsoft’s website. Additionally, you can try running the application as an administrator. Right-click on the application’s icon and select Run as administrator. If none of these methods work, you can use dependency walker to check for any missing or incorrect files.
Download the x86 version of dependency walker and open the application. Select File, then Open and browse to the location of the application’s . exe file. The dependency walker will show any missing or incorrect files. Make sure to fix any errors it detects.
If you’re still experiencing the error, it may be helpful to consult online forums or contact Microsoft support for further assistance.

Run your application as administrator

To fix the 0xc00007b application start error, you can try running your application as an administrator. To do this, follow these steps:

1. Locate the application’s .exe file.
2. Right-click on the file and select “Properties.”
3. In the properties window, go to the “Compatibility” tab.
4. Check the box that says “Run this program as an administrator.”
5. Click “Apply” and then “OK.”

By running the application as an administrator, you may be able to resolve the 0xc00007b error and start your application correctly.

Reinstall your application

To fix the application start error 0xc00007b, follow these steps:

1. Check Compatibility Mode: Right-click on the application’s icon, select Properties, go to the Compatibility tab, and uncheck the “Run this program in compatibility mode” option.

2. Reinstall Microsoft Visual C++ Redistributable: Download and install the latest versions of the Microsoft Visual C++ Redistributable packages for both x86 and x64 versions.

3. Fix Dependency Issues: Use Dependency Walker to identify any missing libraries. Download the x64 bit version if you’re running a 64-bit system.

4. Repair or Reinstall the Application: If the above steps don’t work, try repairing or reinstalling the application. Uninstall it completely, then download and install the latest version from the official website.

5. Check System Files: Open Command Prompt as an administrator and type “chkdsk c: /f” to scan and fix any issues with your system files.

Reinstall Microsoft .NET framework

To fix the application start error 0xc00007b, you can try reinstalling the Microsoft .NET framework. Here’s how:

1. Go to the Microsoft website and download the latest version of the .NET framework.
2. Once the download is complete, locate the downloaded file and double-click to run the installer.
3. Follow the on-screen instructions to install the .NET framework.
4. After the installation is complete, restart your computer.
5. Try launching the application again to see if the error is resolved.

If reinstalling the .NET framework doesn’t fix the error, you may need to explore other troubleshooting steps or seek further assistance.

Updated: September 2023

Fortect is a powerful solution for addressing various issues on Windows 7. If you’re encountering the “This application was unable to start correctly 0xc00007b” error, Fortect can help. It repairs damaged system files and faulty settings that may be causing the error message.

Additionally, Fortect can fix missing or corrupt DLL files, address freezing programs, and even repair causes of the Blue Screen of Death. Consider using Fortect to restore your system’s functionality without losing any important data.

Reinstall Microsoft Visual C++ Redistributable Packages

To fix the application start error 0xc00007b, you can try reinstalling the Microsoft Visual C++ Redistributable Packages. Here’s how:

1. Navigate to the Microsoft website and download the latest version of the Visual C++ Redistributable Packages for your operating system.

2. Locate the downloaded file and double-click to run the installer.

3. Follow the on-screen instructions to complete the installation. Make sure to choose the correct architecture (x86 or x64) for your system.

4. Once the installation is complete, restart your computer.

This should fix the 0xc00007b error and allow your applications to start correctly. If the issue persists, you may need to troubleshoot further or seek additional support from Microsoft.

Update your Windows

To fix the application start error 0xc00007b on Windows, follow these steps:

1. Update Windows: Go to Settings > Update & Security > Windows Update and click on “Check for updates” to make sure you have the latest updates installed.

2. Install missing libraries: If the error occurs because of missing libraries, download and install the necessary libraries from the official Microsoft website.

3. Run as administrator: Right-click on the application’s shortcut or .exe file, select “Properties,” go to the “Compatibility” tab, and check the box that says “Run this program as an administrator.”

4. Check for compatibility issues: Use the Dependency Walker tool to identify any compatibility issues with the application. Download the x64 bit version if you’re using a 64-bit Windows.

5. Reinstall the application: If nothing else works, uninstall and reinstall the application to ensure a fresh installation.

Run check disk

To fix the 0xc00007b application start error, you can try running a check disk on your system. Here’s how:

1. Press the Windows key + R to open the Run dialog box.
2. Type chkdsk c: and press Enter.
3. This will initiate a check disk scan on your C drive. It will identify and fix any errors it finds.
4. Once the scan is complete, restart your computer and check if the error persists.

Running a check disk can help resolve issues with your system’s files and potentially fix the 0xc00007b error.

Switch to ChromeOS

To switch to ChromeOS, follow these steps:

1. Navigate to the official ChromeOS website.
2. Download the latest version of ChromeOS for your device.
3. Once downloaded, proceed with the installation process.
4. Follow the on-screen instructions to complete the installation.
5. After the installation is complete, restart your device.
6. Enjoy the seamless experience of ChromeOS.

Remember to back up your important files before making any changes to your operating system.

For more detailed instructions and troubleshooting, refer to the official ChromeOS user guide.

Upgrade your software to the latest version to avoid any compatibility issues.

Restart your computer

To restart your computer, follow these steps:

1. Close all open programs and save your work.
2. Click on the Start button in the bottom left corner of your screen.
3. Select the Power icon and choose Restart.
4. Wait for your computer to shut down and restart.

If you continue to experience the 0xc00007b error after restarting, try the following fixes:

1. Update your software: Make sure you have the latest version of the application causing the error. Check for updates on the developer’s website or through the application itself.

2. Check for compatibility issues: Some programs may not be compatible with your operating system. Try running the program in compatibility mode by right-clicking on the application’s icon, selecting Properties, and choosing the Compatibility tab. Enable compatibility mode and select the appropriate operating system.

3. Repair or reinstall the application: If the error persists, try repairing or reinstalling the application. Go to the Control Panel, select Programs, and then choose the application causing the error. Click on Repair or Uninstall/Change and follow the on-screen instructions.

Update .NET Framework

To fix the application start error 0xc00007b, you need to update the .NET Framework. Follow these steps:

1. Open the Start menu and search for “Programs and Features.”
2. Open “Programs and Features” and look for the .NET Framework in the list.
3. Right-click on the .NET Framework and select “Uninstall.”
4. Download the latest version of the .NET Framework from the official Microsoft website.
5. Install the downloaded file by double-clicking on it and following the on-screen instructions.
6. After the installation is complete, restart your computer.

This should fix the 0xc00007b error and allow your application to start correctly. If the error persists, you may need to seek further assistance or try other fixes.

Example Message
?

If you are encountering the error message “This application was unable to start correctly (0xc00007b)” on Windows 7, you may need to reinstall the application or update your system’s software to resolve the issue. Download this tool to run a scan

Fix for Can’t Install/Enable .NET Framework 3.5 on Windows 10

Unleashing the Power of .NET: Overcoming Windows 10’s Framework 3.5 Installation Hurdles

Important
Fortect can address issues with net framework 35 installation by repairing damaged system files and faulty settings.

Download Now

Check system requirements: Ensure that your computer meets the minimum system requirements for installing .NET Framework 3.5. This includes having the correct version of Windows and sufficient disk space.

Resolving Error Codes when Installing .NET Framework 3.5

If you’re experiencing error codes when installing . NET Framework 3. 5 on Windows 10, there are a few steps you can take to resolve the issue. First, make sure you have an active internet connection. Then, try using the DISM tool to repair any installation errors. You can also try changing the Group Policy settings or modifying the registry.
If these methods don’t work, you can try installing . NET Framework 3. 5 from an alternate source or using the Windows Update feature. If you’re still having trouble, it may be best to contact your system administrator for further assistance.

The .NET Framework 3.5 installation error is often a result of missing or corrupt system files.

Methods for Installing .NET Framework 3.5 on Windows Server

  1. Press the Windows key and search for “Control Panel”.
  2. Click on “Programs” or “Programs and Features”.
    Press the Windows key and search for "Control Panel".
Click on "Programs" or "Programs and Features".
  3. Click on “Turn Windows features on or off”.
  4. Check the box next to “.NET Framework 3.5 (includes .NET 2.0 and 3.0)”.
  5. Click “OK” to start the installation process.
  6. Follow the on-screen instructions to complete the installation.
    Click "OK" to start the installation process.
Follow the on-screen instructions to complete the installation.

Method 2: Using Command Prompt

  1. Press the Windows key and search for “Command Prompt”.
  2. Right-click on “Command Prompt” and select “Run as administrator”.
  3. In the command prompt window, type the following command and press Enter: dism /online /enable-feature /featurename:NetFX3 /all /source:<path_to_windows_installation_files> /LimitAccess
  4. Replace <path_to_windows_installation_files> with the path to the Windows installation files, such as a mounted ISO or a network share.
  5. Wait for the command to execute and complete the installation process.

Method 3: Using Group Policy Editor

  1. Press the Windows key and search for “Group Policy Editor”.
  2. Click on “Edit group policy” to open the Group Policy Editor.
  3. Navigate to “Computer Configuration” > “Administrative Templates” > “System”.
  4. Double-click on “Specify settings for optional component installation and component repair”.
    Navigate to "Computer Configuration" > "Administrative Templates" > "System".
Double-click on "Specify settings for optional component installation and component repair".
  5. Select the “Enabled” option.
  6. Check the box next to “Download repair content and optional features directly from Windows Update instead of Windows Server Update Services (WSUS)”.
    Select the "Enabled" option.
Check the box next to "Download repair content and optional features directly from Windows Update instead of Windows Server Update Services (WSUS)".
  7. Click “OK” to save the changes.
  8. Press the Windows key and search for “Command Prompt”.
  9. Right-click on “Command Prompt” and select “Run as administrator”.
  10. In the command prompt window, type the following command and press Enter: gpupdate /force
    Right-click on "Command Prompt" and select "Run as administrator".
In the command prompt window, type the following command and press Enter: gpupdate /force
  11. Wait for the command to execute and update the Group Policy settings.
  12. Restart your computer.
Updated: September 2023

If you’re experiencing issues with installing .NET Framework 3.5, Fortect may be able to help. It can repair damaged system files and faulty settings that may be causing the installation problem.

Additionally, if any DLL files required for the installation have gone missing or become corrupt, Fortect can automatically fix the issue. While we cannot guarantee that Fortect will solve every installation issue, it can address common causes and restore your system to a healthier state.

Troubleshooting Installation Errors for .NET Framework 3.5

If you’re experiencing installation errors while trying to install or enable .NET Framework 3.5 on Windows 10, here are some steps you can take to fix the issue:

1. Check your internet connection: Make sure you have a stable internet connection, as the installation requires downloading files from the Microsoft website.

2. Use the default installation method: The easiest way to install .NET Framework 3.5 is through the default method. Open the Control Panel, go to “Programs” and then “Turn Windows features on or off”. Check the box for “.NET Framework 3.5 (includes .NET 2.0 and 3.0)” and click “OK”.

3. Try DISM command: Open Command Prompt as an administrator and enter the following command: dism /online /enable-feature /featurename:NetFx3 /all /source:<path-to-alternate-source>. Replace “<path-to-alternate-source>” with the path to the alternate source, such as the installation media or a network share.

4. Use optionalfeatures.exe: Press “Win + R” to open the Run dialog box, enter “optionalfeatures.exe” and click “OK”. In the Windows Features dialog box, check the box for “.NET Framework 3.5 (includes .NET 2.0 and 3.0)” and click “OK”.

5. Apply Windows updates: Make sure your Windows 10 is up to date by installing the latest cumulative updates and any available KB updates related to .NET Framework.

If you’re still encountering errors, it may be best to consult with your system administrator or contact Microsoft support for further assistance.

One common reason for the inability to install .NET Framework 3.5 is the absence of an active internet connection.

Enabling and Installing .NET Framework 3.5 on Windows 10

To enable and install .NET Framework 3.5 on Windows 10, follow these steps:

1. Press the Windows key and type “Control Panel” to open it.
2. In the Control Panel, click on “Programs” and then “Turn Windows features on or off.”
3. Check the box next to “.NET Framework 3.5 (includes .NET 2.0 and 3.0)” and click “OK.”
4. If prompted, insert your Windows installation media or specify a network location.
5. Wait for the installation to complete.
6. Restart your computer.

If you encounter the error codes 0x800F0906, 0x800F081F, or 0x800F0907, try the following resolutions:

1. Make sure your computer is connected to the internet.
2. If you have a DAKTRONICS or other third-party software installed, contact their support for assistance.
3. If you’re using a Windows Home edition, try changing the Group Policy setting.
4. Modify the registry to point to a Windows update source.
5. Use the Deployment Image Servicing and Management (DISM) tool.

For more detailed instructions, you can refer to the Microsoft website or consult the Windows support team.

Additional Solutions and Information for Installing .NET Framework 3.5

Issue Solution
Error: 0x800F081F – The source files could not be found.
  1. Ensure you have an active internet connection.
  2. Open Command Prompt as Administrator.
    Ensure you have an active internet connection.
Open Command Prompt as Administrator.
  3. Run the following command:
    dism /online /enable-feature /featurename:NetFx3 /source:<drive>:\sources\sxs /limitaccess
    (Replace <drive> with the drive letter of your Windows installation media)
  4. Restart your computer.
Error: 0x800F0906 – The source files could not be downloaded.
  1. Ensure you have an active internet connection.
  2. Open Command Prompt as Administrator.
    Ensure you have an active internet connection.
Open Command Prompt as Administrator.
  3. Run the following command:
    dism /online /enable-feature /featurename:NetFx3 /all /limitaccess /source:C:\Windows\WinSxS
  4. Restart your computer.
Using Windows Update to install .NET Framework 3.5 fails.
  1. Open Control Panel and go to “Programs and Features”.
  2. Click on “Turn Windows features on or off”.
    Open Control Panel and go to "Programs and Features".
Click on "Turn Windows features on or off".
  3. Check the box next to “.NET Framework 3.5 (includes .NET 2.0 and 3.0)”.
  4. Click “OK” and follow the on-screen instructions.
  5. Restart your computer.
Using DISM to install .NET Framework 3.5 fails.
  1. Open Command Prompt as Administrator.
  2. Run the following command:
    dism /online /cleanup-image /restorehealth
  3. Wait for the process to complete.
    Open Command Prompt as Administrator.
Wait for the process to complete.
  4. Run the following command:
    dism /online /enable-feature /featurename:NetFx3 /all /limitaccess /source:C:\Windows\WinSxS
  5. Restart your computer.
Group Policy is preventing installation of .NET Framework 3.5.
  1. Open Local Group Policy Editor by typing “gpedit.msc” in the Run dialog (Win + R).
  2. Navigate to “Computer Configuration” > “Administrative Templates” > “System”.
    Open Local Group Policy Editor by typing "gpedit.msc" in the Run dialog (Win + R).
Navigate to "Computer Configuration" > "Administrative Templates" > "System".
  3. Double-click on “Specify settings for optional component installation and component repair”.
  4. Select “Enabled” and check the box next to “Contact Windows Update directly to download repair content instead of Windows Server Update Services (WSUS)”.
  5. Click “Apply” and “OK”.
  6. Restart your computer.
    Click "Apply" and "OK".
Restart your computer.
Example Message
?

If you are experiencing difficulties in installing the .NET Framework 3.5, make sure to check your system requirements and consider contacting technical support for assistance. Download this tool to run a scan

Computer Keeps Checking Disk on Startup (Fix and Disable Chkdsk)

Unveiling the Frustrating Conundrum: The Perpetual Disk Checking Dilemma

Important
Fortect can address the causes of a computer keeps checking disk on startup, such as damaged system files or missing DLLs.

Download Now

Understanding chkdsk.exe and its purpose

1. Press the Windows key + R to open the Run dialog box.
2. Type “regedit” and press Enter to open the Registry Editor.
3. Navigate to the following key: HKEY_LOCAL_MACHINE\SYSTEM\CurrentControlSet\Control\Session Manager
4. Double-click the “BootExecute” value on the right-hand side.
5. Remove any entry containing “autocheck autochk *”.
6. Click OK and restart your computer.
Disabling chkdsk should only be done if you are confident that your hard drive is healthy and there are no underlying issues causing the disk check.

Reasons for disk check on startup

If your computer keeps checking the disk on startup, there are a few reasons that could be causing this issue. One possible cause is a corrupt file system that needs to be repaired. To fix this, you can use the chkdsk command in Command Prompt.

Here’s how you can do it:

1. Press the Windows key + R to open the Run dialog box.
2. Type “cmd” and press Enter to open Command Prompt.
3. In Command Prompt, type “chkdsk /f” and press Enter.
4. You may be prompted to schedule the disk check for the next restart. Press Y and Enter to confirm.
5. Restart your computer and let the disk check run.

This should help resolve any file system issues and stop the disk check from running on every startup.

Methods to cancel or stop disk check during startup

If you need to cancel or stop the disk check during startup, follow these steps:

1. Press the Windows key + R to open the Run dialog box.
2. Type “regedit” and press Enter to open the Registry Editor.
3. Navigate to the following location: HKEY_LOCAL_MACHINE\SYSTEM\CurrentControlSet\Control\Session Manager
4. Double-click on the BootExecute key on the right-hand side.
5. Remove the value data that contains “autocheck autochk * /r\DosDevice\C:”.
6. Click OK to save the changes.
7. Restart your computer.

Note: Skipping the disk check may cause potential issues with your hard drive. Use this method at your own risk and only if you are confident that your hard drive is not experiencing any problems.

For more information, visit our support page on how to fix and disable chkdsk.

Updated: September 2023

If your computer keeps checking disk on startup, Fortect may be able to help address the issue. Fortect can repair damaged system files and faulty settings that cause normal tasks to stop working or result in confusing error messages.

It can also address the causes of annoying slowdowns or freezing programs, whether they’re due to a damaged registry, missing files, or excessive junk. Additionally, Fortect can automatically fix missing or corrupt DLL files, as well as repair the causes of Blue Screen of Death (BSoD) errors.

Alternative ways to perform disk check on Windows 10

  1. Open the Command Prompt as an administrator by pressing Win + X and selecting Command Prompt (Admin).
  2. Type chkntfs /x C: and press Enter to exclude the C: drive from being checked at startup.
    Open the Command Prompt as an administrator by pressing Win + X and selecting Command Prompt (Admin).
Type chkntfs /x C: and press Enter to exclude the C: drive from being checked at startup.
  3. If you have multiple drives, repeat step 2 for each drive by changing the drive letter.
  4. Restart your computer and check if the disk check on startup issue is resolved.

Method 2: Modify Registry Settings

  1. Open the Registry Editor by pressing Win + R, typing regedit, and pressing Enter.
  2. Navigate to the following key: HKEY_LOCAL_MACHINE\SYSTEM\CurrentControlSet\Control\Session Manager.
    Open the Registry Editor by pressing Win + R, typing regedit, and pressing Enter.
Navigate to the following key: HKEY_LOCAL_MACHINE\SYSTEM\CurrentControlSet\Control\Session Manager.
  3. On the right pane, double-click on the BootExecute value.
  4. In the value data field, remove autocheck autochk * and replace it with autocheck autochk /k:C *.
  5. Click OK and close the Registry Editor.
  6. Restart your computer and check if the disk check on startup issue is resolved.
    Click OK and close the Registry Editor.
Restart your computer and check if the disk check on startup issue is resolved.

Method 3: Use Check Disk Utility

  1. Press Win + X and select Command Prompt (Admin) to open an elevated Command Prompt.
  2. Type chkdsk /f C: and press Enter to schedule a disk check for the C: drive.
    Press Win + X and select Command Prompt (Admin) to open an elevated Command Prompt.
Type chkdsk /f C: and press Enter to schedule a disk check for the C: drive.
  3. Follow the on-screen instructions and restart your computer.
  4. Wait for the disk check to complete and check if the issue is resolved.

Method 4: Disable Automatic Disk Check

  1. Open the Command Prompt as an administrator.
  2. Type chkntfs /x C: and press Enter to exclude the C: drive from being checked at startup.
  3. If you have multiple drives, repeat step 2 for each drive by changing the drive letter.
  4. Type fsutil dirty query C: and press Enter to check if the C: drive is marked as dirty.
    If you have multiple drives, repeat step 2 for each drive by changing the drive letter.
Type fsutil dirty query C: and press Enter to check if the C: drive is marked as dirty.
  5. If the drive is marked as dirty, type chkdsk /f C: and press Enter to schedule a disk check for the C: drive.
  6. Restart your computer and check if the disk check on startup issue is resolved.
    If the drive is marked as dirty, type chkdsk /f C: and press Enter to schedule a disk check for the C: drive.
Restart your computer and check if the disk check on startup issue is resolved.

Running CHKDSK on startup using different methods

  1. Open the Start menu and type Command Prompt in the search bar.
  2. Right-click on the Command Prompt application and select Run as administrator.
    Open the Start menu and type Command Prompt in the search bar.
Right-click on the Command Prompt application and select Run as administrator.
  3. In the Command Prompt window, type chkdsk C: /f /r and press Enter.
  4. If prompted to schedule a disk check on the next restart, type Y and press Enter.
  5. Restart your computer and wait for the CHKDSK scan to complete.

Method 2: Running CHKDSK using Windows Explorer

  1. Open Windows Explorer by pressing Win + E on your keyboard.
  2. Right-click on the C: drive (or the drive you want to check) and select Properties.
    Open Windows Explorer by pressing Win + E on your keyboard.
Right-click on the C: drive (or the drive you want to check) and select Properties.
  3. In the properties window, go to the Tools tab.
  4. Under the Error-checking section, click on Check next to “Check disk for errors.”
  5. If prompted to schedule a disk check on the next restart, click on Scan drive.
  6. Restart your computer and wait for the CHKDSK scan to complete.
    If prompted to schedule a disk check on the next restart, click on Scan drive.
Restart your computer and wait for the CHKDSK scan to complete.

Method 3: Disabling CHKDSK on Startup

  1. Open the Start menu and type Command Prompt in the search bar.
  2. Right-click on the Command Prompt application and select Run as administrator.
    Open the Start menu and type Command Prompt in the search bar.
Right-click on the Command Prompt application and select Run as administrator.
  3. In the Command Prompt window, type chkntfs /x C: (replace “C:” with the drive letter you want to disable CHKDSK for) and press Enter.
  4. Restart your computer to apply the changes. CHKDSK will no longer run on startup for the specified drive.

Stopping CHKDSK on startup through various solutions

If your computer keeps running CHKDSK on startup and you want to fix or disable it, there are various solutions available. One option is to use the command prompt. Press the Windows key + R, type “cmd” and press Enter. Then, type “chkntfs /x C:
” and hit Enter
. Another solution is to edit the registry. Press the Windows key + R, type “regedit” and press Enter. Navigate to “HKEY_LOCAL_MACHINE\SYSTEM\CurrentControlSet\Control\Session Manager” and find the “BootExecute” value.
Double-click it and remove “autocheck autochk /p \? ? \C: ” from the list.
Click OK and restart your computer.

Recovering lost or deleted files on Windows 10 PC or laptop

If your computer keeps checking the disk on startup, you can fix and disable the chkdsk utility on your Windows 10 PC or laptop. To fix this issue, you can run the chkdsk command and repair any file system issues on your hard disk. To disable the chkdsk utility, you can skip the disk check by pressing any key during the checking process. This will allow your computer to start up without the disk scanning.

Example Message
?

If your computer keeps checking the disk on startup, it is recommended to run a disk scan or check for any errors to ensure the integrity of your system. Download this tool to run a scan

Reset WiFi Card in Windows

Unleash the untapped potential of your Windows WiFi card with a simple reset technique that will have your internet connection running at full speed once again. Say goodbye to sluggish browsing and hello to seamless online experiences in just a few easy steps. Discover how to reset your WiFi card in Windows and unlock a world of lightning-fast connectivity like never before.

Important
Fortect can help address issues with a reset wifi card by repairing damaged system files and faulty settings.

Download Now

Restart your router: Sometimes, the issue may not be with your Wi-Fi card directly but rather with the router. Simply power off your router, wait for a few seconds, and then turn it back on. This can often resolve connectivity issues.

Fi adapter

To reset your Wi-Fi card in Windows 10, follow these troubleshooting steps:

1. Open the Start menu and search for “Device Manager,” then click on the top result.
2. In Device Manager, expand the “Network adapters” category.
3. Right-click on your wireless adapter and select “Uninstall device.”
4. In the confirmation window, check the box that says “Delete the driver software for this device” and click “Uninstall.”
5. Once the adapter is uninstalled, restart your computer.
6. After the restart, Windows will automatically reinstall the Wi-Fi drivers.
7. If you’re still experiencing network problems, you can try resetting the TCP/IP stack. Open the Start menu and search for “Command Prompt,” then right-click on the top result and select “Run as administrator.”
8. In the Command Prompt, type the following command and press Enter: netsh int ip reset
9. Restart your computer again and check if the Wi-Fi connection problem is resolved.

Sometimes all you need is a reset to refresh your WiFi connection and get back in the game.

Fi adapter

To reset your Wi-Fi card in Windows 10, follow these steps:

1. Open the Start Menu and click on “Settings”.
2. In the Settings window, click on “Network & Internet”.
3. On the left-hand side, click on “Wi-Fi” to access the Wi-Fi settings.
4. Scroll down and click on “Network and Sharing Center”.
5. In the Network and Sharing Center, click on “Change adapter options”.
6. Right-click on your wireless adapter icon and select “Disable”.
7. After a few seconds, right-click on the same adapter icon again and select “Enable”.
8. This will reset your Wi-Fi card and may fix any network issues you were experiencing.

If you continue to have trouble with your Wi-Fi network, you may want to try updating your Wi-Fi drivers or contacting your internet service provider for further assistance.

Resetting the WiFi card is like hitting the refresh button on your internet connection, allowing you to start anew.

Fi adapters in Windows

If you’re experiencing Wi-Fi connection problems, resetting your Wi-Fi adapter in Windows can be a helpful troubleshooting step. To do this, follow these steps:

1. Press the Windows key + X on your keyboard and select “Device Manager”.

2. Expand the “Network adapters” category.

3. Right-click on your Wi-Fi adapter and select “Disable device”. Confirm the action.

4. Right-click on the Wi-Fi adapter again and select “Enable device”.

5. Restart your PC to apply the changes.

This will reset your Wi-Fi adapter and can often resolve network issues. If you’re still having trouble, consider checking your router settings or running the Network troubleshooter for further assistance.

Updated: September 2023

Fortect is a powerful software that addresses various issues with Windows systems. While we cannot guarantee that it can fix every problem, it may be able to help with certain aspects of a reset wifi card error.

For example, if the issue is caused by damaged system files or faulty settings, Fortect can repair them, potentially resolving the problem. Additionally, if the error is related to missing or corrupt DLL files, Fortect can automatically fix this issue as well.

python
import subprocess

def reset_wifi_card():
# Command to reset Wi-Fi card on Linux (may vary for different OS)
command = "sudo ifconfig wlan0 down && sudo ifconfig wlan0 up"

try:
# Execute the command
subprocess.call(command, shell=True)
print("Wi-Fi card reset successfully.")
except Exception as e:
print("Failed to reset Wi-Fi card:", str(e))

# Call the function to reset the Wi-Fi card
reset_wifi_card()

Please note that the example above assumes a Linux-based operating system and uses the `wlan0` interface as an example. You will need to modify the command based on your specific requirements and the operating system you are using.

Fi adapter

To reset your Wi-Fi card in Windows, follow these steps:

1. Open the Start menu and type “Network Connections” to access the Network Connections settings.

2. In the Network Connections window, locate your wireless network adapter. It may be labeled as “Wi-Fi” or “Wireless Network Connection.”

3. Right-click on the adapter and select “Disable” from the context menu. Wait for a few seconds, then right-click again and select “Enable.” This will reset the adapter.

4. If the issue persists, you can try resetting the TCP/IP stack. Open the Command Prompt as an administrator and type “netsh int ip reset” followed by pressing Enter. Restart your computer afterward.

5. If the problem still persists, you can try resetting your network settings. Open the Start menu and go to Settings > Network & Internet > Status. Under “Network reset,” click on “Reset now” to reset your network settings.

Fi adapter

1. Open the Start Menu and type “Device Manager” to launch it.
2. In Device Manager, expand the “Network Adapters” section to view all adapter options.
3. Right-click on your Wi-Fi adapter and select “Disable device.” Confirm the action if prompted.
4. After disabling the adapter, right-click on it again and select “Enable device” to reset it.
5. Alternatively, you can also restart your PC to reset the adapter.

Fi adapter in Windows

If you’re experiencing Wi-Fi connection problems on your Windows computer, resetting the Wi-Fi adapter might help. Here’s how you can do it:

1. Press the Windows key + X and select “Device Manager” from the list.
2. In Device Manager, expand the “Network adapters” section.
3. Right-click on your wireless network adapter and select “Disable device”.
4. Wait for a few seconds, then right-click on the adapter again and select “Enable device”.
5. If prompted, restart your computer.

This will reset the adapter’s settings and can often resolve network issues.

Fi adapters: a troubleshooting guide

  • Check the physical connections: Ensure that the Fi adapter is securely connected to the computer’s USB port or any other applicable interface.
  • Update the Fi adapter driver: Visit the manufacturer’s website or use Windows Update to download and install the latest driver for your specific Fi adapter model.
    Check the physical connections: Ensure that the Fi adapter is securely connected to the computer's USB port or any other applicable interface.
Update the Fi adapter driver: Visit the manufacturer's website or use Windows Update to download and install the latest driver for your specific Fi adapter model.
  • Restart the computer: Sometimes a simple restart can resolve connectivity issues with the Fi adapter.
  • Disable and re-enable the Fi adapter: Open the Device Manager, locate the Fi adapter, right-click on it, and choose “Disable.” After a few seconds, right-click again and select “Enable.”
  • Check for interference: Move any devices that may cause interference, such as cordless phones or microwave ovens, away from the Fi adapter and the computer.
  • Run the Network Troubleshooter: Use the built-in Network Troubleshooter in Windows to automatically identify and fix common networking problems.
    Check for interference: Move any devices that may cause interference, such as cordless phones or microwave ovens, away from the Fi adapter and the computer.
Run the Network Troubleshooter: Use the built-in Network Troubleshooter in Windows to automatically identify and fix common networking problems.
  • Reset the Fi adapter: Open the Device Manager, locate the Fi adapter, right-click on it, and select “Uninstall device.” Restart the computer, and Windows will automatically reinstall the Fi adapter driver.
  • Check for software conflicts: Temporarily disable any third-party firewall or antivirus software that might be interfering with the Fi adapter’s functionality.
  • Perform a system restore: If the Fi adapter was previously working fine and suddenly stopped, reverting the system back to an earlier point in time using System Restore may help resolve the issue.
  • Contact the Fi adapter manufacturer: If none of the above steps work, reach out to the manufacturer’s support team for further assistance.
Example Message
?

If you’re experiencing connectivity issues, it’s best to troubleshoot by resetting your Wi-Fi card. Download this tool to run a scan