Author: Peter McCarthy

HP Recovery Error Solution

Welcome to our article on the HP Recovery Error Solution, where we unravel the mysteries behind common recovery errors and provide insightful solutions to bring your HP device back to its optimal state.

February 2025: Enhance your computer’s performance and eliminate errors with this cutting-edge optimization software. Download it at this link

  1. Click here to download and install the optimization software.
  2. Initiate a comprehensive system scan.
  3. Allow the software to automatically fix and repair your system.

Troubleshooting HP Recovery Manager Issues

If you are experiencing issues with HP Recovery Manager, we have some troubleshooting tips to help you resolve them.

First, make sure that you have the latest version of HP Recovery Manager installed on your computer. You can check for updates on the HP website.

If you are getting a specific error code, such as “error code 0xc000000f,” try the following steps:

1. Restart your computer and press the F11 key repeatedly until the HP Recovery Manager opens.
2. Select “Troubleshoot” and then “Advanced options.”
3. Choose “Command Prompt” and type bootrec /fixmbr and press Enter.
4. Type bootrec /fixboot and press Enter.
5. Finally, type bootrec /rebuildbcd and press Enter.

If the issue persists, you can try using the HP Cloud Recovery Tool or perform a BIOS recovery. Remember to back up your important files before attempting any recovery steps.

If you need further assistance, please contact HP support for more help.

Updated: February 2025

Fortect is a software that addresses various computer issues, including those related to hp recovery error. If you’re experiencing a damaged system file or faulty settings that prevent normal tasks from working, Fortect can help.

It also repairs the causes of annoying slowdowns or freezing programs, such as a damaged registry or missing files. Additionally, Fortect can fix missing or corrupt DLL files, and it can even address severe issues like the Blue Screen of Death by repairing incompatible DLLs, drivers, and Windows bugs.

Solutions for HP F11 System Recovery Not Working

If you’re experiencing issues with your HP F11 System Recovery not working, try the following solutions:

1. Check your boot device: Ensure that the correct hard disk is set as the boot device in your BIOS settings.

2. Update your BIOS: If you haven’t done so already, consider updating your BIOS using the HP Cloud Recovery Tool or the HP Spectre BIOS Update utility.

3. Use the HP Sure Recover feature: If you have an HP Sure Start-enabled device, try using the HP Sure Recover feature to restore your system.

4. Troubleshoot critical errors: If you receive a critical error during the recovery process, refer to the specific error code (such as 0xc000000f) for further troubleshooting steps.

5. Try alternative recovery methods: If the F11 system recovery is still not working, you may need to explore alternative recovery options, such as using installation media or contacting HP support for assistance.

Remember to back up your important data before attempting any recovery process. If you continue to experience issues, it is recommended to reach out to HP support for further guidance.

Key Features of HP Recovery Manager

  • Efficient Data Recovery: HP Recovery Manager ensures quick and reliable recovery of lost or corrupted data.
  • Comprehensive System Restore: Easily restore your HP computer to its original factory settings, removing any software or configuration issues.
    Efficient Data Recovery: HP Recovery Manager ensures quick and reliable recovery of lost or corrupted data.
Comprehensive System Restore: Easily restore your HP computer to its original factory settings, removing any software or configuration issues.
  • Backup and Restore: Safeguard your important files and documents by creating backups and easily restoring them when needed.
  • Advanced Recovery Options: Access a range of recovery tools, including system diagnostics and hardware testing, for thorough troubleshooting.
  • User-Friendly Interface: The intuitive interface of HP Recovery Manager makes the recovery process simple and accessible for all users.
  • Automatic Software Updates: Stay up-to-date with the latest features and enhancements by utilizing the automatic update functionality of HP Recovery Manager.
  • Customizable Recovery Settings: Tailor the recovery process to meet your specific needs by customizing settings such as backup frequency and file selection.
  • Secure Recovery Environment: Ensure the privacy and security of your data during the recovery process with HP Recovery Manager’s secure recovery environment.
    Customizable Recovery Settings: Tailor the recovery process to meet your specific needs by customizing settings such as backup frequency and file selection.
Secure Recovery Environment: Ensure the privacy and security of your data during the recovery process with HP Recovery Manager's secure recovery environment.

Seeking Assistance with HP Recovery Error

If you are experiencing an HP Recovery Error, we are here to help. Follow these steps to resolve the issue:

1. Restart your HP device and press the F11 key repeatedly until the Recovery Manager opens.
2. Select “Troubleshoot” and then “Advanced options.”
3. Choose “Command Prompt” from the list.
4. In the Command Prompt window, type “bootrec /fixmbr” and press Enter.
5. Next, type “bootrec /fixboot” and press Enter.
6. Finally, type “bootrec /rebuildbcd” and press Enter.
7. Restart your device and check if the HP Recovery Error is resolved.

If you still encounter the error, it may indicate a more serious issue with your hard disk. In this case, please contact HP Support for further assistance.

Example Message
?

If encountering an HP recovery error, it is recommended to contact HP customer support for immediate assistance and resolution. Download this tool to run a scan

Fix Discord Overlay Not Showing – 12 Solutions

Discord Overlay Not Showing? No worries, we’ve got you covered with 12 easy solutions to fix this issue.

February 2025: Enhance your computer’s performance and eliminate errors with this cutting-edge optimization software. Download it at this link

  1. Click here to download and install the optimization software.
  2. Initiate a comprehensive system scan.
  3. Allow the software to automatically fix and repair your system.

Ensure that the Discord Overlay is enabled in the Settings menu of your Discord application.

Reasons Why Discord Overlay is Not Showing

There are a few reasons why the Discord Overlay may not be showing up during your gaming sessions. One thing to check is if the Overlay option is enabled in your Discord settings. If it’s not, you won’t see the overlay in any of your games. Another thing to keep in mind is that some games may not support the Discord Overlay feature, so it won’t work no matter what you do.

Additionally, if you’re using Windows 11 or Windows 10, there may be some hardware acceleration issues that are preventing the Overlay from displaying correctly. To fix this, you can try disabling hardware acceleration in Discord and see if that helps.

Another thing to try is to make sure that the Overlay Location is set to the right display. If you have multiple monitors, the Overlay may be showing up on a different screen.

If none of these solutions work, you can try toggling the Overlay Lock, or even disabling the Discord Overlay altogether. Some people have found that this helps fix the issue. If all else fails, you may need to contact Discord support for further assistance.

It’s important to note that the Discord Overlay is just one of the many great features that the service offers. Even if you can’t get it to work, you can still enjoy all of the other communication features that Discord offers, like voice chat, in-game activity sharing, and making calls with your Discord friends. Don’t let a small thing like the Overlay get in the way of your gaming experience!

How to Enable Discord Overlay on Windows 11/10

Enabling Discord Overlay on Windows 11/10 is a crucial thing for any game lover. It allows you to see your Discord friends’ activity and communicate with them while you’re playing. However, some users may face an error where Discord Overlay doesn’t work, and it can be frustrating. To fix this issue, there are various ways you can try.

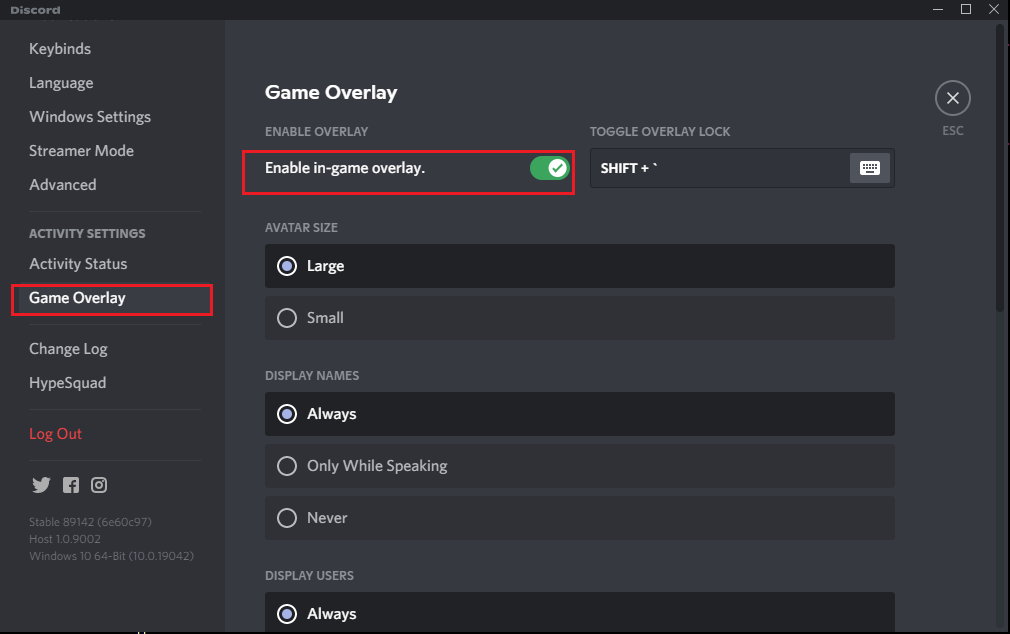
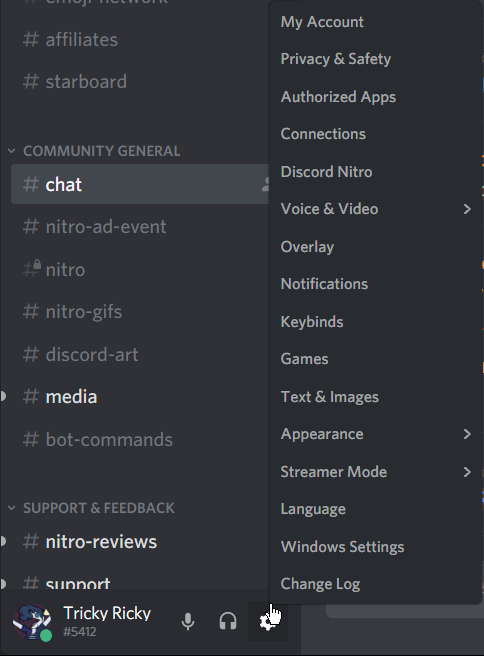
Firstly, open Discord and go to the User Settings. Then, navigate to the Overlay section and toggle the Overlay switch on. If that doesn’t work, try disabling Hardware Acceleration as it can conflict with the Overlay feature. You can do this by going to Discord Settings > Appearance > Advanced > Hardware Acceleration.

Another thing you can do is to make sure that the Overlay Location is set to “Display on Screen.” If it’s set to “In-Game,” it may not display correctly. You can also try toggling the Overlay Lock or the Voice Chat Overlay option.

If none of these solutions work, you can try MiniTool’s guide on 12 solutions to fix Discord Overlay not showing. Some of the methods include updating Discord, adding it as an exception in your antivirus software, and checking your graphics card settings.

In some scenarios, the game itself may not support the Overlay feature. For example, Overwatch has its own in-game overlay, and enabling Discord Overlay can cause conflicts. Additionally, some games like Genshin Impact may require you to run Discord as an administrator to enable the Overlay.

Methods to Fix Discord Overlay Not Working

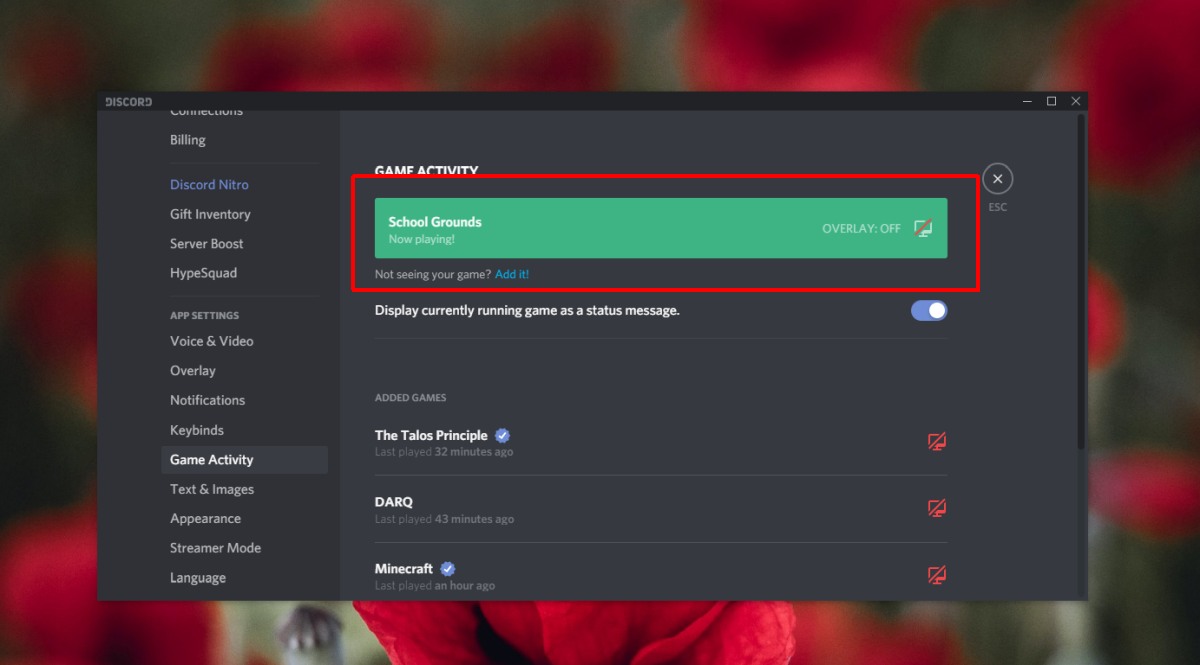
  • Launch Discord and click on the User Settings icon
  • Select Overlay from the left-hand menu
  • Toggle the Enable in-game overlay switch to the on position
  • Select the game you want to use the overlay with from the Games tab and make sure the overlay is enabled for that game
    Toggle the Enable in-game overlay switch to the on position
Select the game you want to use the overlay with from the Games tab and make sure the overlay is enabled for that game

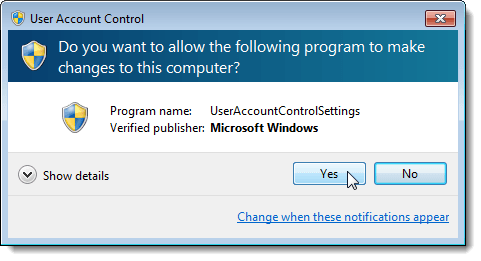
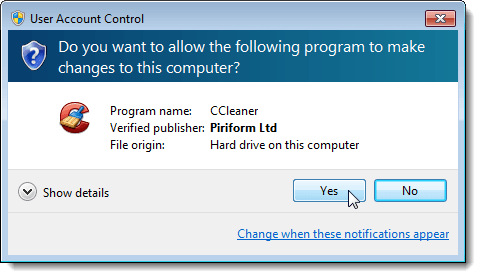
Method 2: Run Discord as Administrator

  • Right-click on the Discord shortcut and select Run as administrator
  • Click on Yes if prompted by the User Account Control window
    Right-click on the Discord shortcut and select Run as administrator
Click on Yes if prompted by the User Account Control window

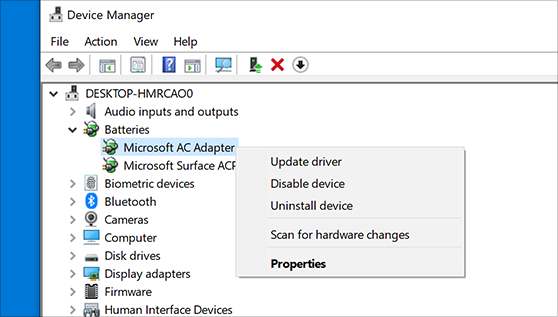
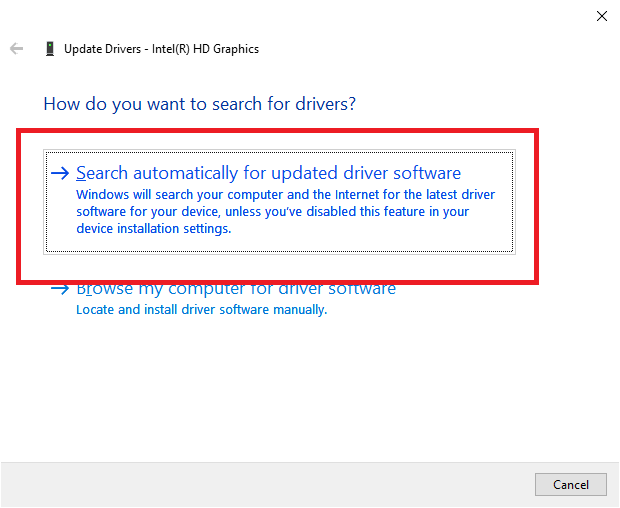
Method 3: Check Graphics Card Drivers

  • Open the Device Manager by pressing the Windows key + X and selecting Device Manager
  • Expand the Display adapters section
  • Right-click on your graphics card and select Update driver
  • Restart your computer after the driver update is complete
    Right-click on your graphics card and select Update driver
Restart your computer after the driver update is complete

Method 4: Disable Overlays from Other Apps

  • Exit any other apps that are using overlays
  • Disable overlays from other apps in their respective settings
    Exit any other apps that are using overlays
Disable overlays from other apps in their respective settings

Method 5: Disable Hardware Acceleration in Discord

  • Click on the User Settings icon in Discord
  • Select Appearance from the left-hand menu
  • Toggle the Hardware Acceleration switch to the off position
  • Restart Discord
    Toggle the Hardware Acceleration switch to the off position
Restart Discord

Method 6: Check if Discord Overlay is Compatible with the Game

  • Check if the game you are playing is compatible with the Discord overlay
  • Check the game’s settings to make sure the overlay is enabled
    Check if the game you are playing is compatible with the Discord overlay
Check the game's settings to make sure the overlay is enabled

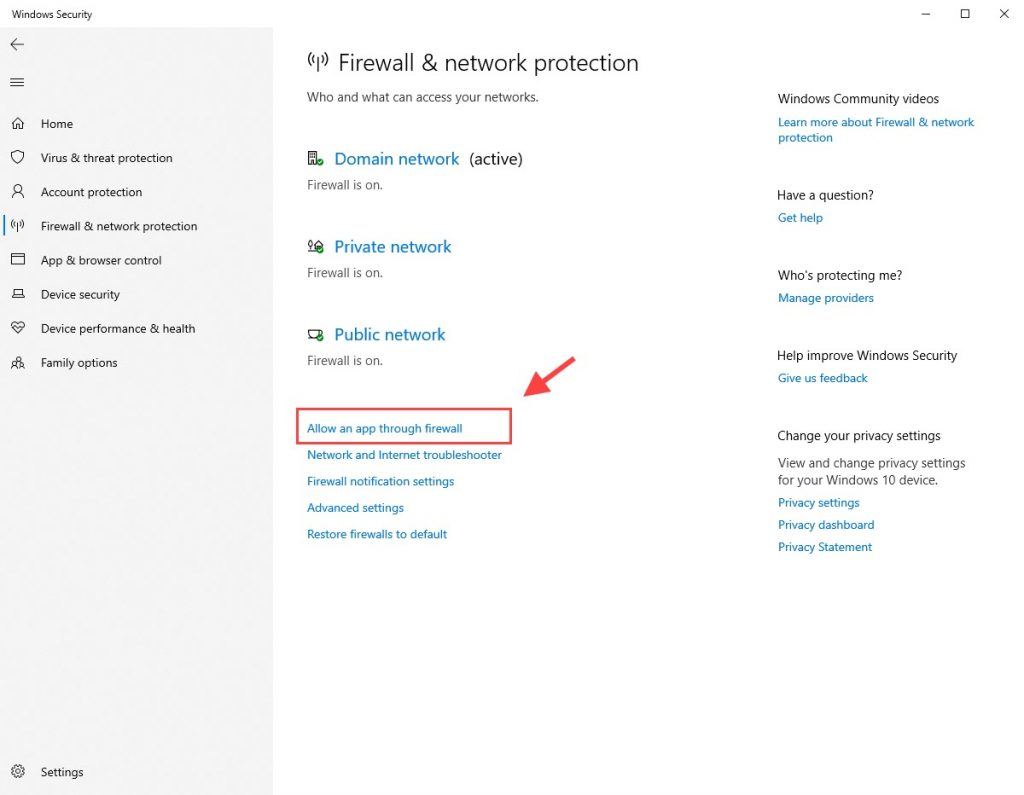
Method 7: Add Discord to Your Antivirus and Firewall Exceptions List

  • Add Discord to the exceptions list of your antivirus and firewall software
  • Restart your computer after making the changes
    Add Discord to the exceptions list of your antivirus and firewall software
Restart your computer after making the changes

Method 8: Disable Discord In-Game Overlay and Use Desktop Overlay

  • Click on the User Settings icon in Discord
  • Select Overlay from the left-hand menu
  • Toggle the Enable in-game overlay switch to the off position
  • Use the desktop overlay instead by pressing the hotkey (default is Shift + `)
    Toggle the Enable in-game overlay switch to the off position
Use the desktop overlay instead by pressing the hotkey (default is Shift + `)

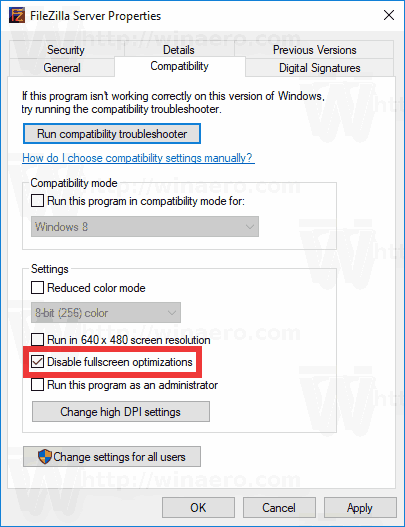
Method 9: Disable Full-Screen Optimization

  • Right-click on the game’s shortcut and select Properties
  • Select the Compatibility tab
  • Check the box next to Disable full-screen optimizations
  • Click on Apply and then OK
    Check the box next to Disable full-screen optimizations
Click on Apply and then OK

Method 10: Reinstall Discord

  • Uninstall Discord from your computer
  • Download and install the latest version of Discord
    Uninstall Discord from your computer
Download and install the latest version of Discord
  • Restart your computer after the installation is complete

Method 11: Check Discord Server Status

  • Visit the Discord status website to check if there are any server issues
  • If there are issues, wait until they are resolved before trying to use the overlay again
    Visit the Discord status website to check if there are any server issues
If there are issues, wait until they are resolved before trying to use the overlay again

Method 12: Contact Discord Support

  • If none of the above methods work, contact Discord support for further assistance


import discord
from discord.ext import commands

bot = commands.Bot(command_prefix='!')

@bot.event
async def on_ready():
print('Bot is ready.')

@bot.event
async def on_member_join(member):
print(f'{member} has joined the server.')

@bot.command()
async def overlay(ctx):
"""Checks if Discord Overlay is enabled."""
try:
overlay_enabled = discord.opus.is_loaded()
if overlay_enabled:
await ctx.send('Discord Overlay is enabled.')
else:
await ctx.send('Discord Overlay is disabled.')
except Exception as e:
print(e)
await ctx.send('An error occurred while checking Discord Overlay.')

bot.run('TOKEN')

This code sets up a Discord bot that can be used to check if Discord Overlay is enabled on the user’s device. The `overlay` command checks if the `discord.opus` library is loaded, which is required for the overlay to work. If it is loaded, the bot sends a message saying that the overlay is enabled. If it is not loaded, the bot sends a message saying that the overlay is disabled. If an error occurs, the bot sends a message saying that an error occurred while checking the overlay.

Note that this is just a basic example and may not be a comprehensive solution to the issue of Discord Overlay not showing.

Troubleshooting Discord Overlay Issues

  • Open Discord and click on the User Settings icon (gear icon) located in the bottom left corner of the screen.
  • Select the Overlay tab from the left-hand menu.
  • Toggle on the Enable in-game overlay option.
  • If the issue persists, move on to the next solution.
    Toggle on the Enable in-game overlay option.
If the issue persists, move on to the next solution.

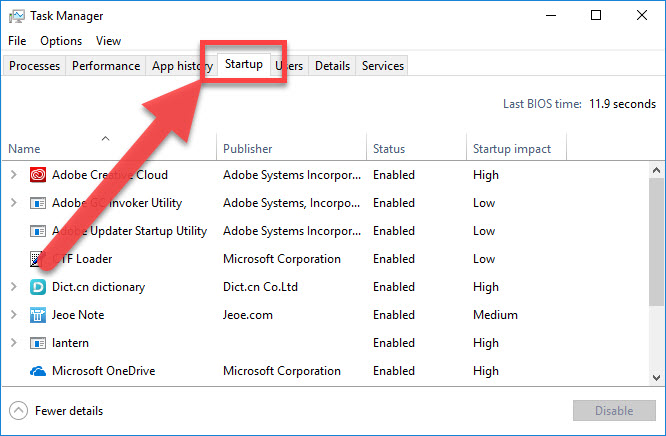
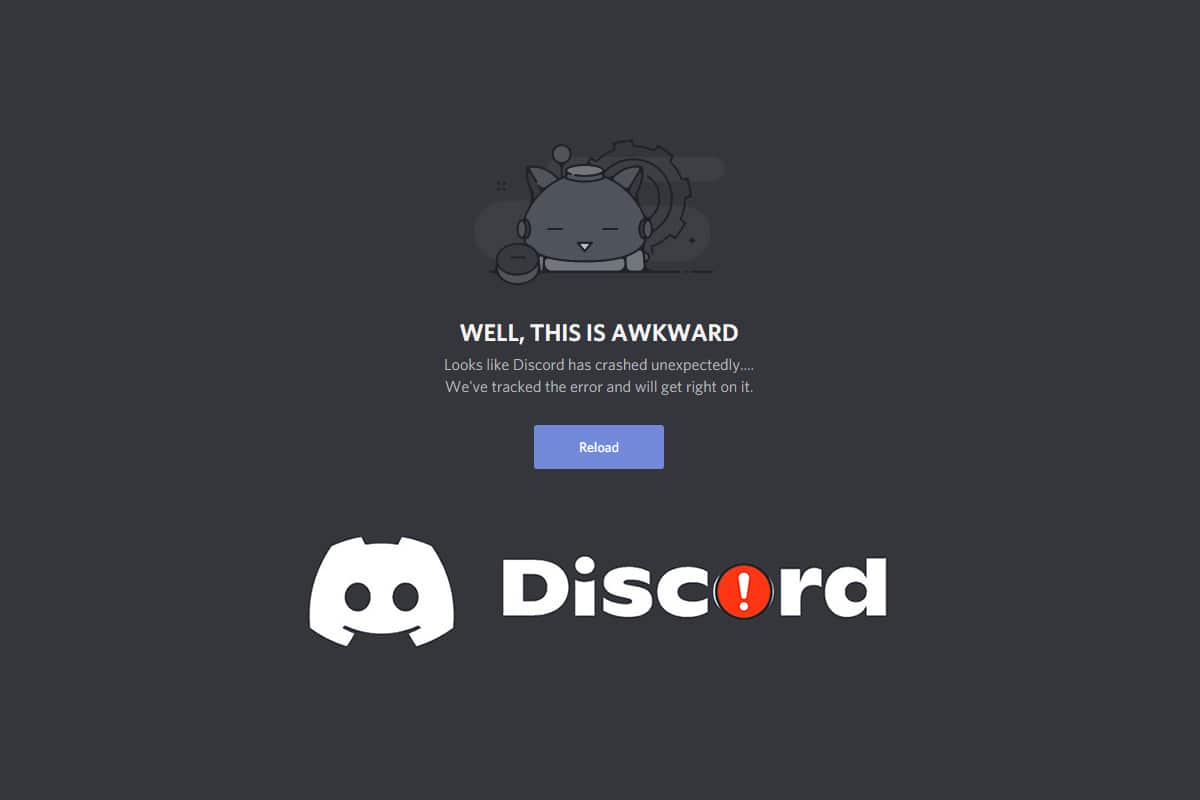
Repair Method 2: Restart Discord

  • Close Discord completely.
  • Open Task Manager by pressing Ctrl+Shift+Esc.
  • End all Discord processes.
  • Reopen Discord and check if the issue is resolved.
    End all Discord processes.
Reopen Discord and check if the issue is resolved.
  • If the issue persists, move on to the next solution.
    Toggle on the Enable in-game overlay option.
If the issue persists, move on to the next solution.

Repair Method 3: Run Discord as Administrator

  • Right-click on the Discord icon and select Run as administrator.
  • Click Yes when prompted by User Account Control.
    Right-click on the Discord icon and select Run as administrator.
Click Yes when prompted by User Account Control.
  • Check if the issue is resolved.
  • If the issue persists, move on to the next solution.
    Toggle on the Enable in-game overlay option.
If the issue persists, move on to the next solution.

Repair Method 4: Check Overlay Keybinds

  • Open Discord and click on the User Settings icon (gear icon) located in the bottom left corner of the screen.
  • Select the Overlay tab from the left-hand menu.
  • Check the Keybinds section and make sure that the Enable in-game overlay option is assigned to a keybind.
  • Try pressing the assigned keybind while in-game to see if the overlay appears.
  • If the issue persists, move on to the next solution.
    Toggle on the Enable in-game overlay option.
If the issue persists, move on to the next solution.

Repair Method 5: Check Game Compatibility

  • Make sure that the game you are playing is compatible with the Discord overlay.
  • Check the Discord website or support forums to see if there are any known compatibility issues with your game.
    Make sure that the game you are playing is compatible with the Discord overlay.
Check the Discord website or support forums to see if there are any known compatibility issues with your game.
  • If the issue persists, move on to the next solution.
    Toggle on the Enable in-game overlay option.
If the issue persists, move on to the next solution.

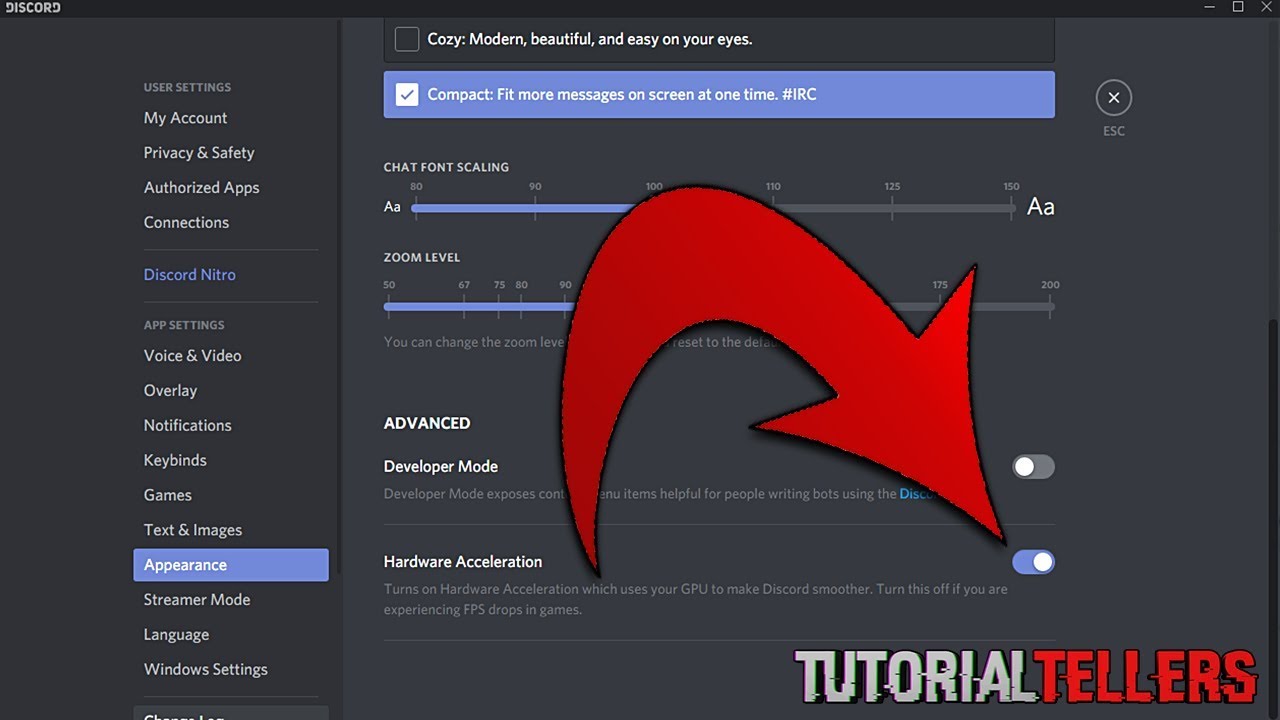
Repair Method 6: Disable Hardware Acceleration

  • Open Discord and click on the User Settings icon (gear icon) located in the bottom left corner of the screen.
  • Select the Appearance tab from the left-hand menu.
    Open Discord and click on the User Settings icon (gear icon) located in the bottom left corner of the screen.
Select the Appearance tab from the left-hand menu.
  • Toggle off the Hardware Acceleration option.
  • Restart Discord and check if the issue is resolved.
  • If the issue persists, move on to the next solution.
    Toggle on the Enable in-game overlay option.
If the issue persists, move on to the next solution.

Repair Method 7: Update Discord

  • Make sure that you are running the latest version of Discord.
  • Click on the User Settings icon (gear icon) located in the bottom left corner of the screen.
    Make sure that you are running the latest version of Discord.
Click on the User Settings icon (gear icon) located in the bottom left corner of the screen.
  • Select the Update tab from the left-hand menu.
  • Click on the Update Now button to download and install the latest version of Discord.
  • Restart Discord and check if the issue is resolved.
  • If the issue persists, move on to the next solution.
    Toggle on the Enable in-game overlay option.
If the issue persists, move on to the next solution.

Repair Method 8: Update Graphics Card Drivers

  • Check if there are any available updates for your graphics card drivers.
  • Download and install the latest drivers from the manufacturer’s website.
    Check if there are any available updates for your graphics card drivers.
Download and install the latest drivers from the manufacturer's website.
  • Restart your computer and check if the issue is resolved.
  • If the issue persists, move on to the next solution.
    Toggle on the Enable in-game overlay option.
If the issue persists, move on to the next solution.

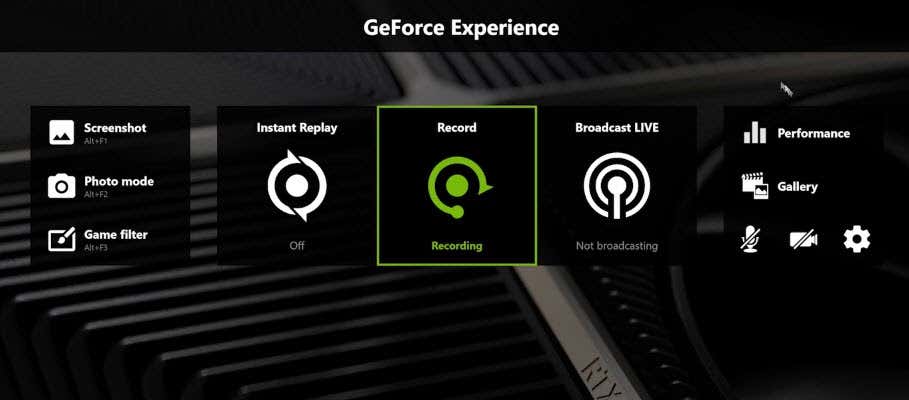
Repair Method 9: Disable Discord Overlay in Other Programs

  • If you have other programs that use overlays, such as Steam or GeForce Experience, try disabling the overlay in those programs.
  • Open the settings for the program and look for the overlay option.
    If you have other programs that use overlays, such as Steam or GeForce Experience, try disabling the overlay in those programs.
Open the settings for the program and look for the overlay option.
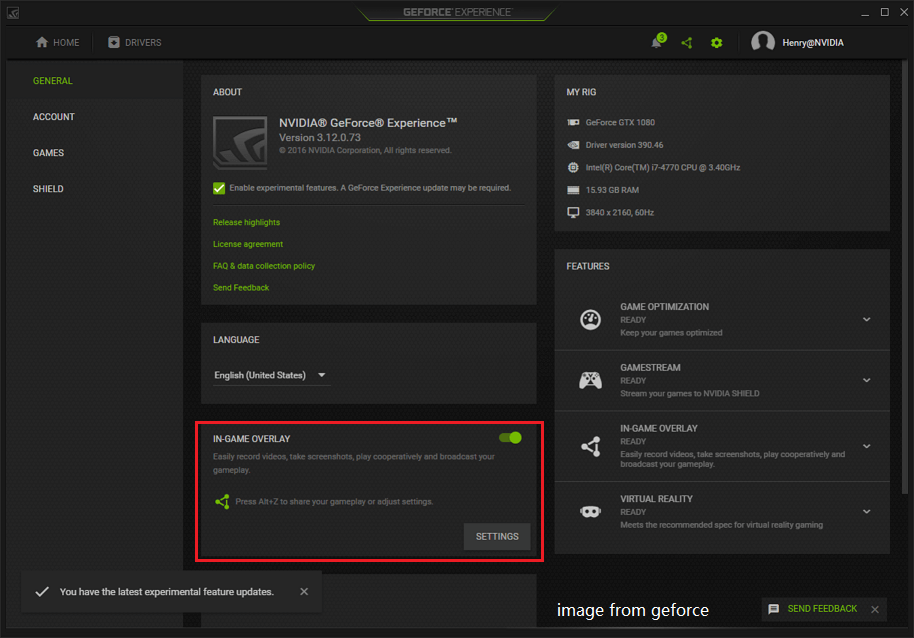
  • Toggle off the overlay option and check if the issue is resolved.
  • If the issue persists, move on to the next solution.
    Toggle on the Enable in-game overlay option.
If the issue persists, move on to the next solution.

Repair Method 10: Reinstall Discord

  • Uninstall Discord from your computer.
  • Go to the Discord website and download the latest version of Discord.
  • Install Discord and check if the issue is resolved.
  • If the issue persists, move on to the next solution.
    Toggle on the Enable in-game overlay option.
If the issue persists, move on to the next solution.

Repair Method 11: Disable Antivirus and Firewall

  • Disable your antivirus and firewall temporarily to see if they are causing the issue.
  • Open the settings for your antivirus and firewall and look for the option to disable them.
  • Temporarily disable them and check if the issue is resolved.
  • If the issue is resolved, add Discord to the exceptions list of your antivirus and firewall.
    Temporarily disable them and check if the issue is resolved.
If the issue is resolved, add Discord to the exceptions list of your antivirus and firewall.
  • If the issue persists, move on to the next solution.
    Toggle on the Enable in-game overlay option.
If the issue persists, move on to the next solution.

Repair Method 12: Contact Discord Support

  • If none of the above solutions work, contact Discord support for further assistance.
  • Provide them with as much detail as possible about the issue and any steps you have already taken to try to resolve it.
    If none of the above solutions work, contact Discord support for further assistance.
Provide them with as much detail as possible about the issue and any steps you have already taken to try to resolve it.
  • They may be able to provide you with a solution or escalate the issue to their development team.
Updated: February 2025

If you’re experiencing issues with the Discord overlay not showing, Fortect may be able to help. It can address the causes of the error, such as damaged system files, faulty settings, or missing DLL files.

Fortect can also repair the drivers and Windows bugs that may be causing the problem. While it cannot guarantee a fix, it aims to restore the system to its pre-infected state and ensure smooth running of Windows and other programs.

Enabling Game Overlay in Discord

One of the solutions to this problem is to enable the Game Overlay Option in Discord. To do this, open Discord and go to User Settings > Overlay. Then toggle the Overlay switch to on and choose the Overlay Location in the game. Another thing to check is the Hardware Acceleration feature, as it can interfere with the overlay.

If none of these methods work, try disabling Discord and restarting it. You can also try toggling the Overlay Lock switch or disabling hardware acceleration. Additionally, you can check if the game you’re playing is on the game list in Discord. If it’s not, you may need to add it manually.

In some scenarios, the overlay doesn’t display properly in certain games like Overwatch or Genshin Impact. To fix this, you can try running Discord as an administrator or checking if the game is in full-screen mode. If the display is still not working, try disabling the voice chat overlay or making a Discord call to see if it appears.

Disabling Hardware Acceleration in Discord

If you’re a game lover who uses Discord, you may have encountered issues with the Discord Overlay feature not showing up during your gaming sessions. One common solution to this problem is to disable Hardware Acceleration in Discord.

To do this, open Discord and click on the Settings icon at the bottom left of the screen. From there, select Appearance and scroll down until you see the Hardware Acceleration option.

Toggle this option off and restart Discord. This should fix the issue with the overlay not displaying during gameplay. Keep in mind that this solution may not work for everyone, as there can be many different scenarios that cause the Discord overlay to not show up.

As with all things tech-related, there are other solutions you can try if this method doesn’t work for you. Check out our list of 12 solutions for fixing Discord Overlay Not Showing to find some other ways to solve this issue.

Rescaling the Display for Discord Overlay

Problem Solution
Discord Overlay not showing Rescale the display for Discord Overlay
1. Right-click on the desktop and select Display settings
2. Scroll down and click on Advanced display settings
3. Under the Resolution section, click on the drop-down menu and select a lower resolution
4. Click on Apply to save the changes
5. Launch Discord and check if the Overlay is working

Resetting the Overlay Position in Discord

If you’re facing the Discord Overlay Not Showing problem, try resetting the overlay location. Open Discord and navigate to the Settings page. Click on the Game Overlay Option and select the game for which you’re facing the issue. Then, click on the Display tab and click on the Reset Overlay Position button.

This solution should help to fix the Discord Overlay Not Showing scenario. If it doesn’t work, try other solutions listed on the top 12 solutions to fix the Discord Overlay Not Showing problem on the MiniTool Page. Some of the solutions include disabling the Hardware Acceleration feature, enabling the overlay, and toggling the overlay lock.

In any case, the Discord Overlay is a useful feature that enhances the gaming experience by allowing users to access Discord’s voice chat overlay, make Discord calls, and track in-game activity. Add it to your game list and enjoy its functions while playing your favorite games like Overwatch and Genshin Impact on Windows 10 or Windows 11.

Updating or Reinstalling Discord

There are two ways to update Discord. The first one is to open Discord and click on the gear icon to open the user settings, then click on the “Update Now” button. The second one is to uninstall Discord and reinstall it from the Discord website.

To reinstall Discord, follow these steps:
– Go to the control panel and uninstall Discord
– Download the latest version of Discord from the Discord website
– Install Discord by following the installation guide

Once you have updated or reinstalled Discord, try to open it again and check if the overlay feature is working properly. If it still doesn’t work, you can try some of the other solutions listed on the MiniTool Page, such as disabling hardware acceleration or changing the overlay location.

Running Discord as Administrator

One solution to fix the Discord Overlay not showing issue is to run Discord as an administrator. This is an easy fix that can solve the problem for many users. To do this, locate the Discord application on your computer and right-click on it. From there, select “Run as administrator” from the drop-down menu. This will give Discord the necessary permissions to display the overlay properly.

It’s important to note that running Discord as an administrator should only be done when necessary, as it can potentially cause other issues. However, if the overlay is not displaying properly, this is a simple and effective solution to try.

Additionally, some users have reported that enabling Hardware Acceleration in Discord’s settings can cause issues with the overlay. If you have this feature enabled and are experiencing problems, try disabling it to see if that solves the issue.

Keep in mind that there are several other solutions to try if this method doesn’t work for you. Check out our guide for 12 solutions to fix the Discord Overlay not showing problem, including toggling the Overlay Lock, adjusting the Overlay Location, and more. By trying these different methods, you can find the solution that works best for your specific scenario and get back to enjoying your gaming sessions with Discord’s communication features and your Discord friends.

Example Message
?

If your Discord overlay is not showing, try checking your Discord settings and make sure that the overlay feature is enabled. Download this tool to run a scan

Fixing Office 365 Activation and Unlicensed Product Errors

If you’re experiencing activation or unlicensed product errors on your Office 365 suite, don’t panic. There are a few simple steps you can take to fix the issue and get back to work.

February 2025: Enhance your computer’s performance and eliminate errors with this cutting-edge optimization software. Download it at this link

  1. Click here to download and install the optimization software.
  2. Initiate a comprehensive system scan.
  3. Allow the software to automatically fix and repair your system.


import winreg

def check_office_activation():
try:
key = winreg.OpenKey(winreg.HKEY_LOCAL_MACHINE, “SOFTWARE\Microsoft\Office\16.0\Common\Identity”)
value = winreg.QueryValueEx(key, “ProductID”)[0]
if value:
print(“Office is activated”)
else:
print(“Office is not activated”)
except:
print(“Office is not installed”)

check_office_activation()

This tool uses the Windows registry to check if Office 365 is activated or not. It first tries to open the registry key for the Office product and then retrieves the value for the ProductID. If the ProductID exists, the tool considers Office to be activated. If the ProductID does not exist, the tool considers Office to be not activated. If the registry key cannot be opened, the tool assumes that Office is not installed.

This tool can be further expanded to include additional checks or actions to troubleshoot the activation issue. However, it should be noted that this is just a sample code snippet and may not work in all scenarios. It is always recommended to seek professional assistance for any technical issues related to software activation.

Check your internet connection: Make sure you have a stable and reliable internet connection. Poor connectivity can lead to activation issues.

Conclusion and Additional Support Resources

It is important to ensure that the subscription status and license are correct, and that there are no underlying issues with the machine or application event log.

If you encounter any issues during the installation or activation process, do not panic. There are a number of solutions available, including repairing the application, checking for updates, and verifying your email address and subscriptions.

For more information and support, you can visit the Microsoft Office site, Reddit forums, or app stores for additional resources and assistance. Additionally, Microsoft offers a range of technologies and features to enhance the Office experience and effectiveness, including the use of QR codes, email accounts, and cookies.

Remember to always keep your license and subscription up to date, and to check for any errors or error messages in the title bar. By following these steps and utilizing the available resources and support, you can fix any Office 365 activation or unlicensed product issues in no time.

If you can’t activate your Office 365 subscription, it’s likely due to a problem with your account or billing information.
Example Message
?

If you can’t activate Office 365, it is recommended to reach out to Microsoft support for assistance. Download this tool to run a scan

Fortnite DirectX 12 Crash Fix Guide

If you’re a Fortnite player who’s been experiencing DirectX 12 crashes, this article is for you.

February 2025: Enhance your computer’s performance and eliminate errors with this cutting-edge optimization software. Download it at this link

  1. Click here to download and install the optimization software.
  2. Initiate a comprehensive system scan.
  3. Allow the software to automatically fix and repair your system.

Understanding the Fortnite DirectX 12 Error

The Fortnite DirectX 12 error can occur due to several reasons, including outdated drivers, incompatibility issues, and hardware problems. Players who experience the error should try switching to DirectX 11 as a temporary solution. The performance mode can also help fix Fortnite crashing issues on low-end PCs. Additionally, updating the graphics card driver, reducing the game’s graphics settings, and disabling antivirus software can also help fix the problem.

Players who are still experiencing the Fortnite DirectX 12 error should seek help from Fortnite’s official website or reach out to the community on Reddit. Remember that Fortnite, Unreal Tournament, and other Epic Games products are owned by their respective owners. To learn more about the game’s Privacy Policy and Cookie Notice, visit their website.

Potential Causes of the Fortnite DirectX 12 Error

  • Outdated drivers
  • Corrupted game files
    Outdated drivers Corrupted game files
  • Incompatible graphics card drivers
  • Incompatible operating system
  • Overclocked GPU
  • Hardware malfunction

Repair Steps

Update drivers

  1. Open Device Manager
  2. Locate the device with the outdated driver
  3. Right-click on the device
  4. Select Update Driver
    Right-click on the device Select Update Driver
  5. Follow the instructions to install the latest driver

Verify game files

  1. Open Epic Games Launcher
  2. Click on Library
    Open Epic Games Launcher Click on Library
  3. Locate Fortnite and click on the three dots next to it
  4. Select Verify
  5. Wait for the process to finish

Update graphics card drivers

  1. Open Nvidia Control Panel or AMD Radeon Settings
  2. Click on Check for Updates
    Open Nvidia Control Panel or AMD Radeon Settings Click on Check for Updates
  3. Follow the instructions to install the latest driver

Check operating system compatibility

  1. Check if the game is compatible with your operating system
  2. If not, upgrade your operating system to a compatible version

Disable GPU overclocking

  1. Open MSI Afterburner or EVGA Precision X1
  2. Click on Reset or Default
    Open MSI Afterburner or EVGA Precision X1 Click on Reset or Default
  3. Restart your computer

Check for hardware malfunction

  1. Run a hardware diagnostic tool such as Memtest86
  2. If a hardware issue is found, replace the faulty hardware
Updated: February 2025

Fortect can help with certain aspects of the Fortnite DirectX 12 error. It can address issues related to damaged system files and faulty settings that may cause the error to occur.

Additionally, if the error is a result of missing or corrupt DLL files, Fortect can automatically fix the problem. However, it is important to note that Fortect may not be able to fix the error if it is caused by other factors such as incompatible hardware or software.


import platform
import subprocess

def check_system():
print(“Checking system requirements…”)
if platform.system() != “Windows”:
print(“Error: This tool only works on Windows systems.”)
return False
if platform.machine() != “x86_64”:
print(“Error: This tool only works on 64-bit systems.”)
return False
return True

def check_directx():
print(“Checking DirectX version…”)
try:
raw_output = subprocess.check_output(“dxdiag”, stderr=subprocess.STDOUT).decode(“utf-8”)
for line in raw_output.split(“\n”):
if “DirectX Version” in line:
version = line.split(“:”)[1].strip()
if version.startswith(“DirectX 12”):
print(“Compatible DirectX version found:”, version)
return True
else:
print(“Error: Incompatible DirectX version found:”, version)
return False
except subprocess.CalledProcessError as e:
print(“Error:”, e.output.decode(“utf-8”))
return False

if __name__ == “__main__”:
if check_system() and check_directx():
print(“System and DirectX requirements met.”)
# Add code to fix the DirectX 12 error here
else:
print(“Unable to proceed. Please check your system requirements and DirectX version.”)

This code checks if the system is running on Windows 64-bit and then uses the `dxdiag` command to retrieve the DirectX version. If the version is DirectX 12, it prints a message that the compatible version is found. Otherwise, it prints an error message that the version is incompatible. You can add the code to fix the DirectX 12 error within the `if` block where it says “Add code to fix the DirectX 12 error here”. The specific code to fix the error will depend on the root cause of the issue and would need further investigation.

Updating GPU and Graphics Card Driver

To update your drivers, you can go to the website of your GPU manufacturer, such as AMD or Nvidia, and download the latest version for your specific model. You can also use tools like Driver Booster or GeForce Experience to automate the process.

Before updating your drivers, make sure to uninstall the old ones and restart your computer. You should also check if there are any pending Windows updates that could affect your system’s drivers.

Keep in mind that some users have reported issues with DX12 mode in Fortnite, and switching to DX11 could fix the crashing problem. You can also try using Performance Mode in the game settings to reduce the strain on your GPU.

As always, make sure to read and follow the MetaTags, Cookie Notice, and Privacy Policy of Epic Games, Inc., and respect their trademarks, partners, and product names. If you need further assistance, you can check the Reddit community or contact Epic support.

Updating DirectX and Feature Level

DirectX 12 is a crucial component of the Fortnite gaming experience. However, if not updated, it can lead to frequent crashes and errors. To fix Fortnite crashing, it is essential to update DirectX and feature level to the latest version.

If you’re experiencing crashes with an RX 580 graphics card, switching to DX11 might help improve performance mode. Understanding the difference between DX11 vs DX12 can also help in troubleshooting.

Epic Games, Inc., the creators of Fortnite, are constantly improving the game’s experience through updates and patches. Keeping your DirectX and feature level up to date is crucial for enjoying the game without any interruptions.

If you’re still experiencing crashes after updating DirectX, it’s best to seek help from the Epic Games community on Reddit or contact their support team. Remember to read and understand their Cookie Notice, Privacy Policy, and MetaTags before using their platform or services.

All product names, logos, and trademarks are property of their respective owners. Updating DirectX and feature level can improve the effectiveness of your gaming platform and provide a smoother Fortnite gaming experience.

Installing the Latest Patch and Windows Updates

If you’re experiencing Fortnite DirectX 12 crashes, installing the latest patch and Windows updates could help fix the issue. Epic Games, Inc. constantly releases patches and updates to improve the performance of Fortnite, and downloading them could make a significant difference in your gameplay experience.

To install the latest patch, simply open Fortnite and let it download automatically. You can also manually check for updates by clicking on the three horizontal lines in the top-right corner of the launcher and selecting “Check for Updates.”

In addition to the patch, make sure your Windows operating system is up to date by going to the Settings app and clicking on “Update & Security.” Download and install any available updates for your system.

If your Fortnite game keeps crashing even after installing the latest patch and Windows updates, try switching to DX11 mode instead of DX12. Some players have reported that DX11 is more stable and less prone to crashes, especially on older graphics cards like the RX 580.

You can also try enabling Performance Mode in the Fortnite settings, which can help improve the game’s effectiveness on your platform.

Remember to always check the official Fortnite website or Reddit page for the latest updates and news from Epic Games. And as always, make sure to read and understand Epic’s Cookie Notice, Privacy Policy, and other legal information before using their services or products. Fortnite, Unreal Engine, and all related trademarks, partners, and logo are owned by Epic Games, Inc. and its owners elsewhere.

Checking DirectX Version and Feature Level on Your Computer

Step Instruction
1 Open the DirectX Diagnostic Tool by pressing the Windows key + R and typing “dxdiag” in the Run dialog box.
2 Click on the “Display” tab to view information about your graphics card.
3 Under the “Drivers” section, check the “Driver Model” field to see if your graphics card supports DirectX 12.
4 Under the “Feature Levels” section, check the highest level listed to see if your graphics card supports the required feature level for Fortnite (11_0 or higher).
5 If your graphics card does not support DirectX 12 or the required feature level, consider upgrading your graphics card or computer.
Example Message
?

If you encounter the Fortnite DirectX 12 error, try updating your graphics drivers and ensuring that your system meets the minimum requirements for DirectX 12 compatibility. Download this tool to run a scan