
Having trouble with sound not working in Firefox? Here are some troubleshooting tips to help you fix the issue.
July 2025: Enhance your computer’s performance and eliminate errors with this cutting-edge optimization software. Download it at this link
- Click here to download and install the optimization software.
- Initiate a comprehensive system scan.
- Allow the software to automatically fix and repair your system.
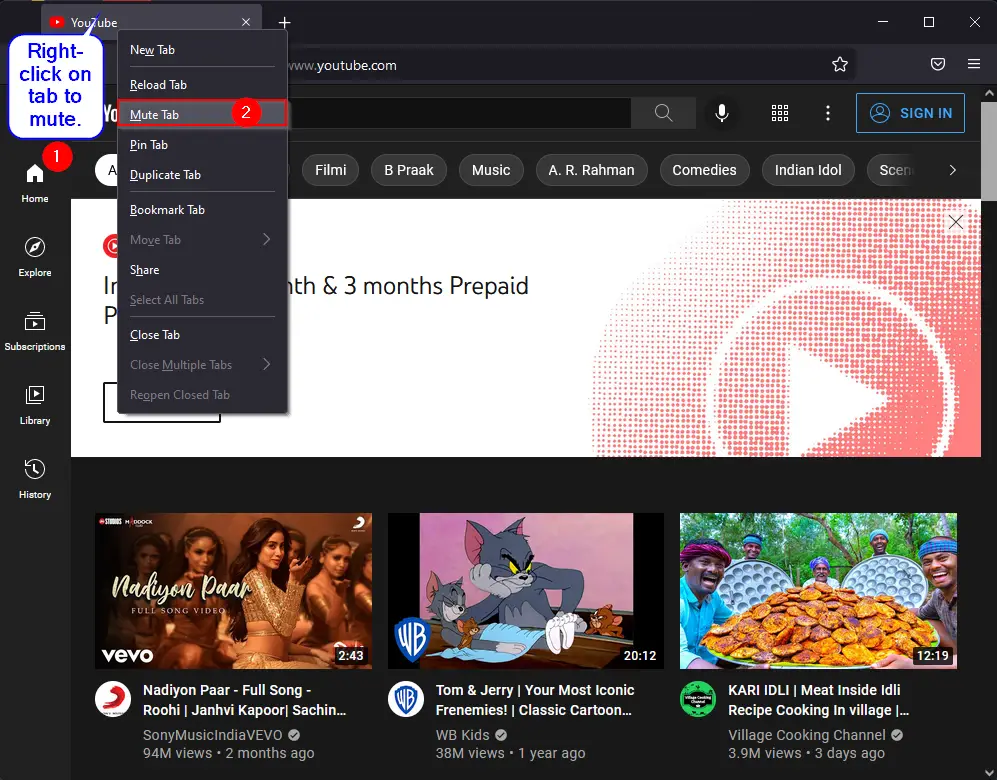
Check Volume and Mute Settings
If the volume settings are correct, try playing a video or music from a different website or application to see if the issue is specific to Firefox. If you can hear sound from other sources, the problem may lie within Firefox itself.
Additionally, check if any plug-ins or extensions in Firefox are causing the sound issue. Disable them one by one to identify the culprit.
If the problem persists, consider clearing your browser cache in Firefox. This can sometimes resolve sound issues caused by corrupted data.
Update Audio Drivers
| Step | Description |
|---|---|
| 1 | Open Device Manager by pressing Windows key + X and selecting Device Manager. |
| 2 | Expand the “Sound, video and game controllers” category. |
| 3 | Right-click on your audio device and select “Update driver”. |
| 4 | Choose “Search automatically for updated driver software”. |
| 5 | Follow the on-screen instructions to complete the driver update process. |
Verify Browser Installation
To verify the browser installation and settings, first check if Firefox is the default browser on your computer. Open Firefox and go to the menu in the top right corner. Select “Options” and then scroll down to the “General” tab. Here, you can check if Firefox is set as the default browser. If not, click on “Make Default” to ensure it is.
Next, check if the browser is up to date by clicking on the menu again and selecting “Help” followed by “About Firefox.” If there is an update available, Firefox will prompt you to download and install it.
Lastly, check the browser’s sound settings by typing about:preferences in the address bar and going to the “Privacy & Security” tab. Make sure that audio settings are enabled and the volume is not muted.
By verifying the browser installation and settings, you can troubleshoot and fix any sound issues you may be experiencing in Firefox.
Troubleshoot Audio Extensions
- Open Firefox browser
- Click on the Menu button (three horizontal lines) in the top right corner
- Select Add-ons from the drop-down menu
- Go to the Extensions tab on the left side
- Disable any audio-related extensions
- Restart Firefox
Frequently Asked Questions
Why is my audio not working on Firefox?
Your audio may not be working on Firefox because the browser may be muted or set to a low volume in the Windows Sound settings. Additionally, ensure that the correct speakers are selected in the sound settings menu.
How do I unblock audio in Firefox?
To unblock audio in Firefox, you can go to the Settings and select the option to allow media autoplay for all websites. This will override the default Block Audio setting and allow media with sound to autoplay.
Does Firefox have audio settings?
Yes, Firefox does have audio settings. To access them, you can select Sound and click on the Playback tab in the new window that appears. Alternatively, you can right-click on the speaker icon in the taskbar and click on Sounds to access this setting. From there, you can right-click on the connected device you want to use and select Set as Default Device.