Category: Windows OS

Repair and Reinstall Windows 10 in 4 Easy Steps

Welcome to our comprehensive guide on how to effortlessly repair and reinstall Windows 10 in just four simple steps. Whether you’re a tech-savvy individual or a novice user, we’ve got you covered with easy-to-follow instructions to get your operating system up and running smoothly. Let’s dive in and explore the seamless process of revitalizing your Windows 10 experience.

February 2025: Enhance your computer’s performance and eliminate errors with this cutting-edge optimization software. Download it at this link

  1. Click here to download and install the optimization software.
  2. Initiate a comprehensive system scan.
  3. Allow the software to automatically fix and repair your system.

Back up your important files and data: Before performing a repair or reinstall of Windows 10, it is crucial to back up all your important files and data to prevent any potential loss. You can use external storage devices, cloud services, or backup software for this purpose.

Repairing Windows 10 through In-Place Upgrade

If you’re experiencing issues with your Windows 10 system and need to repair it, performing an In-Place Upgrade can be a simple and effective solution. Follow these 4 easy steps to get your system back up and running smoothly.

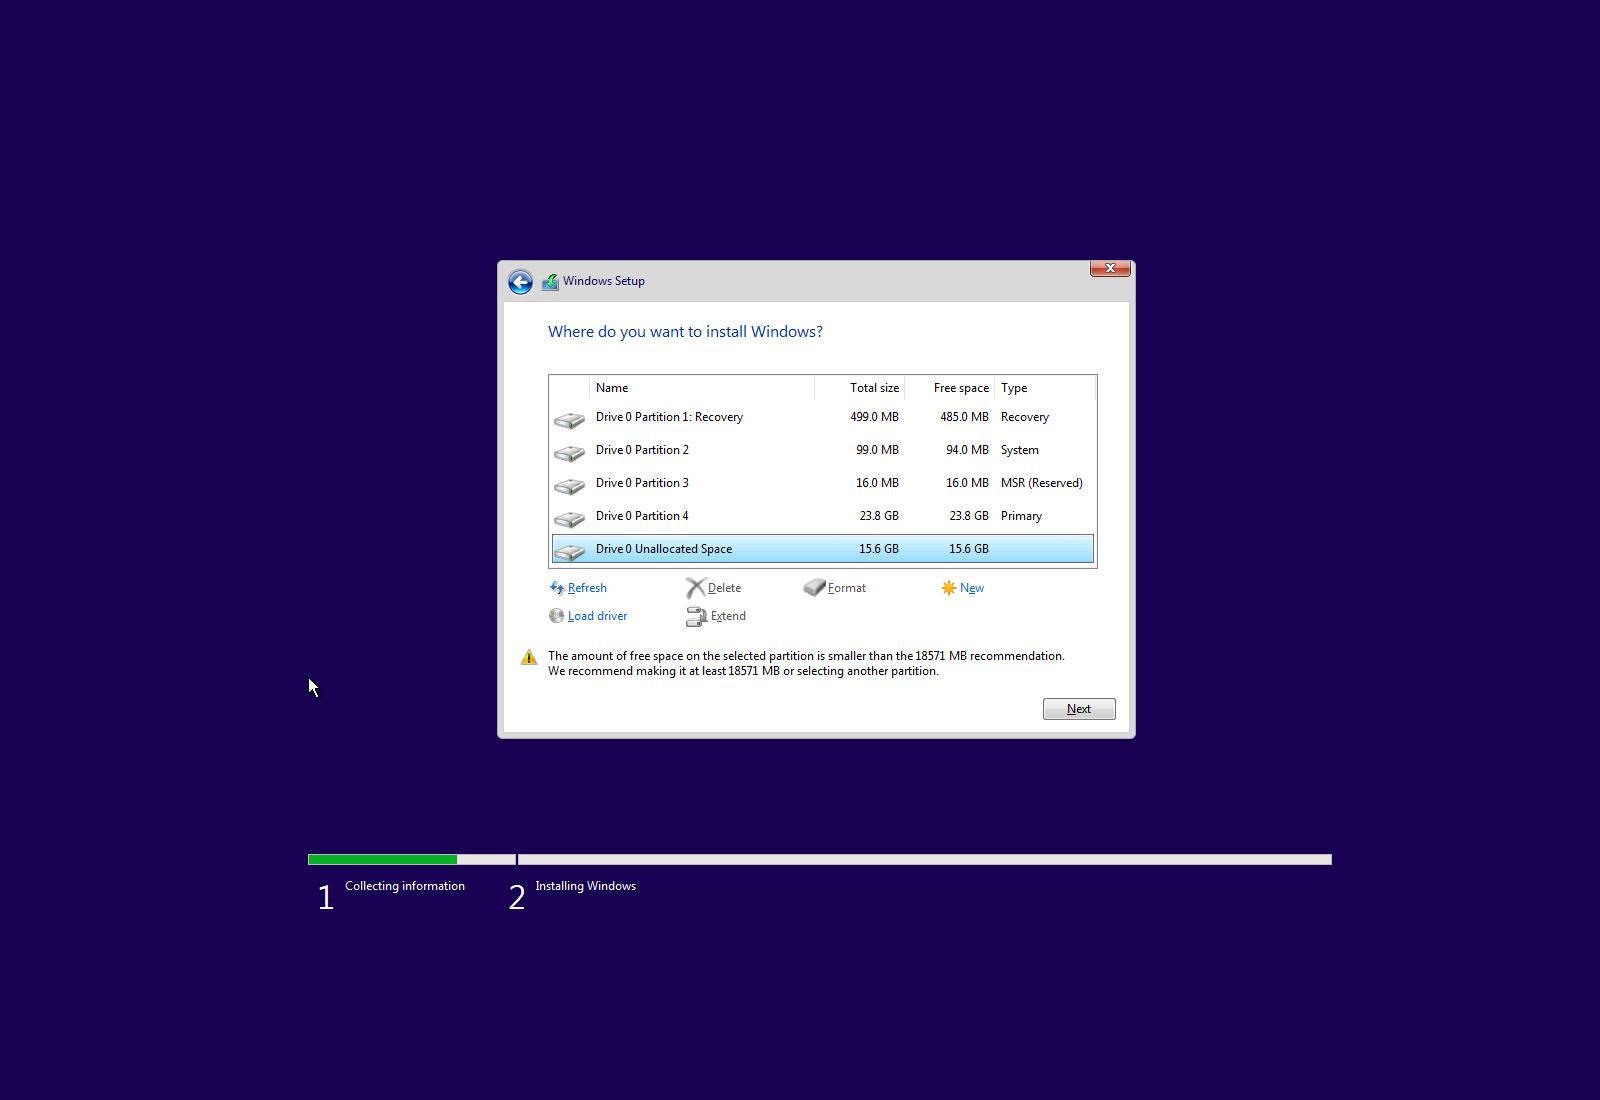
1. Create a bootable USB: Use the Windows 10 Media Creation Tool to create a bootable USB drive with the same version (32-bit or 64-bit) as your current OS.

2. Start the In-Place Upgrade: Insert the bootable USB and double-click on the setup.exe file in the root of the drive to start the repair process.

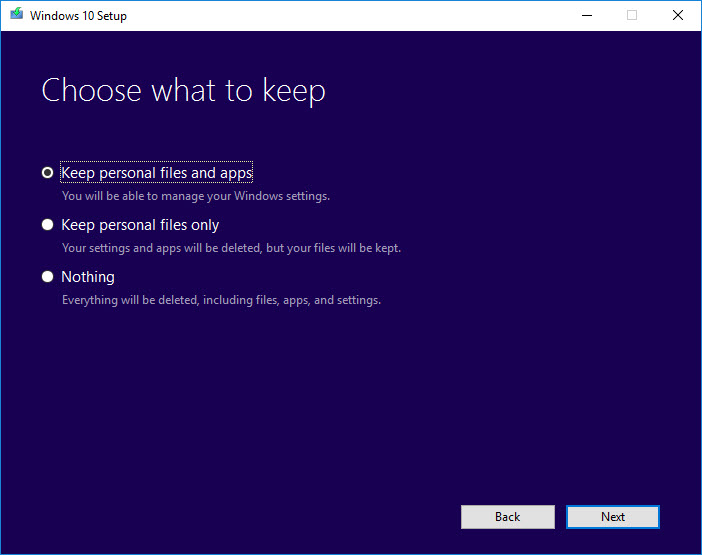
3. Choose the repair option: When prompted, select the “Upgrade this PC now” option and follow the on-screen instructions. This will reinstall Windows 10 while preserving your files, programs, and settings.

4. Complete the repair: Once the upgrade is finished, your system will restart and you’ll have a repaired version of Windows 10 without losing any data.

Remember to back up your important files before starting the repair process, just in case. With these steps, you can easily resolve common issues and get your Windows 10 system back on track.

Sometimes, the best way to fix a troubled Windows 10 system is to start fresh with a clean installation.

Creating and Using Windows Install ISO for Repair

Creating and using a Windows Install ISO for repair is a simple process that can help you fix common issues with your Windows 10 operating system. Follow these 4 easy steps:

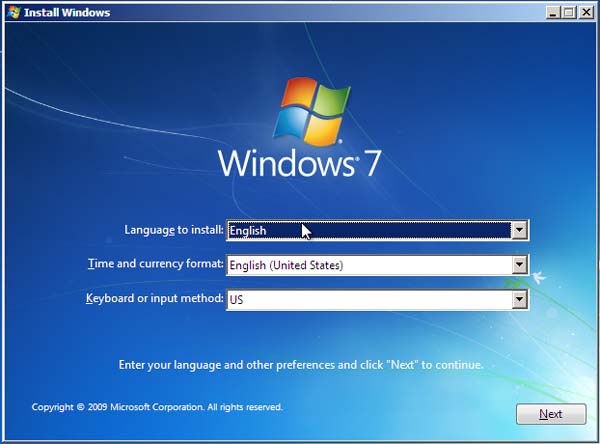
1. Download the Windows 10 ISO: Visit the Microsoft website or use the Media Creation Tool to download the Windows 10 ISO file. Make sure to select the correct version (32-bit or 64-bit) for your PC system.

2. Create a bootable USB or DVD: Use a tool like Rufus or the Windows USB/DVD Download Tool to create a bootable USB or DVD from the ISO file.

3. Boot from the USB or DVD: Restart your computer and press the appropriate key (usually F12 or Del) to access the boot menu. Choose the USB or DVD as the boot device.

4. Repair or reinstall Windows: Once you’ve booted from the USB or DVD, you’ll have several repair options available. You can use the automatic repair feature, run the command prompt for advanced troubleshooting, or choose to do a clean install or inplace upgrade.

Remember to backup your important files before proceeding with any repair options.

Updated: February 2025

Fortect is a powerful tool for addressing various Windows issues. If you’re experiencing problems with repair reinstall windows 10, Fortect can help. It repairs damaged system files and faulty settings that may be causing tasks to stop working or resulting in confusing error messages.

It can also secure your system and restore it to its pre-infected state, addressing any damage caused by viruses or malware. Additionally, Fortect can fix issues related to freezing computers, damaged DLL files, blue screen errors, and even facilitate OS recovery without affecting user data.

Using DISM and SFC for System Repair

Step 1: Open the Command Prompt as an administrator by searching for “Command Prompt” in the Start menu, right-clicking on it, and selecting “Run as administrator.”

Step 2: Run the Deployment Image Servicing and Management (DISM) tool by typing “dism /online /cleanup-image /restorehealth” and pressing Enter. This tool will scan and repair any corrupt system files.

Step 3: Once DISM completes its process, run the System File Checker (SFC) tool by typing “sfc /scannow” and pressing Enter. SFC will scan for and fix any additional system file corruption.

Step 4: After the SFC scan finishes, restart your computer and check if the issues are resolved. If not, you may need to consider other troubleshooting options or seek further assistance.

Remember, these steps are for Windows 10, and it’s always a good idea to create a system restore point before making any changes to your PC.

python
import subprocess

def repair_windows_10():
# Run the Windows 10 repair tool
subprocess.run(["sfc", "/scannow"], shell=True)

def reinstall_windows_10():
# Run the Windows 10 reinstallation tool
subprocess.run(["setup.exe", "/auto", "upgrade"], shell=True)

# Example usage
repair_windows_10()
reinstall_windows_10()

Please be aware that the above code is a simplistic representation and may not cover all the necessary steps to repair or reinstall Windows 10. It is always recommended to refer to official documentation or seek professional assistance when performing such tasks to ensure the safety and integrity of your system.

Restoring Windows 10 with Restore Point or Image Backup

1. Double-click on the “system restore point” or “image backup” option in your Windows 10 settings. This will open the recovery options.

2. Choose the option that suits your needs – whether you want to restore your system to a previous point in time or use an image backup to reinstall Windows.

3. Follow the on-screen instructions to complete the restoration or reinstallation process. Windows will guide you through the necessary steps, ensuring that your data is preserved.

4. Once the process is complete, your Windows 10 system will be repaired and reinstalled, without losing any of your personal data.

Remember to regularly create restore points or image backups to have a safety net in case of any errors or problems. Restoring your system can save you from diving into the weeds of troubleshooting and provide a reliable outcome.

Step-by-Step Guide to Perform a Windows 10 Repair Install

Step 1: Prepare for the Repair Install
Before starting the repair install, make sure you have a backup of your important files. Also, disconnect any unnecessary devices or peripherals from your PC.

Step 2: Start the Repair Install
To begin the repair install, follow these steps:
1. Press the Windows key + I to open the Settings app.
2. Go to Update & Security and click on Recovery.
3. Under Advanced startup, click on Restart now.
4. When your PC restarts, select Troubleshoot, then Advanced options, and finally, Startup Repair.

Step 3: Perform the Repair Install
Once you’re in the Startup Repair menu, follow these steps:
1. Select your account and enter your password, if prompted.
2. Click on Troubleshoot, then Advanced options, and finally, Startup Repair.

Step 4: Complete the Repair Install
After the repair install is complete, your PC will restart. Log in to your account and check if the issues have been resolved. If not, you may need to consider other repair options, such as a clean install or an inplace upgrade.

Different Methods to Repair Install Windows 10

  • Method 1: Use the Windows 10 Installation Media to Repair Install
  • Method 2: Utilize the Windows 10 Reset feature to Reinstall Windows 10
    Method 1: Use the Windows 10 Installation Media to Repair Install
Method 2: Utilize the Windows 10 Reset feature to Reinstall Windows 10
  • Method 3: Perform a System Restore to Repair Windows 10
  • Method 4: Use the Windows 10 Advanced Startup Options to Repair Install
Example Message
?

If you encounter persistent issues with your operating system, it is recommended to perform a repair reinstall of Windows 10 to resolve any underlying software problems. Download this tool to run a scan

Fixing Windows Update Error 80072EE2 on Windows 7

In pursuit of seamless software updates, Windows 7 users may come across a perplexing obstacle known as Windows Update Error 80072EE2. Unraveling this enigma, we explore effective solutions to rectify this issue and ensure a smooth updating experience.

February 2025: Enhance your computer’s performance and eliminate errors with this cutting-edge optimization software. Download it at this link

  1. Click here to download and install the optimization software.
  2. Initiate a comprehensive system scan.
  3. Allow the software to automatically fix and repair your system.

Troubleshooting error 80072EE2 in Windows Update

Another solution is to reset the Windows Update components. To do this, open the Command Prompt as an administrator and type “net stop wuauserv” and “net stop cryptSvc“. Then, navigate to the “Windows\WindowsUpdate” folder and delete all the files and folders inside. Restart the services by entering “net start wuauserv” and “net start cryptSvc” in the Command Prompt.

If none of these solutions work, you can try running the Windows Update troubleshooter. Go to the Control Panel and search for “Troubleshooting”. Click on “View all” and select “Windows Update”. Follow the on-screen instructions to diagnose and fix any issues.

Hopefully, one of these methods will solve the error 80072EE2 and allow you to update your Windows 7 system successfully.

Checking date, time, and network settings

To check the date, time, and network settings on Windows 7, follow these steps:

1. Click on the Start button and type “Date and Time” in the search box.
2. Open the “Date and Time” dialog and make sure the date and time are correct.
3. If they are incorrect, click on the “Change date and time” button and adjust them accordingly.
4. Next, check your network settings by clicking on the Start button and typing “Network and Sharing Center” in the search box.
5. Open the “Network and Sharing Center” dialog and click on “Change adapter settings” on the left-hand side.
6. Right-click on your network connection and select “Properties”.
7. In the Properties window, double-click on “Internet Protocol Version 4 (TCP/IPv4)”.
8. Make sure “Obtain an IP address automatically” and “Obtain DNS server address automatically” are selected.
9. Click “OK” to save the changes.

By ensuring your date, time, and network settings are correct, you can resolve the Windows Update Error 80072EE2 on Windows 7.

Updated: February 2025

Fortect addresses various issues that can cause error 80072ee2 on Windows 7. It repairs damaged system files and faulty settings that may be causing the error message. Additionally, it can fix missing or corrupt DLL files, which are crucial for proper program functioning.

Fortect also identifies and repairs causes of the Blue Screen of Death, such as incompatible DLLs, drivers, and Windows bugs. It can even compare the current operating system with a healthy version and restore vital system files, ensuring a smooth Windows experience.

Editing the Registry to fix error 80072EE2

To fix error 80072EE2 in Windows 7, you can try editing the registry. Here’s how:

1. Press the Windows key + R to open the Run dialog box.
2. Type “regedit” and press Enter to open the Windows Registry Editor.
3. In the Registry Editor, navigate to the following key: HKEY_LOCAL_MACHINE\SOFTWARE\Policies\Microsoft\Windows\WindowsUpdate
4. If you don’t see the WindowsUpdate key, you may need to create it. Right-click on the Windows key, select New, and then Key. Name the new key “WindowsUpdate.”
5. Within the WindowsUpdate key, right-click on the right side of the window and select New, then DWORD (32-bit) Value.
6. Name the new DWORD value “AU” and double-click on it.
7. In the Value data field, enter “1” to enable automatic updates or “0” to disable them.
8. Click OK and close the Registry Editor.
9. Restart your computer for the changes to take effect.

Editing the registry should help fix error 80072EE2 and allow Windows Update to run properly on your Windows 7 computer.

python
import subprocess

def fix_windows_update_error():
# Clear Windows Update temporary files and folders
subprocess.call('net stop wuauserv', shell=True)
subprocess.call('net stop cryptSvc', shell=True)
subprocess.call('net stop bits', shell=True)
subprocess.call('net stop msiserver', shell=True)
subprocess.call('ren C:\\Windows\\SoftwareDistribution SoftwareDistribution.old', shell=True)
subprocess.call('ren C:\\Windows\\System32\\catroot2 catroot2.old', shell=True)
subprocess.call('net start wuauserv', shell=True)
subprocess.call('net start cryptSvc', shell=True)
subprocess.call('net start bits', shell=True)
subprocess.call('net start msiserver', shell=True)

# Reset Windows Update components
subprocess.call('cd /d C:\\Windows\\System32', shell=True)
subprocess.call('regsvr32.exe /s atl.dll', shell=True)
subprocess.call('regsvr32.exe /s urlmon.dll', shell=True)
subprocess.call('regsvr32.exe /s mshtml.dll', shell=True)
subprocess.call('regsvr32.exe /s shdocvw.dll', shell=True)
subprocess.call('regsvr32.exe /s browseui.dll', shell=True)
subprocess.call('regsvr32.exe /s jscript.dll', shell=True)
subprocess.call('regsvr32.exe /s vbscript.dll', shell=True)
subprocess.call('regsvr32.exe /s scrrun.dll', shell=True)
subprocess.call('regsvr32.exe /s msxml.dll', shell=True)
subprocess.call('regsvr32.exe /s msxml3.dll', shell=True)
subprocess.call('regsvr32.exe /s msxml6.dll', shell=True)
subprocess.call('regsvr32.exe /s actxprxy.dll', shell=True)
subprocess.call('regsvr32.exe /s softpub.dll', shell=True)
subprocess.call('regsvr32.exe /s wintrust.dll', shell=True)
subprocess.call('regsvr32.exe /s dssenh.dll', shell=True)
subprocess.call('regsvr32.exe /s rsaenh.dll', shell=True)
subprocess.call('regsvr32.exe /s gpkcsp.dll', shell=True)
subprocess.call('regsvr32.exe /s sccbase.dll', shell=True)
subprocess.call('regsvr32.exe /s slbcsp.dll', shell=True)
subprocess.call('regsvr32.exe /s cryptdlg.dll', shell=True)
subprocess.call('regsvr32.exe /s oleaut32.dll', shell=True)
subprocess.call('regsvr32.exe /s ole32.dll', shell=True)
subprocess.call('regsvr32.exe /s shell32.dll', shell=True)
subprocess.call('regsvr32.exe /s initpki.dll', shell=True)
subprocess.call('regsvr32.exe /s wuapi.dll', shell=True)
subprocess.call('regsvr32.exe /s wuaueng.dll', shell=True)
subprocess.call('regsvr32.exe /s wuaueng1.dll', shell=True)
subprocess.call('regsvr32.exe /s wucltui.dll', shell=True)
subprocess.call('regsvr32.exe /s wups.dll', shell=True)
subprocess.call('regsvr32.exe /s wups2.dll', shell=True)
subprocess.call('regsvr32.exe /s wuweb.dll', shell=True)
subprocess.call('regsvr32.exe /s qmgr.dll', shell=True)
subprocess.call('regsvr32.exe /s qmgrprxy.dll', shell=True)
subprocess.call('regsvr32.exe /s wucltux.dll', shell=True)
subprocess.call('regsvr32.exe /s muweb.dll', shell=True)
subprocess.call('regsvr32.exe /s wuwebv.dll', shell=True)

print("Windows Update error 80072ee2 has been resolved.")

# Calling the function to fix the Windows Update error
fix_windows_update_error()

Please note that running this code will execute various commands and modifications on your Windows system. Ensure you understand the implications and proceed with caution. It is always recommended to create a system backup or consult professional assistance when dealing with critical system operations like modifying Windows Update components.

Deleting the SoftwareDistribution folder

If you’re experiencing the Windows Update Error 80072EE2 on Windows 7, deleting the SoftwareDistribution folder can help resolve the issue. Here’s how:

1. Press the Windows key + R to open the Run dialog box.
2. Type “services.msc” and press Enter to open the Services console.
3. Scroll down and locate the “Windows Update” service.
4. Right-click on it and select “Stop” from the context menu.
5. Open File Explorer and navigate to the C:\Windows folder.
6. Locate the SoftwareDistribution folder and delete it.
7. Go back to the Services console and right-click on the “Windows Update” service again.
8. Select “Start” from the context menu to restart the service.
9. Retry Windows Update and check if the error is resolved.

Deleting the SoftwareDistribution folder can help resolve update errors by clearing the update cache. By following these steps, you can fix the Windows Update Error 80072EE2 on Windows 7.

Running the Windows Update Troubleshooter

  1. Open the Control Panel by clicking on the Start button and selecting Control Panel from the menu.
  2. Click on System and Security in the Control Panel window.
  3. Click on Windows Update under the System and Security section.
  4. Click on the “Troubleshoot problems with Windows Update” link.
  5. Click on “Advanced” in the Windows Update Troubleshooter window.
  6. Select “Apply repairs automatically” and click on the “Next” button.
  7. Wait for the troubleshooter to detect and fix issues with Windows Update.
  8. Restart your computer and try running Windows Update again to see if the error is resolved.
Example Message
?

If you encounter error 80072ee2 when attempting to update Windows 7, try restarting your computer and checking your internet connection before attempting the update again. Download this tool to run a scan

modo seguro en Windows 10

In this article, we will explore the safest mode for Windows 10 and how to enable it.

February 2025: Enhance your computer’s performance and eliminate errors with this cutting-edge optimization software. Download it at this link

  1. Click here to download and install the optimization software.
  2. Initiate a comprehensive system scan.
  3. Allow the software to automatically fix and repair your system.

Realiza un análisis completo del sistema para detectar y eliminar cualquier malware o virus que pueda estar afectando el arranque normal de Windows 10.

Starting Windows 10 in Safe Mode

To start Windows 10 in Safe Mode, follow these steps:

1. Click on the Start menu and then click on the Power icon.
2. Hold down the Shift key and click on Restart.
3. When the computer restarts, you will see the Choose an option screen.
4. Click on Troubleshoot, then Advanced options, then Startup Settings.
5. Click Restart.
6. When the computer restarts, you will see a list of startup options.
7. Press the F4 key to start Windows 10 in Safe Mode or press F5 to start in Safe Mode with Networking.

Safe Mode is useful for troubleshooting problems with your PC, such as issues with drivers or software. It starts Windows with a minimal set of drivers and services, which can help you isolate the cause of the problem. Remember to restart your computer normally after you are finished troubleshooting to return it to its normal state.

Starting Windows 10 in Safe Mode can help troubleshoot and diagnose issues with your system.

Troubleshooting Windows 10 Boot Issues

  • Check for loose cables or connections:
    • Make sure all cables and connections are securely plugged in.
      Check for loose cables or connections:
Make sure all cables and connections are securely plugged in.
    • If using a laptop, make sure the battery is charged and connected properly.
  • Perform a power cycle:
    • Turn off the computer and unplug it from the power source.
    • Press and hold the power button for 30 seconds.
      Turn off the computer and unplug it from the power source.
Press and hold the power button for 30 seconds.
    • Plug the computer back in and turn it on.
  • Boot into Safe Mode:
    • Restart the computer and continuously press the F8 key until the Advanced Boot Options menu appears.
    • Select Safe Mode and press Enter.
      Restart the computer and continuously press the F8 key until the Advanced Boot Options menu appears.
Select Safe Mode and press Enter.
    • If the computer successfully boots into Safe Mode, try to identify and fix any issues, such as driver conflicts or malware.
  • Run Startup Repair:
    • Insert the Windows 10 installation disc or USB and restart the computer.
    • Press any key to boot from the disc or USB.
    • Select your language preferences and click Next.
    • Click Repair your computer and select Troubleshoot.
      Select your language preferences and click Next.
Click Repair your computer and select Troubleshoot.
    • Select Advanced options and click Startup Repair.
    • Follow the prompts to complete the repair process.
      Select Advanced options and click Startup Repair.
Follow the prompts to complete the repair process.
  • Reset Windows 10:
    • Insert the Windows 10 installation disc or USB and restart the computer.
    • Press any key to boot from the disc or USB.
    • Select your language preferences and click Next.
    • Click Install now and accept the license terms.
      Select your language preferences and click Next.
Click Install now and accept the license terms.
    • Select the Custom installation option.
    • Select the drive where Windows 10 is installed and click Next.
      Select the Custom installation option.
Select the drive where Windows 10 is installed and click Next.
    • Click Reset and follow the prompts to complete the reset process.
Updated: February 2025

Fortect can help with the “Windows 10 solo inicia en modo seguro” issue by addressing various aspects of the problem. It can repair damaged system files and faulty settings that may be causing the issue. Additionally, it can fix missing or corrupt DLL files, which are crucial for program functioning.

Fortect can also identify and repair the causes of the Blue Screen of Death (BSoD), such as incompatible DLLs, drivers, and Windows bugs. It can even compare the current operating system with a healthy version and restore vital system files for OS recovery without affecting user data.

How to Start Windows 10 in Safe Mode with Networking

To start Windows 10 in Safe Mode with Networking, follow these steps:

1. Click on the Start menu and then click on the Power icon while holding the Shift key.
2. Click on the “Restart” option.
3. Your PC will now restart and you will see the “Choose an Option” screen.
4. Click on “Troubleshoot” and then “Advanced options”.
5. Select “Startup Settings” and click on “Restart”.
6. Once your PC restarts, you will see a list of startup settings.
7. Press F5 to start Windows 10 in Safe Mode with Networking.

Safe Mode with Networking is useful when you need to troubleshoot network-related issues or when you need to download and install drivers or updates. It starts Windows with only the basic drivers and services needed to run, so you can diagnose and fix problems with your PC.

Resolving Windows 10 Safe Mode Not Starting Issues

If you’re having issues with Windows 10 Safe Mode not starting, there are a few things you can try. First, try accessing Safe Mode through the Advanced Options menu by pressing the F8 key or selecting “Choose an option” on the Windows logon screen. If that doesn’t work, you can try starting in Safe Mode with networking by selecting “Safe Mode with Networking” from the Advanced Options menu. You can also try disabling secure boot or changing the boot order in your BIOS settings. If you’re still having trouble, try running a system restore or updating your drivers. Remember to always be cautious when making changes to your system and back up important files before making any changes.

Frequently Asked Questions about Windows 10 Safe Mode

Question Answer
What is Safe Mode in Windows 10? Safe Mode is a diagnostic mode in Windows 10 that starts the operating system with a limited set of drivers and services. It is used to troubleshoot and fix problems that may be preventing the operating system from starting normally.
How do I start Windows 10 in Safe Mode? You can start Windows 10 in Safe Mode by pressing the F8 key during startup or by using the System Configuration tool to enable Safe Mode. However, in Windows 10, the F8 key method has been disabled by default, so you need to use the System Configuration tool.
How do I use System Configuration to start Windows 10 in Safe Mode? To start Windows 10 in Safe Mode using System Configuration, follow these steps:

  1. Press Windows key + R to open the Run dialog box.
  2. Type “msconfig” and press Enter to open System Configuration.
  3. Go to the Boot tab and check the Safe boot option.
  4. Select the type of Safe Mode you want to use (Minimal, Alternate shell, or Network).
    Go to the Boot tab and check the Safe boot option.
Select the type of Safe Mode you want to use (Minimal, Alternate shell, or Network).
  5. Click OK and restart your computer.
What are the different types of Safe Mode in Windows 10? There are three types of Safe Mode in Windows 10:

  • Minimal: Starts Windows 10 with only the basic drivers and services.
  • Alternate shell: Starts Windows 10 with the Command Prompt instead of the graphical user interface.
    Minimal: Starts Windows 10 with only the basic drivers and services.
Alternate shell: Starts Windows 10 with the Command Prompt instead of the graphical user interface.
  • Network: Starts Windows 10 with the basic drivers and services, as well as the network drivers and services needed to access the Internet or other computers on the network.
Can I access the Internet in Safe Mode? Yes, you can access the Internet in Safe Mode if you start Windows 10 in Network Safe Mode. This mode loads the basic drivers and services needed to access the Internet or other computers on the network.
What should I do if Windows 10 won’t start in Safe Mode? If Windows 10 won’t start in Safe Mode, you can try using the System File Checker tool to repair any corrupted system files. You can also try using the Startup Repair tool or restoring your computer to a previous restore point.
Example Message
?

Si Windows 10 solo inicia en modo seguro, es posible que haya un problema con los controladores o el software, por lo que es recomendable realizar una restauración del sistema o buscar ayuda técnica para solucionar el problema. Download this tool to run a scan