Page 29 of 51

Fixing Motherboard Internet Issues

In this article, I will discuss common motherboard internet issues and provide solutions for fixing them.

June 2025: Enhance your computer’s performance and eliminate errors with this cutting-edge optimization software. Download it at this link

  1. Click here to download and install the optimization software.
  2. Initiate a comprehensive system scan.
  3. Allow the software to automatically fix and repair your system.

Recognizing Common Symptoms of Connectivity Issues

Common symptoms of connectivity issues with your motherboard can include slow internet speeds, intermittent connection drops, or the inability to connect to the internet at all. If you are experiencing any of these issues, it’s important to troubleshoot the problem to get your internet connection back up and running smoothly.

One common symptom of connectivity issues is slow internet speeds. If you notice that web pages are taking a long time to load or videos are buffering frequently, this could indicate a problem with your motherboard’s internet connection.

Another red flag to watch out for is intermittent connection drops. If you find that your internet connection is working fine one moment and then suddenly cuts out without warning, there may be an issue with your motherboard’s connectivity.

If you are unable to connect to the internet at all, this is a clear sign that there is a problem with your motherboard’s internet connection. Make sure to check all connections and settings to ensure everything is configured correctly.

It’s important to address these symptoms promptly to avoid any disruptions to your internet usage. By recognizing these common signs of connectivity issues with your motherboard, you can take the necessary steps to fix the problem and get back online quickly.

Diagnosing Physical and Hardware-Related Causes

Motherboard diagnostic tools

Issue Possible Cause Diagnostic Steps
No Internet Connection Loose or faulty Ethernet cable Check Ethernet cable connections, replace cable if necessary
Intermittent Connection Network card driver issues Update network card drivers, check for software conflicts
Slow Internet Speed Overheating motherboard Check motherboard temperature, clean dust and ensure proper ventilation
No Wi-Fi Signal Dead Wi-Fi card Replace Wi-Fi card, check antenna connections

FAQs

Can a motherboard cause Ethernet issues?

A motherboard can cause Ethernet issues if there is a problem with the Ethernet port itself. It may be necessary to update the Ethernet driver, reinstall the network card, replace the port, or use a USB Ethernet adapter to resolve the issue. Additionally, interference from other devices or a lightning strike could also cause port issues.

Why is my WiFi not working on my motherboard?

Your WiFi may not be working on your motherboard due to outdated BIOS and chipset drivers, or firmware on your wireless access point. Update these from your system manufacturer’s website and the access point to potentially resolve the issue.

Can my motherboard affect my WiFi?

My motherboard can affect my WiFi speed if it contains WiFi capabilities, but typically the motherboard itself is not the main factor affecting internet speed. The bandwidth of your internet connection is what ultimately determines the speed of your WiFi.

How do I know if my motherboard Ethernet is bad?

You can know if your motherboard Ethernet is bad if you experience issues such as no internet access, limited connectivity, network cable unplugged, intermittent connection, no lights or indicators, failed network diagnostics, hardware-related issues, or software-related issues.

Fix White Screen on Desktop Monitor Windows 11/10/8/7 Laptop

Have you ever encountered the frustrating issue of a white screen on your desktop monitor while using a Windows laptop?

June 2025: Enhance your computer’s performance and eliminate errors with this cutting-edge optimization software. Download it at this link

  1. Click here to download and install the optimization software.
  2. Initiate a comprehensive system scan.
  3. Allow the software to automatically fix and repair your system.

Diagnose and Fix with Hardware Checks

Desktop computer with diagnostic tools.

If you are experiencing a white screen on your desktop monitor while using Windows 11/10/8/7 laptop, it may be caused by hardware issues. To diagnose and fix the problem, you can start by conducting hardware checks.

1. Check the monitor connections: Make sure the cables connecting your monitor to the computer are securely plugged in. If necessary, try using a different cable to see if that resolves the issue.

2. Test the monitor on another device: Connect the monitor to another computer or laptop to determine if the issue lies with the monitor itself or the computer hardware.

3. Check the monitor settings: Adjust the brightness and contrast settings on the monitor to see if that helps. You can also reset the monitor to its default settings.

If none of these steps resolve the white screen issue, it may be a hardware problem that requires professional assistance. Consider taking your computer to a technician for further diagnosis and repair.

Employ Software and Driver Updates

1. Start by checking for any available software updates for your operating system. Make sure you are running the latest version of Windows to ensure compatibility with your monitor.

2. Next, update your graphics card driver. Right-click on the Start button and select Device Manager. Expand the Display adapters category, right-click on your graphics card, and select Update driver.

3. Additionally, check for any monitor driver updates. Open Device Manager again, expand the Monitors category, right-click on your monitor, and select Update driver.

4. Reboot your laptop after installing the updates to apply the changes.

By employing software and driver updates, you can resolve issues that may be causing the white screen on your desktop monitor. Keep your system up to date to ensure optimal performance and compatibility with your hardware.

Implement Safe Mode and System Restore Techniques

  • Restart your computer.
  • During the startup process, press the F8 key multiple times until the Advanced Boot Options menu appears.
  • Choose Safe Mode using the arrow keys on your keyboard and press Enter.
  • Once in Safe Mode, check for any recently installed software or updates that may have caused the white screen issue.
  • If the white screen does not appear in Safe Mode, it likely indicates a software conflict.

System Restore Techniques

  • Click on the Start button and type System Restore in the search bar.
  • Select Create a restore point from the search results.
  • Click on the System Restore button and follow the on-screen instructions to choose a restore point before the white screen issue occurred.
  • Restart your computer after the restore process is complete.
  • If the white screen persists, try using a different restore point or seek professional help.

Employ Force Restart and Malware Scans

Employ Force Restart: If you are facing a white screen on your desktop monitor, the first step you should take is to force restart your laptop. To do this, simply hold down the power button on your laptop until it shuts down completely. Wait a few seconds, then turn it back on and check if the white screen issue has been resolved.

Run Malware Scans: Another common cause of a white screen on your desktop monitor could be malware or virus infections. To address this, run a malware scan on your laptop using a trusted antivirus software. Make sure to update the antivirus program before scanning to ensure it detects the latest threats. If any malware is detected, follow the prompts to remove it from your system.

After running a malware scan, restart your laptop and check if the white screen issue persists. If the problem continues, you may need to consider other troubleshooting steps such as checking for software updates, adjusting display settings, or contacting technical support for further assistance.

FAQ

How do I fix my white screen on my desktop?

To fix a white screen on your desktop, you can try force restarting your PC, using third-party software, checking your drivers, booting in safe mode, scanning for malware, removing a recently installed Windows update, running an SFC scan, or using system restore.

Why did my screen become white?

Can white screen of death be fixed?

White screen of death can be fixed by removing all external devices connected to your computer via USB, as they could be causing the issue.

What causes a LCD screen to go white?

A LCD screen goes white when the screen circuit board fuse is blown or when the screen power supply conversion circuit fails, resulting in a blank display.

How to Fix Origin Not Opening and Errors

Having trouble with Origin not opening or encountering errors? Let’s discuss some solutions.

June 2025: Enhance your computer’s performance and eliminate errors with this cutting-edge optimization software. Download it at this link

  1. Click here to download and install the optimization software.
  2. Initiate a comprehensive system scan.
  3. Allow the software to automatically fix and repair your system.

Delete Cache Files

  • Close the Origin client if it is currently open.
  • Press Windows key + R to open the Run dialog box.
  • Type %ProgramData% and hit Enter.
  • Delete the Origin folder.
  • Press Windows key + R again.
  • Type %AppData% and hit Enter.
  • Delete the Origin folder in this location as well.
  • Restart your computer and try opening Origin again.

Run Compatibility Troubleshooter

Compatibility Troubleshooter icon

To run the Compatibility Troubleshooter, follow these steps:

1. Right-click on the Origin shortcut on your desktop or in the Start menu.

2. Select “Properties” from the context menu.

3. Go to the “Compatibility” tab.

4. Check the box next to “Run this program in compatibility mode for” and select the appropriate Windows version from the drop-down menu.

5. Click on “Apply” and then “OK” to save the changes.

6. Try opening Origin again to see if the issue has been resolved.

If the Compatibility Troubleshooter doesn’t fix the problem, you may need to explore other troubleshooting options.

Update Graphics Driver

To update your graphics driver and potentially fix Origin not opening or errors, follow these steps:

1. Open the Start menu and search for “Device Manager.”
2. Double-click on “Display adapters” to expand the category.
3. Right-click on your graphics card and select “Update driver.”
4. Choose “Search automatically for updated driver software” and follow the on-screen instructions.
5. If Windows doesn’t find a new driver, visit the manufacturer’s website to download and install the latest driver manually.
6. Restart your computer after updating the driver to apply the changes.

Updating your graphics driver can resolve compatibility issues and improve overall performance when running Origin or other graphics-intensive applications.

Reinstall the Client

Once Origin has been uninstalled, go to the official Origin website and download the latest version of the client. Run the installer and follow the on-screen instructions to reinstall Origin on your computer.

After the installation is complete, launch the client and log in to your account. This should resolve any issues you were experiencing with Origin not opening or errors popping up.

If you continue to encounter problems, you may want to consider reaching out to Origin’s customer support for further assistance.

Add as Antivirus Exception

To fix Origin not opening and errors, one potential solution is to add it as an antivirus exception. This can help prevent your antivirus software from blocking Origin’s processes, which may be causing the issue. To do this, follow these steps:

1. Open your antivirus software.
2. Navigate to the settings or preferences section.
3. Look for an option related to adding exceptions or exclusions.
4. Add the Origin installation folder as an exception. This is typically located in the C:\Program Files (x86)\Origin directory on Windows.

By adding Origin as an antivirus exception, you may be able to resolve the issue of it not opening or encountering errors.

Perform a Clean Boot

1. Press the Windows key + R to open the Run command.
2. Type msconfig and press Enter to open the System Configuration window.
3. Go to the Services tab and check the box next to “Hide all Microsoft services.”
4. Click on “Disable all” to disable all non-Microsoft services.
5. Next, go to the Startup tab and click on “Open Task Manager.”
6. Disable all startup apps by right-clicking on each and selecting Disable.
7. Close Task Manager and click Apply, then OK in the System Configuration window.
8. Restart your computer to apply the Clean Boot.

Performing a Clean Boot can help identify any conflicting programs that may be causing Origin to not open or display errors.

F.A.Q.

How do I fix Origin on my computer?

To fix Origin on your computer, you can start by closing the Origin client and then uninstalling it through the Control Panel. After that, reinstall Origin and try installing your game again.

Why Origin is not working?

Origin may not be working because it is not compatible with your current Windows version. To fix this issue, you can run the Program Compatibility Troubleshooter.

How do I fix Sims 4 Origin?

To fix Sims 4 Origin, you can try repairing the game by opening Origin, clicking on your games library, right-clicking on The Sims 4, and selecting Repair Game. If the game still won’t load, quit Origin and try launching the game again from the Sims 4 icon in your Applications folder.

How do I reset Origin?

To reset Origin, you can download the Reset Origin tool, locate the file in your Downloads folder, and then double-click to open it. Follow the prompts to click the Reset Origin button, enter your password, and confirm to start the reset process.

Troubleshoot hyperlinks not opening in browser

Having trouble with hyperlinks not opening in your browser? Let’s troubleshoot the issue together.

June 2025: Enhance your computer’s performance and eliminate errors with this cutting-edge optimization software. Download it at this link

  1. Click here to download and install the optimization software.
  2. Initiate a comprehensive system scan.
  3. Allow the software to automatically fix and repair your system.

Symptoms of the Issue

Symptoms of hyperlinks not opening in a browser may include clicking on a hyperlink but nothing happening, receiving an error message when trying to open a link, or the browser freezing when attempting to access a hyperlink.

If you are experiencing these issues, first check your internet connection to ensure it is working properly. Next, clear your browser cache and cookies to see if that resolves the problem.

If the problem persists, try opening the hyperlink in a different browser to see if the issue is specific to one browser. You can also disable any browser extensions or add-ons that may be causing conflicts with the hyperlinks.

Finally, ensure your operating system and browser are up to date as outdated software can sometimes cause issues with hyperlink functionality.

Reset Internet Explorer Settings

Internet Explorer settings

This action will restore Internet Explorer to its default settings, potentially resolving issues with hyperlinks not opening in the browser.

Use the Microsoft Fix It Tool

Microsoft Fix It Tool interface

If hyperlinks are not opening in your browser, you can use the Microsoft Fix It Tool to troubleshoot the issue. First, navigate to the Microsoft Fix It Tool website. Then, locate the specific troubleshooter for fixing hyperlinks not opening in the browser. Download and run the troubleshooter on your computer. Follow the on-screen instructions to complete the troubleshooting process. Once the troubleshooter has finished running, restart your computer to apply any changes that were made.

Test opening hyperlinks in your browser again to see if the issue has been resolved. If the problem persists, consider reaching out to your system administrator or Microsoft support for further assistance.

Set Default Programs

If the issue persists, you may need to reset the default programs using the Windows Registry. Press Windows + R to open the Run dialog box, type “regedit,” and press Enter. Navigate to HKEY_CURRENT_USER\Software\Microsoft\Windows\CurrentVersion\Explorer\FileExts\.html and delete the “UserChoice” key.

After making these changes, restart your computer and try opening hyperlinks again. If the problem continues, consider reaching out to a system administrator or help desk for further assistance.

Edit the Registry Manually

1. Press the Windows key + R to open the Run dialog box.

2. Type “regedit” and press Enter to open the Windows Registry Editor.

3. Navigate to “HKEY_CLASSES_ROOT\htmlfile\shell\open\command” in the Registry Editor.

4. Double-click on the “(Default)” entry and make sure the value data is set to “C:\Program Files\Internet Explorer\iexplore.exe” -nohome (or the correct file path for your default browser).

By editing the Registry in this way, you can potentially resolve issues with hyperlinks not opening in your browser.

Export and Import Registry Key

Registry Key Description
HKEY_CLASSES_ROOT\htmlfile\shell\open\command Specifies the command that is used to open HTML files. Check if the value is set to the correct browser executable path.
HKEY_CLASSES_ROOT\.html Contains information about how Windows handles HTML files. Make sure the default value is set to htmlfile.
HKEY_CURRENT_USER\Software\Classes\.html Similar to the previous key, ensure that the default value is set to htmlfile.

Exporting and importing these registry keys can help resolve issues with hyperlinks not opening in your browser. Be sure to proceed with caution when making changes to the Windows registry.

Reinstall Web Browsers

To troubleshoot hyperlinks not opening in your browser, one solution is to reinstall the web browser. This can help resolve any issues with the browser’s settings or configurations that may be causing the problem.

First, you will need to uninstall the browser from your computer. To do this, go to the Control Panel and select “Add or Remove Programs” (Windows 7/8/8.1) or “Programs and Features” (Windows 10). Find the web browser in the list of installed programs, right-click on it, and select “Uninstall.”

Once the browser is uninstalled, download the latest version from the official website and install it on your computer. This should reset the browser to its default settings and may fix the issue with hyperlinks not opening.

After reinstalling the browser, test to see if the hyperlinks are now working properly. If the problem persists, you may need to further troubleshoot the issue or seek help from a tech support professional.

FAQs

Why can’t I open hyperlinks?

You can’t open hyperlinks because there may be security restrictions in your Internet browser preventing pop-up windows from opening, or your Flash player plug-in may be blocking you from opening URLs in local Flash files.

How do I fix hyperlinks not responding?

To fix hyperlinks not responding, you can try opening and resetting your internet browser. If that doesn’t work, you may need to replace an html file in the registry.

Why do hyperlinks stop working?

Hyperlinks stop working for various reasons, such as mistyped URLs, pages being offline, URL changes, or restricted access to the linked page.

Why won’t Microsoft Office open hyperlinks?

Microsoft Office won’t open hyperlinks because the default Internet browser is not registered properly in the operating system. This often occurs after uninstalling Google Chrome or changing the default browser to Chrome or Firefox.

PS4 Platinum Headset Dongle Not Lighting Up – How to Fix

In my experience, the PS4 Platinum headset dongle not lighting up can be a frustrating issue to deal with. Here are some solutions to help you fix it.

June 2025: Enhance your computer’s performance and eliminate errors with this cutting-edge optimization software. Download it at this link

  1. Click here to download and install the optimization software.
  2. Initiate a comprehensive system scan.
  3. Allow the software to automatically fix and repair your system.

Troubleshooting Wireless Headset Pairing

PS4 Platinum headset dongle not lighting up

If your PS4 Platinum Headset Dongle is not lighting up, it may be due to a pairing issue. To troubleshoot this problem, follow these steps:

1. Check the USB port: Make sure the dongle is properly inserted into the USB port on your PlayStation 4 console. If it’s loose, try plugging it into a different port.

2. Reset the dongle: Press and hold the reset button on the dongle for 10 seconds. This will reset the pairing settings and should make the dongle light up again.

3. Reset the headset: Turn off the headset and then turn it back on while holding the power button for 10 seconds. This will reset the headset’s pairing settings.

If these steps don’t resolve the issue, try performing a factory reset on both the dongle and the headset. This will erase all previous pairing information and start fresh.

Fixing Echo and Audio Issues

If your PS4 Platinum headset dongle is not lighting up, there are a few steps you can take to try and fix the issue.

First, make sure the dongle is properly connected to the USB port on your PlayStation 4. It may not be lighting up because it is not securely plugged in.

Next, try resetting the dongle by inserting a small pin into the reset hole on the back of the dongle. Hold the pin in the hole for a few seconds, then release it. This may help to reset any issues causing the lack of lighting.

Another option is to reset your wireless router, as sometimes connectivity issues can cause the dongle not to light up. Turn off your router, wait a few seconds, then turn it back on.

If none of these steps work, you may need to perform a factory reset on your headset. This will erase all saved settings, so make sure to back up any important information beforehand. To perform a factory reset, press and hold the reset button on the headset for 10 seconds.

Indicator Light and Disconnection Solutions

Indicator Light Disconnection Solutions
1. Solid White Light – Check if the headset is properly connected to the dongle
– Make sure the dongle is securely plugged into the PS4
– Ensure the dongle is not blocked by any obstacles
2. Blinking White Light – Reset the dongle by unplugging and replugging it
– Restart the PS4 console
– Check for any interference from other wireless devices
3. No Light – Replace the batteries in the headset
– Try using a different USB port on the PS4
– Reset the headset by holding the power button for 10 seconds

Companion App Recognition Problems

If you are experiencing recognition problems with the companion app on your PS4 Platinum Headset dongle, there are a few steps you can take to try and fix the issue.

First, make sure the dongle is securely connected to the PS4 console and that it is properly inserted. Sometimes a loose connection can cause recognition problems.

Next, try resetting the dongle by pressing and holding the reset button for a few seconds. This can help to refresh the connection and resolve any issues.

If resetting the dongle does not work, try restarting your PS4 console. Sometimes a simple reboot can solve recognition problems with accessories.

If none of these steps work, check for any software updates for both the PS4 console and the companion app. Updating to the latest software versions can sometimes fix compatibility issues.

Lastly, make sure that the companion app is properly installed and configured on your device. Double-check the settings and permissions to ensure that everything is set up correctly.

FAQ

Why is my PS4 wireless headset not turning on?

Your PS4 wireless headset may not be turning on due to being out of range from your console or interference from another electronic device. Try resetting your headset or turning off and on your wireless router to troubleshoot the issue.

Why is my headset not showing up on PS4?

Your headset may not be showing up on your PS4 because the console is not recognizing it. Try going to Settings>Devices>Audio Devices>Headset and Headphones to troubleshoot the issue. Make sure the headset adapter is securely plugged in until you hear a “click,” even if it requires some force.

How do I put my PS4 Platinum headset in pairing mode?

To put your PS4 Platinum headset in pairing mode, you can turn off the headset by pressing the OFF button near the ear cup and then turn it back ON. The headset light will blink to indicate pairing mode.

How to use PS4 headset without USB?

To use a PS4 headset without USB, you can connect a Bluetooth headset by turning it on and setting it to pair mode. Then, go to Settings, select Devices, choose Bluetooth Devices, and select your headset from the list to pair it with the PS4.

PS4 Cannot Start Application Error Fix – Spiderman

Having trouble with the “PS4 Cannot Start Application Error” while trying to play Spiderman? Let’s discuss some potential fixes.

June 2025: Enhance your computer’s performance and eliminate errors with this cutting-edge optimization software. Download it at this link

  1. Click here to download and install the optimization software.
  2. Initiate a comprehensive system scan.
  3. Allow the software to automatically fix and repair your system.

Restart Console, Clean Disk, and Adjust Power Connection

To fix the PS4 Cannot Start Application Error while playing Spiderman, there are a few steps you can take. First, try restarting your console to see if that resolves the issue. If that doesn’t work, you can try cleaning the disk to ensure there are no smudges or scratches causing the error. Additionally, check and adjust the power connection to ensure it is securely plugged in.

If the issue persists, you may need to check for any software updates for both the game and your console. Sometimes, outdated software can cause errors like this. You can also try rebuilding the database on your PS4 to see if that helps resolve the problem.

Reinstall Game and Update System Software

If you are experiencing the “PS4 Cannot Start Application” error while trying to play Spiderman on your PlayStation 4, there are a few steps you can take to fix the issue.

1. Reinstall the game: Go to the game library, delete the Spiderman game file, and then redownload and reinstall it from the PlayStation Store.

2. Update system software: Make sure your PS4 system software is up to date. Go to Settings > System Software Update and follow the on-screen instructions to install any available updates.

3. Rebuild the database: To do this, boot your PS4 in safe mode by holding down the power button for 7 seconds. Select the “Rebuild Database” option from the menu.

Rebuild and Reset the PS4 Database

Playstation controller and console

Step Instructions
1 Turn off the PS4 completely by holding the power button for at least 7 seconds until you hear a second beep.
2 Connect your PS4 controller with a USB cable and press the PS button to turn on the console in Safe Mode.
3 Select “Rebuild Database” option from the Safe Mode menu and wait for the process to complete.
4 If the issue persists, you can try resetting the PS4 to factory settings by selecting the “Initialize PS4” option in Safe Mode.

Troubleshoot CE-30005-8 Error

If you are encountering the CE-30005-8 error on your PS4 while trying to start the Spiderman application, there are a few steps you can take to troubleshoot and fix the issue.

First, try restarting your PS4 and launching the game again. If the error persists, try rebuilding the database of your PS4 by booting into Safe Mode. To do this, turn off your PS4 completely, then hold down the power button until you hear two beeps. Select the “Rebuild Database” option and wait for the process to complete.

If the error still occurs, you may need to delete and reinstall the Spiderman application. Before doing this, make sure to back up any save data to prevent loss.

If none of these solutions work, you may need to contact PlayStation support for further assistance or check online forums like Reddit or GameFAQs for additional troubleshooting tips from the community.

F.A.Qs

How do you fix PS4 when it says Cannot start the application?

To fix the issue when your PS4 says “Cannot start the application,” you can try restarting your console, checking for system updates, or reinstalling the game or application causing the error.

What does CE 30005 8 mean?

CE 30005 8 indicates an error that occurred while trying to access the Hard Disk Drive (“HDD”) or Blu-ray / DVD Drive. To troubleshoot, start by ejecting the disc from the system and checking for any dirt, scratches, or damage.

Why won’t my PS4 install Spider-Man?

Your PS4 won’t install Spider-Man because there may not be enough storage space on your console. Check your PS4’s Storage capacity under Settings to ensure you have enough space to download and install the game.

Fix Windows Explorer Not Responding Problem

If you are experiencing issues with Windows Explorer not responding, it can be frustrating and disruptive to your workflow.

June 2025: Enhance your computer’s performance and eliminate errors with this cutting-edge optimization software. Download it at this link

  1. Click here to download and install the optimization software.
  2. Initiate a comprehensive system scan.
  3. Allow the software to automatically fix and repair your system.

Recognizing the Symptoms

If you’re experiencing Windows Explorer not responding, there are a few key symptoms to watch out for. One common sign is frequent freezing or crashing of File Explorer when trying to open folders or files. Another symptom is sluggish performance, where File Explorer takes longer than usual to respond to commands. You may also notice error messages popping up, indicating a problem with Windows Explorer.

Pay attention to any unusual behavior like icons flickering on the desktop or the taskbar disappearing and reappearing. These are potential signs of a Windows Explorer issue.

In some cases, you might encounter an error message stating “Windows Explorer has stopped working” or “Windows Explorer is not responding.” This is a clear indicator that there is a problem that needs to be addressed. Additionally, if you notice that certain tasks in File Explorer are not functioning properly, such as copying or moving files, it could be a symptom of the underlying issue.

If you experience any of these symptoms, it’s important to take action to resolve the problem and prevent further issues with your Microsoft Windows system.

Identifying the Cause

To identify the cause of the Windows Explorer not responding problem, start by checking for any recently installed software or updates that may be causing conflicts.

Next, run a full system scan using your antivirus software to rule out any potential malware infections that could be impacting the performance of Windows Explorer.

If the issue persists, try booting your computer in safe mode to see if the problem is related to any third-party software or drivers.

Additionally, check for any recent changes in settings or configurations that may have triggered the problem.

You can also try updating Windows and device drivers to ensure that you have the latest software installed.

Comprehensive Resolutions

Windows task manager

1. Restart Windows Explorer: Press Ctrl + Shift + Esc to open Task Manager. Locate Windows Explorer, right-click on it, and select Restart.

2. Check for Windows Updates: Make sure your Windows operating system is up to date by going to Settings > Update & Security > Windows Update.

3. Run a Full System Scan: Use your antivirus software to perform a full system scan to check for any malware or viruses that may be causing the issue.

4. Clear Windows Explorer History: Go to File Explorer Options > General Tab > Clear File Explorer History.

5. Boot in Safe Mode: Restart your computer and press F8 before the Windows logo appears to boot in Safe Mode. Check if the issue persists in Safe Mode.

6. Check for Corrupted Files: Open Command Prompt (cmd.exe) as an administrator and run the command sfc /scannow to scan for and repair corrupted system files.

7. Disable Unnecessary Startup Programs: Go to Task Manager > Startup and disable any unnecessary programs that may be causing conflicts with Windows Explorer.

Updating Video Drivers

To update your video drivers and potentially fix the Windows Explorer not responding problem, follow these steps:

1. Download the latest video driver: Visit the website of your video card manufacturer and locate the latest driver for your specific model. Download the driver to your computer.

2. Uninstall the current video driver: Press the Windows key + X on your keyboard and select Device Manager. Locate your video card under the Display adapters section, right-click on it, and select Uninstall device. Check the box that says “Delete the driver software for this device” and then click Uninstall.

3. Install the new video driver: Run the downloaded driver file and follow the on-screen instructions to install the new driver. Restart your computer after the installation is complete.

4. Update Windows: Press the Windows key + I on your keyboard to open the Settings app. Go to Update & Security > Windows Update and click on Check for updates. Install any available updates for your system.

By updating your video drivers and keeping your Windows system up to date, you may be able to resolve the Windows Explorer not responding issue.

Running System File Checker

To fix the Windows Explorer not responding problem, you can try running the System File Checker tool. This built-in Windows utility scans for and repairs corrupted system files that may be causing the issue.

Here’s how to run System File Checker:

1. Press the Windows key + R to open the Run dialog box.
2. Type cmd and press Enter to open the Command Prompt.
3. In the Command Prompt window, type sfc /scannow and press Enter.
4. Wait for the scan to complete. This may take some time depending on your system’s performance.
5. Once the scan is finished, follow any on-screen instructions provided by the tool.
6. Restart your computer to apply the repairs made by System File Checker.

Running System File Checker can help resolve Windows Explorer not responding issues by fixing any underlying system file corruption. If the problem persists after running the tool, you may need to further troubleshoot the issue or seek additional assistance.

Scanning for Viruses and Malware

To scan for viruses and malware on your Windows computer, it is important to regularly run a full system scan using a reliable antivirus software. Make sure to update your antivirus program’s virus definitions before scanning to ensure it can detect the latest threats. Running a full system scan can help identify and remove any malicious software that may be causing your Windows Explorer to become unresponsive.

If you suspect that your computer is infected with malware, you can also perform a custom scan of specific folders or files where the infection may be hiding. Be sure to scan your Downloads folder, as this is a common location for malware to be stored. Additionally, scanning your external storage devices, such as USB drives, is important to prevent the spread of malware.

In addition to using antivirus software, you can also use Windows Defender, which is built into Windows 10 and Windows 11, to scan for viruses and malware. Open Windows Security by clicking on the Start button, then selecting Settings > Update & Security > Windows Security. From there, you can run a quick scan or a full scan to check for any threats on your computer.

By regularly scanning for viruses and malware, you can help keep your computer running smoothly and prevent issues such as Windows Explorer not responding.

Initiating Safe Mode for Startup Problems

If Windows Explorer is not responding, one solution is to initiate Safe Mode to troubleshoot startup problems. To do this, reboot your computer and press F8 repeatedly until the Advanced Boot Options menu appears. Select “Safe Mode” from the list and press Enter. Safe Mode will load with minimal drivers and services, allowing you to diagnose the issue.

Once in Safe Mode, you can run a virus scan using Microsoft Security Essentials or another trusted antivirus program to check for any infections that may be causing the problem. You can also check for any recent changes or updates that may have triggered the issue and undo them if necessary.

If Windows Explorer is still not responding in Safe Mode, you can try performing a System Restore to revert your system to a previous state where the issue was not present. Alternatively, you can check for any corrupt system files using the Command Prompt by running the “sfc /scannow” command.

Conducting a Clean Boot for Troubleshooting

To troubleshoot the Windows Explorer not responding problem, you can try conducting a Clean Boot. This will help determine if a third-party application is causing the issue.

To perform a Clean Boot, press the Windows key + R, type “msconfig” and hit Enter. In the System Configuration window, go to the Services tab and check the box next to “Hide all Microsoft services.” Click on “Disable all” and then go to the Startup tab. Click on “Open Task Manager” and disable all the startup items.

Restart your computer and see if the Windows Explorer not responding issue persists. If the problem is resolved, you can enable services and startup items one by one to identify the culprit.

Restarting File Explorer via Task Manager

To restart File Explorer via Task Manager, simply follow these steps:

1. Open Task Manager by pressing Ctrl + Shift + Esc on your keyboard.

2. Once Task Manager is open, locate the “Windows Explorer” process under the “Processes” tab.

3. Right-click on “Windows Explorer” and select “Restart” from the context menu.

This will effectively restart File Explorer, which may resolve any issues you are experiencing with it not responding.

Clearing File Explorer History

To clear File Explorer history, click on the View tab in File Explorer. Then, click on the Options button on the far right. In the Folder Options window, go to the General tab. Under the Privacy section, click on the Clear button next to Clear File Explorer history. Click OK to confirm and close the window.

This process will remove all recent files and folders from the File Explorer history. Once you have cleared the history, try reopening File Explorer to see if the issue is resolved. If File Explorer is still not responding, you may need to further troubleshoot the problem by checking for any system updates, running a full antivirus scan, or restarting your computer.

Extending System Partition

Step Description
1 Open Disk Management by right-clicking on Start and selecting Disk Management.
2 Right-click on the system partition that you want to extend and select Extend Volume.
3 Follow the wizard to extend the partition using available disk space.
4 Click Finish to complete the process.

F.A.Qs

How do I fix Windows Explorer?

To fix Windows Explorer, you can restart the File Explorer in Task Manager, manually restart the Explorer.exe process via Command Prompt, run a System File Checker Scan, clear File Explorer history, change display settings, extend the system partition if it is full, or create a new user account.

Why Windows Explorer has stopped working?

Windows Explorer has stopped working because of outdated or corrupt video drivers. Updating to the latest video driver can help resolve this issue.

How do you reset Windows Explorer?

To reset Windows Explorer, you can open Task Manager by pressing Ctrl+Shift+Esc, then select “Run new task” in Windows 8 or 10 (or “Create new task” in Windows 7). Type “explorer.exe” into the run box and click “OK” to relaunch Windows Explorer.

Second Monitor Freezing Issue Resolved on Windows

Having trouble with your second monitor freezing on Windows? Let me share with you the solution to this frustrating issue.

June 2025: Enhance your computer’s performance and eliminate errors with this cutting-edge optimization software. Download it at this link

  1. Click here to download and install the optimization software.
  2. Initiate a comprehensive system scan.
  3. Allow the software to automatically fix and repair your system.

Troubleshooting Display Freezes

If your second monitor is freezing on Windows, try these troubleshooting steps to resolve the issue. First, check the cable connections between your computer and the monitor to ensure they are secure. Next, update your graphics card drivers to the latest version. If the issue persists, try adjusting the display resolution settings on your computer.

Additionally, try using a different input device such as a different mouse or keyboard to see if that helps. If all else fails, consider restarting your computer to see if that resolves the freezing problem.

Resolving Random Display Freezes

If you are experiencing random display freezes on your second monitor while using Windows, there are a few steps you can take to resolve the issue.

First, check all the cables connecting your second monitor to your computer to ensure they are securely plugged in.

Next, update your graphics card drivers to the latest version to ensure compatibility with your system.

If the issue persists, try using a different port on your computer for connecting the second monitor.

Lastly, adjust the display settings on your computer to match the resolution supported by your second monitor.

Addressing Second Monitor Unresponsiveness

Desktop with unresponsive second monitor

  • Check Connection:
    • Ensure that the second monitor is properly connected to the computer.
    • Check for any loose or damaged cables.
      Ensure that the second monitor is properly connected to the computer.
Check for any loose or damaged cables.
  • Restart Second Monitor:
    • Turn off the second monitor and unplug it from the power source.
    • Wait for a few minutes before plugging it back in and turning it on.
      Turn off the second monitor and unplug it from the power source.
Wait for a few minutes before plugging it back in and turning it on.
  • Update Graphics Drivers:
    • Open Device Manager by pressing Win+X and selecting it from the menu.
    • Expand the Display adapters category and right-click on your graphics card.
    • Select Update driver and follow the on-screen instructions to update the drivers.

Solutions for Unresponsive Displays

If your second monitor is freezing on Windows, try these solutions to resolve the issue:

1. Check the display connections: Ensure that all cables connecting the second monitor to your computer are securely plugged in.

2. Update graphics drivers: Visit the manufacturer’s website to download and install the latest graphics drivers for your system.

3. Adjust display settings: Right-click on the desktop, select “Display settings,” and make sure the resolution and refresh rate are set correctly for the second monitor.

If the issue persists, consider testing the monitor on another computer to determine if the problem lies with the hardware or software.

F.A.Qs

How do I unfreeze my monitor?

To unfreeze your monitor, you can try pressing Ctrl+Alt+Delete to open the Task Manager and end any unresponsive programs. If that doesn’t work, you can restart the computer, check for updates, uninstall unused programs, clear cache and temporary files, and check the hardware for any issues.

Why does my computer freeze when I connect a second monitor?

Your computer may freeze when you connect a second monitor due to issues with the graphics card and display driver having to adjust to different refresh rates. This can cause stuttering, lagging, and freezing.

Why is my monitor stuck on a screen?

Your monitor may be stuck on a screen due to a combination of software and hardware issues. Software problems like a buggy application or operating system glitch can cause the screen to freeze, while hardware issues such as a failing hard drive, faulty RAM, or overheating can also be a factor.

Why is one of my monitors not responding?

One of your monitors may not be responding because it is not receiving power. Make sure the monitor is plugged in, the power cord is not damaged, and try plugging it into a different outlet. Also, check if there is a power button on the display that needs to be pressed to turn it on.

Cannot Enable Bluetooth in Windows 10 – Fix Now

Having trouble enabling Bluetooth on your Windows 10 computer? Let’s find a solution.

June 2025: Enhance your computer’s performance and eliminate errors with this cutting-edge optimization software. Download it at this link

  1. Click here to download and install the optimization software.
  2. Initiate a comprehensive system scan.
  3. Allow the software to automatically fix and repair your system.

Before You Begin

Next, ensure that the Bluetooth feature is enabled on your Windows 10 device. To do this, go to the taskbar and look for the Bluetooth icon. If it is not there, you can enable Bluetooth through the Settings menu.

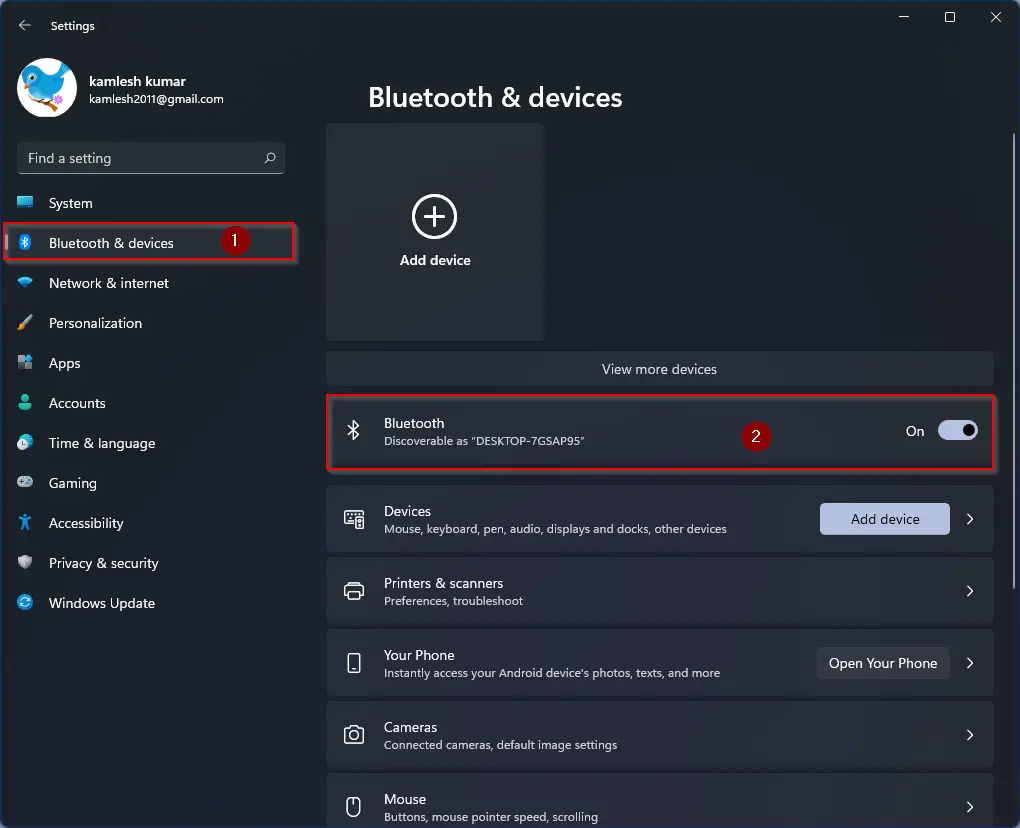
Open the Settings app by pressing the Windows key + I, then go to Devices > Bluetooth & other devices. Toggle the Bluetooth switch to turn it on. If the switch is grayed out, your device may not support Bluetooth or the necessary drivers may be missing.

To check for missing drivers, open Device Manager by right-clicking on the Start button and selecting Device Manager from the context menu. Look for any devices with a yellow exclamation mark, which indicates a driver issue. Right-click on the device and select Update driver to automatically search for the latest drivers online.

If updating the drivers does not solve the issue, you may need to troubleshoot further by checking for Windows updates, restarting your PC, or resetting the Bluetooth settings.

Verify Product Information

1. Check the Device Manager: Press Windows key + X, then select Device Manager. Look for any exclamation marks or warning signs next to the Bluetooth device.

2. Verify Bluetooth status: Go to Settings > Devices > Bluetooth & other devices. Make sure Bluetooth is turned on.

3. Confirm hardware compatibility: Ensure your device is Bluetooth-enabled and compatible with Windows 10.

If everything appears to be in order, consider updating the device driver. Go back to the Device Manager, right-click on the Bluetooth device, and select Update driver. Follow the on-screen instructions to complete the process.

If the issue persists, consider performing a troubleshoot by right-clicking on the Bluetooth icon in the taskbar and selecting Troubleshoot problems.

Ensure Bluetooth Is Activated

1. Press the Windows key + I to open the Settings menu.
2. Click on Devices and then select Bluetooth & other devices.
3. Toggle the switch to turn on Bluetooth if it is currently off.
4. If Bluetooth is already on but not working, try restarting your computer to refresh the connection.
5. You can also check for any driver updates by right-clicking on the Start menu, selecting Device Manager, and then expanding the Bluetooth category to see if there are any issues.
6. If there are driver issues, right-click on the Bluetooth device and select Update driver to search for updates.
7. In some cases, disabling and re-enabling Bluetooth can also help resolve connectivity issues.
8. If none of these steps work, you may need to troubleshoot further or seek assistance from a professional.

Examine Bluetooth Device

Image of Bluetooth symbol with a magnifying glass.

If you are experiencing issues enabling Bluetooth on your Windows 10 device, there are a few troubleshooting steps you can take to fix the problem. First, make sure that the Bluetooth device is turned on and in pairing mode.

Next, navigate to the Device Manager by pressing the Windows key + X on your keyboard and selecting “Device Manager” from the context menu. Look for the Bluetooth device under the “Bluetooth” or “Network adapters” section.

Right-click on the Bluetooth device and select “Enable” from the drop-down list. If the option is not available, you may need to update the device driver.

To do this, double-click on the Bluetooth device, go to the “Driver” tab, and select “Update Driver.” Follow the on-screen instructions to update the driver software.

Once the driver has been updated, restart your computer and try enabling Bluetooth again. If you are still unable to enable Bluetooth, consider checking for any Windows updates or performing a system restore to a point where Bluetooth was working correctly.

Toggle Bluetooth Device Discovery

1. Press the Windows key + I to open the Settings menu.
2. Click on Devices and then select Bluetooth & other devices from the sidebar.
3. Scroll down to the Bluetooth section and toggle the switch to turn on Bluetooth.
4. Under the “Related settings” section, click on More Bluetooth options.
5. In the Bluetooth Settings window, go to the Options tab.
6. Check the box next to “Allow Bluetooth devices to find this PC” to enable device discovery.
7. Click Apply and then OK to save the changes.
8. Your Bluetooth should now be enabled and ready to connect to other devices.

If you continue to experience issues with enabling Bluetooth in Windows 10, consider updating your drivers or restarting your computer to see if that resolves the problem.

Investigate PC Settings

PC settings menu.

Check if Bluetooth is turned on: Make sure the toggle switch for Bluetooth is in the on position. If it’s already on, try turning it off and then back on to see if that resolves the issue.

Update Bluetooth drivers: Go to Device Manager by right-clicking on the Start button and selecting it. Look for the Bluetooth section and expand it. Right-click on your Bluetooth device and select Update driver.

Restart the Bluetooth Support Service: Press Windows key + R, type services.msc, and hit Enter. Look for Bluetooth Support Service, right-click on it, and select Restart.

If you still cannot enable Bluetooth in Windows 10 after following these steps, consider checking for any Windows updates or performing a system restore to a point before the issue occurred. If the problem persists, you may need to seek further assistance from Microsoft support or a professional technician.

Run the Troubleshooter

If you are facing issues enabling Bluetooth in Windows 10, one quick fix you can try is running the Troubleshooter. This built-in tool can help diagnose and resolve common Bluetooth problems on your computer.

To run the Troubleshooter, follow these steps:
1. Go to the Start menu and type “Troubleshoot settings” in the search bar.
2. Click on “Troubleshoot settings” from the search results.
3. Scroll down to find and click on “Bluetooth” under “Find and Fix other problems.”
4. Click on “Run the troubleshooter” and follow the on-screen instructions.

Once the Troubleshooter has completed its scan, it will provide you with a report detailing any issues it found and steps to resolve them. Follow the recommended actions to fix the Bluetooth problem on your Windows 10 PC.

If running the Troubleshooter does not solve the issue, you may need to further troubleshoot or seek additional support from Microsoft or a professional technician.

Verify Bluetooth Service Activity

1. Open the Run dialog box by pressing Windows key + R.

2. Type services.msc and press Enter to open the Services window.

3. Scroll down and look for the Bluetooth Support Service.

4. Right-click on Bluetooth Support Service and select Properties.

5. Make sure the Startup type is set to Automatic and the Service status is Running.

6. Click on the Start button if the service is not running.

7. Click Apply and then OK to save the changes.

This should help verify and ensure that the Bluetooth service is active on your Windows 10 computer. If you continue to experience issues with enabling Bluetooth, you may need to troubleshoot further or seek additional support.

Re-Enable Bluetooth Driver

Bluetooth settings icon

If you are unable to enable the Bluetooth driver on your Windows 10 computer, there are a few steps you can take to try and fix the issue.

First, check if the Bluetooth driver is disabled in Device Manager. To do this, right-click on the Start button and select Device Manager. Look for the Bluetooth driver under the Network adapters or Bluetooth section. If it is disabled, right-click on it and select Enable.

If the driver is already enabled but you still cannot use Bluetooth, try re-enabling the driver. Right-click on the Bluetooth driver in Device Manager and select Disable. Then right-click on it again and select Enable.

If re-enabling the driver does not work, you can try updating the Bluetooth driver. Right-click on the driver in Device Manager and select Update driver. Follow the on-screen instructions to update the driver.

After updating the driver, restart your computer and see if you can now enable Bluetooth. If none of these steps work, you may need to uninstall and reinstall the Bluetooth driver. Right-click on the driver in Device Manager and select Uninstall device. Then restart your computer and Windows should automatically reinstall the driver.

Update Bluetooth Driver

To fix the issue of not being able to enable Bluetooth in Windows 10, one common solution is to update the Bluetooth driver. Outdated drivers can cause compatibility issues and prevent Bluetooth from functioning properly.

1. To update the Bluetooth driver, first press the Windows key + X on your keyboard and select Device Manager from the drop-down list.

2. In the Device Manager window, locate and expand the Bluetooth category.

3. Right-click on the Bluetooth driver and select Update driver.

After updating the driver, restart your computer to apply the changes. This should resolve the problem and allow you to enable Bluetooth on your Windows 10 device.

If updating the driver does not fix the issue, you may need to troubleshoot further or seek professional assistance to diagnose the underlying cause of the problem. Remember to always back up your data before making any changes to your system to prevent data loss.

Troubleshooting Accessory Issues

  • Go to Settings > Devices > Bluetooth & other devices.
  • Make sure Bluetooth is turned on.
  • Ensure your device is set to be discoverable.

Update Bluetooth Driver

  • Open Device Manager by pressing Win+X and choosing Device Manager.
  • Locate Bluetooth in the list of devices.
  • Right-click on Bluetooth and select Update driver.
  • Follow the on-screen instructions to update the driver.

Restart Bluetooth Support Service

  • Press Win+R to open the Run dialog box.
  • Type services.msc and press Enter.
  • Locate Bluetooth Support Service in the list.
  • Right-click on it and select Restart.

F.A.Qs

Why can’t I turn on Bluetooth on Windows 10?

You may not be able to turn on Bluetooth on Windows 10 due to a Bluetooth driver error. Make sure to keep all drivers updated to ensure proper device functionality. Try updating your operating system and then manually update or reinstall your Bluetooth driver. Alternatively, you can use an automated driver updater tool for this task.

Why is my Bluetooth turn on option missing Windows 10?

The Bluetooth turn on option may be missing on Windows 10 if the Bluetooth drivers are not fully compatible with the latest Windows version. Updating the Bluetooth drivers should resolve the issue.

Why wont my Bluetooth turn on?

Your Bluetooth may not be turning on because the setting is toggled off on your device. To fix this, go to the Menu > Settings > Bluetooth, and toggle the switch to turn it on. Also, ensure that the device is set to be discoverable.

Why is Bluetooth no longer available Windows 10?

Bluetooth is no longer available on Windows 10 due to various reasons such as outdated Bluetooth drivers, damage to external Bluetooth adapters, and improper connections.